Options
View
Using the options listed on the View tab in the Options window, you can hide nearly all of the software’s interfaces:
-
Options in the taskbar menu
-
Fade-out pop-up in the taskbar
-
Access to the Configuration Panel
Showing options in systray menu
You can choose to hide the Console, Configuration Panel and Connection Panel options in the taskbar (systray) menu. The menu can thus be reduced to the single item Quit.
The taskbar menu’s Quit item cannot be removed using the software. However, it can be deleted using the installation options (see “Deployment Guide”).
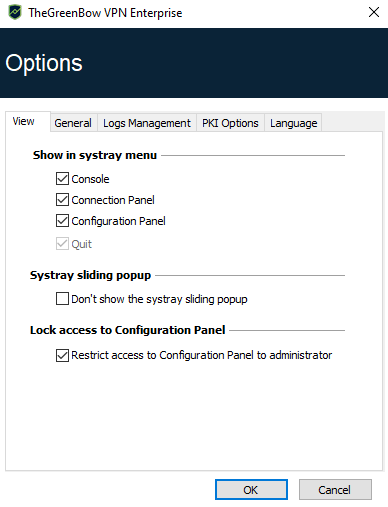
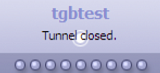
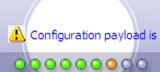
Showing the systray fade-out pop-up
When the Don’t show the systray sliding popup option is disabled, a fade-out pop-up appears above the VPN Client icon in the taskbar when a VPN tunnel is opened or closed.
This pop-up shows the tunnel status when it is being opened or closed and automatically fades out unless the mouse cursor is placed directly over it:
|
Tunnel is open |

|
|
Tunnel is closed |
|
|
Failed to open the tunnel: the window will briefly explain what happened and provide a hyperlink for more information about the incident. |
|
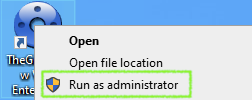
Restricting access to the Configuration Panel
In SN VPN Client Exclusive, the interface of the Configuration Panel is restricted to administrators, by default. To give users access to the Configuration Panel, uncheck the Restrict access to Configuration Panel to administrators option.
To start the VPN Client in administrator mode, right-click on the SN VPN Client Exclusive icon and then select the Run as administrator menu item.
General
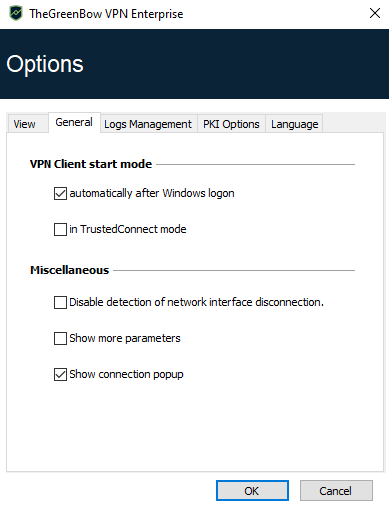
VPN Client startup mode
If the option automatically after Windows logon is checked, the VPN Client will start automatically when the user session is opened.
If the option is not checked, the user must start the VPN Client manually, either by double-clicking on the desktop icon or by selecting the software in the Windows Start menu.
Refer to section Starting the software for further details.
If the in TrustedConnect mode option is also checked, the VPN Client will start up showing the TrustedConnect Panel. Otherwise, the VPN Client will start up showing the Connection Panel.
Disabling detection of network interface disconnection
The standard behavior of the VPN Client is to close the VPN tunnel at its end as soon as a communication issue is encountered on the remote VPN gateway.
For unreliable physical networks prone to frequent micro-disconnections, this function can have drawbacks (which can go as far as not being able to open a VPN tunnel).
When the Disable detection of network interface disconnection box is checked, the VPN Client will not close tunnels as soon as a disconnection is observed. This guarantees a very stable VPN tunnel, even on unreliable physical networks, typically wireless networks such as Wi-Fi, 4G, 5G or satellite.
Show connection popup
A connection window will be displayed automatically every time a VPN connection is established.
This feature can be disabled by unchecking the Show connection popup box.
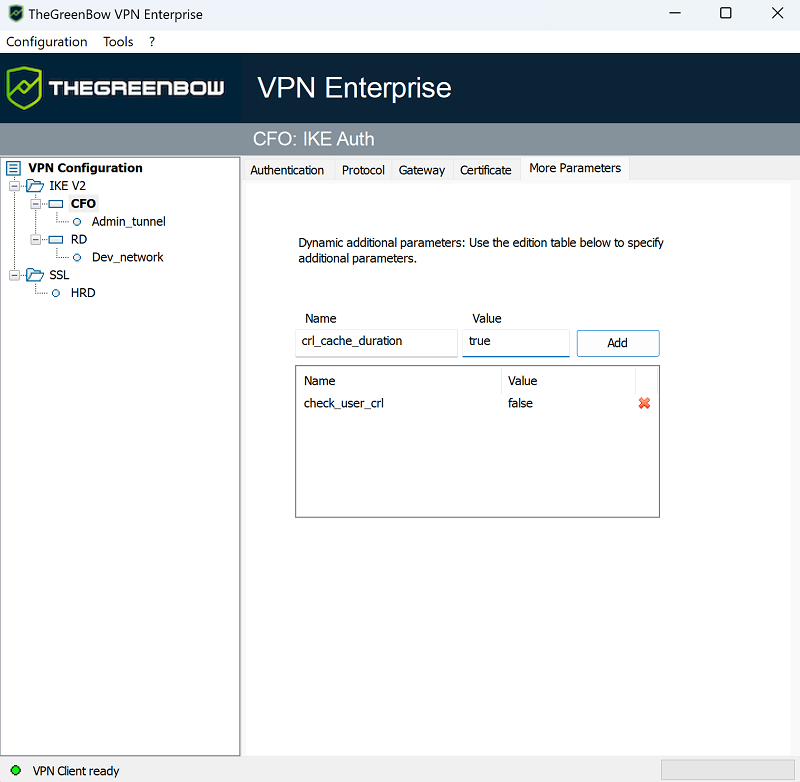
Displaying more parameters
If required, you can configure additional dynamic parameters for the SN VPN Client Exclusive under its IKE Auth configuration. Only the following dynamic parameters are documented in this guide:
-
Specify the IP address of the network interface
-
local_subnet (see section Addresses)
-
-
Specify nonce size for IPsec DR gateways
-
nonce_size (see section IKE Auth: Protocol)
-
-
Specify the size of the virtual local network
-
local_virtual_network_siz (see section Traffic selectors)
-
-
Select a certificate based on its subject
-
user_cert_dnpattern (see section user_cert_dnpattern)
-
-
Select a certificate based on its “key usage” field
-
user_cert_keyusage (see section user_cert_keyusage)
-
-
Select the token/smart card reader to be used for automatic user certificate selection
-
reader_pattern (see section Dynamic parameters)
-
-
Define certificate store to use at tunnel level
-
MachineStore (see section Required characteristics)
-
-
Enable the Online Certificate Status Protocol (OCSP)
-
enable_OCSP (see section VPN gateway certificate)
-
-
Prevent or limit CRL download
-
check_user_crl (see section Preventing or limiting CRL download)
-
crl_cache_duration (see section Preventing or limiting CRL download)
-
-
Validate the certificate even if it does not comply with the constraints on the Key Usage extension
-
allow_server_extra_keyusage (see section Constraints on the Key Usage extension)
-
-
Validate the certificate even if it does not comply with the constraints on the Extended Key Usage extension
-
allow_server_and_client_auth (see section Constraints on the Extended Key Usage extension)
-
-
Use the SHA-2 hash algorithm in the certificate request payload
-
sha2_in_cert_req (see section Managing certification authorities)
-
-
Use other certificate authentication methods
-
Method14_RSASSA_PKCS1 (see section Certificate authentication methods)
-
Method1_PKCS1v15_Scheme (see section Certificate authentication methods)
-
-
Use method 214 or method 14 to authenticate Brainpool user certificates
-
use_method_214 (see section Certificate authentication methods)
-
-
Display a customized message in the PIN code request pop-up window
-
user_smartcard_tip (see section Using a certificate stored on a smart card or token)
-
Under certain circumstances, the Stormshield support team may ask you to add other dynamic parameters (Name, Value) that are not documented in this guide. These are intended to manage specific use cases, either in the installed version of the software or in patches that will be provided to you.
To enable the More parameters tab in the VPN tunnel configuration window as shown below, check the Show more parameters option on the General tab in the Options window.
Managing logs
Refer to section Administrator logs.
PKI Options
The PKI Options tab is used to fine-tune smart card and token management and to further specify certificate access.
PKI options include the following:
-
Configuring rules for gateway certificate verification (validity, CRL, key usage)
-
Specifying the certificate that the VPN Client must use to open a VPN tunnel
-
Defining the smart card reader or token to use on the user workstation
NOTE
When deploying the software, all these options can be preconfigured when SN VPN Client Exclusive is installed. This mechanism is described in the “Deployment Guide”.
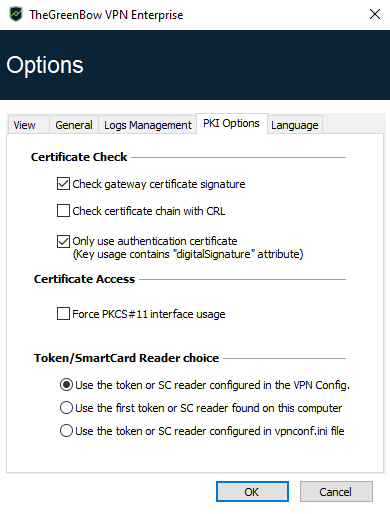
Certificate Check
| Check gateway certificate signature |
When this option is selected, the VPN gateway certificate is checked (including its validity date), as well as all certificates in the certificate chain down to the root certificate. TIP
|
| Check certificate chain with CRL |
When this option is selected, the VPN Client checks the Certificate Revocation List (CRL) of the VPN gateway certificate, as well as the CRL of all certificates in the certificate chain down to the root certificate. The root and intermediate certificates must be imported into the configuration or available in the Windows Certificate Store. Likewise, the CRLs must also be accessible, either in the Windows Certificate Store or available for download. NOTE
|
| Certs of Gateway and Client are issued by different CA |
If the VPN Client and the VPN gateway use certificates from a different certificate authority, this box must be checked. |
| Only use authentication certificate |
When this option is checked, the VPN Client will only take into account Authentication certificates (i.e. certificates whose Key Usage extension contains the digitalSignature attribute). This function allows you to automatically select a certificate when several are stored on the same smart card or token. The checkbox is grayed out when the MSI KEYUSAGE property is set to 2 or 3 during installation (refer to the “Deployment Guide”). |
Certificate Access
| Force PKCS#11 interface usage |
The VPN Client knows how to handle the PKCS#11 and CNG APIs in order to access the certificate for smart cards or tokens. When this option is checked, the VPN Client will only consider the PKCS#11 API to access the certificate for smart cards and tokens. |
| Use the first certificate found |
When this option is checked, the VPN Client will use the first certificate found on the specified smart card reader or token. |
Token/Smart Card Reader choice
| Use the token/SC reader configured in the VPN Config. |
The VPN Client uses the reader or token specified in the VPN configuration file to search for a certificate. |
| Use the first token or SC reader found on this computer |
The VPN Client uses the first smart card or token found on the workstation to search for a certificate. |
| Use the token or SC reader configured in vpnconf.ini file |
The VPN Client uses the vpnconf.ini configuration file to identify the smart card readers or tokens to use to search for a certificate. Refer to the “Deployment Guide”. NOTE
|
Managing languages
Choosing a language
SN VPN Client Exclusive can run in several languages.
You can change languages while running the software.
To choose another language, open the Tools > Options menu, then select the Language tab.
Choose the desired language in the drop-down menu:
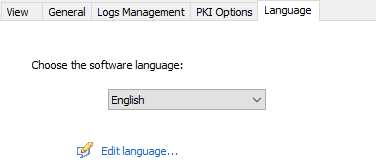
The list of languages available in the standard version of the software is provided in an appendix in section SN VPN Client Exclusive technical data.
Editing or creating a language
SN VPN Client Exclusive lets you create new translations or edit the language used, then test these changes dynamically through an integrated translation tool.
On the Language tab, click on the Edit language... link to display the translation window:
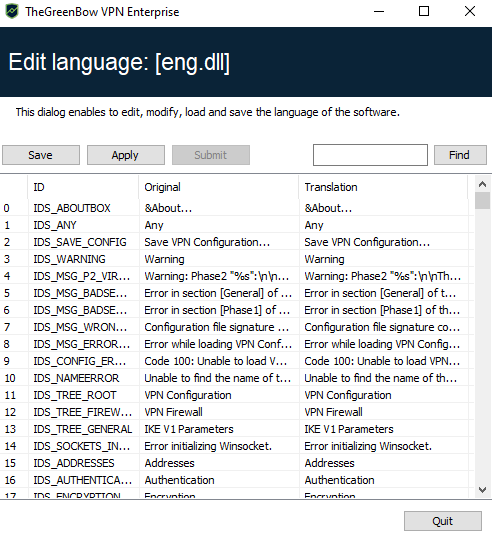
The translation window is split into 4 columns, which display the number of the character string, its identifier, its string in the original language and its translation in the selected language respectively.
Using the translation window, you can perform the following actions:
-
Translate each character string by clicking on the corresponding row.
-
Search for a specific character string in any column of the table (use the Find field then the F3 key to browse through every occurrence of the character string you have entered).
-
Save the changes (Save button).
IMPORTANT
The characters or character strings below must not be modified during translation:
%s the software will replace it with a character string
%d the software will replace it with a digit
\n indicates a carriage return
& indicates that the following character should be underlined
%m-%d-%Y indicates a date format (in this case US format: month-day-year). Only edit this field if you are certain of the format used in the target language.
The IDS_SC_P11_3 string must be left as is.