Setting up a secure connection
This section explains how to set up a secure connection with the Stormshield SSL VPN client.
NOTE
Only one connection can be set up at a time. In addition, shared workstations allow only one connection at a time.
Setting up a saved connection
A connection has to be saved in advance in the Saved connections menu.
-
To set up a saved connection:
-
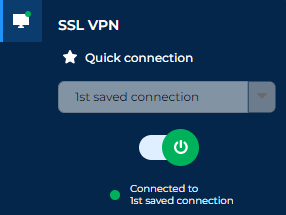
In the Quick connection menu, select a favorite connection or the last connection used from the drop-down list, and click on the button
 .
. -
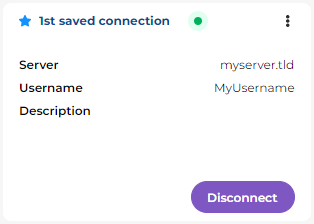
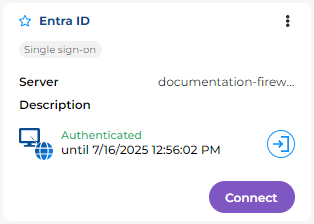
In the Saved connections menu, click on Connect in the section of a saved connection,
-
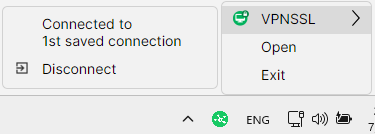
In the pop-up menu (click on the
 icon in the system tray), select SSLVPN and click on the last connection used or a favorite connection.
-
-
If additional information is required to set up the connection, such as an OTP, enter it. If single sign-on is used, authenticate on the portal, which opens automatically in your web browser, to set up the connection.
Once you are logged in, the ![]() icon of the Stormshield SSL VPN client and the connection button
icon of the Stormshield SSL VPN client and the connection button  both turn green. If an error occurs, refer to the section When a connection error occurs.
If single sign-on was used to set up the connection, the expiry date of your authentication session appears. For more information, see the section Setting up a connection using single sign-on.
Log out by clicking on Disconnect or on the connection button .
|
Quick connection menu |
Saved connections menu |
|
|
|
|
|
Pop-up menu |
|
|
Setting up a direct connection (without saving information)
-
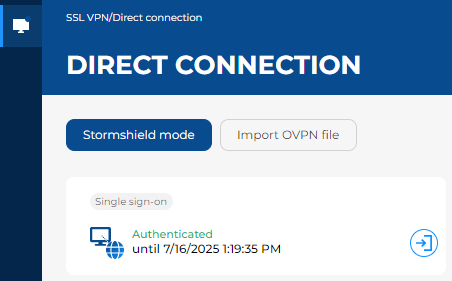
Go to the Direct connection menu.
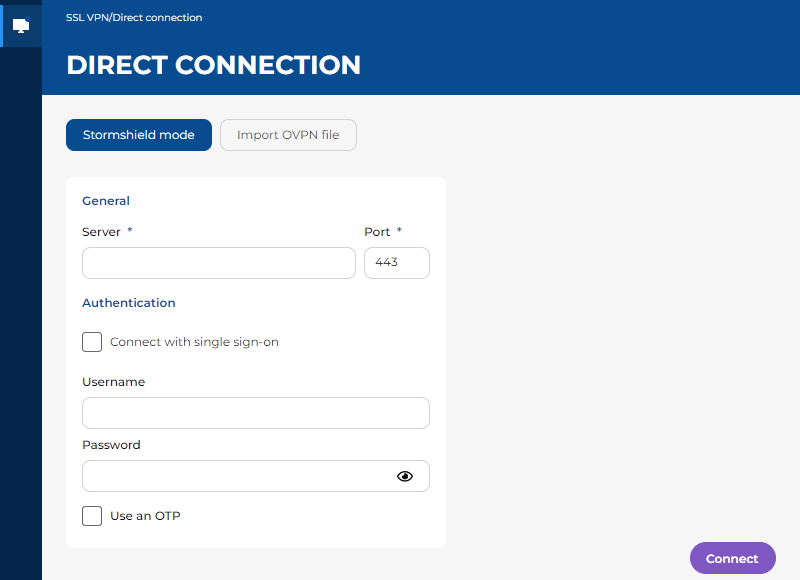
-
Choose between Stormshield mode and OpenVPN mode, and fill in the fields.
If necessary, refer to the section Description of connection modes and available fields.
NOTE
The Stormshield SSL VPN client has been designed to connect to SNS firewalls in version 4 or 5. Methods that involve connecting to another OpenVPN gateway, or importing an OVPN file generated by another OpenVPN gateway, are not officially supported, and may not be guaranteed to function normally. -
Click on Connect.
-
If single sign-on is used, authenticate on the portal, which opens automatically in your web browser, to set up the connection.
Once you are logged in, the ![]() icon of the Stormshield SSL VPN client and the connection button both turn green. If an error occurs, refer to the section When a connection error occurs.
icon of the Stormshield SSL VPN client and the connection button both turn green. If an error occurs, refer to the section When a connection error occurs.
If single sign-on was used to set up the connection, the expiry date of your authentication session appears. For more information, see the section Setting up a connection using single sign-on.
Log out by clicking on Disconnect or on the connection button .
Setting up a connection using single sign-on
To set up a connection using single sign-on, you must first select Stormshield mode and the checkbox Connect with single sign-on in the details of the connection.
- Set up the saved connection or direct connection.
- On the authentication portal that automatically opens in your web browser, follow the steps in the authentication process.
- Once you are successfully authenticated, wait while the Stormshield SSL VPN client sets up the connection.
Once you are connected, the expiry date of your authentication session appears. As long as the expiry date remains in the future, you can set up the connection without having to authenticate again.
|
Saved connections menu |
Direct connection menu |
|
|
|
|
When requested by an administrator from your organization, you can cancel your authentication before it expires:
- Click on the
 button to the right of the date on which your authentication session expires.
 - Click on OK. This operation will not disconnect the connection that is currently set up.
When a connection error occurs
First things to check
-
Read the error message that appears, as it may provide clues to the issue that has occurred. If necessary, you can find it in the Connection logs menu.
-
Check the information that has been entered for the saved connection or direct connection.
-
If an OTP was used, check whether it is still valid. The Stormshield SSL VPN client will make several attempts to connect if no response is received, but the OTP may expire in the meantime.
Error messages
-
If the message "The VPN configuration has been updated. Enter a new OTP to connect." appears, this means that the Stormshield SSL VPN client has just retrieved a VPN configuration update from the SNS firewall.
The OTP (one-time password) that you entered made it possible to the retrieve the new VPN configuration. As it is generated for a single use, this OTP can no longer be used. Wait for a new OTP to be generated in your OTP generator, then connect.
-
If the warning message "Probable security risk" appears, this means that the certificate presented to the Stormshield SSL VPN client cannot be automatically validated. You will then need to indicate whether to trust the certificate and connect, or cancel the connection.
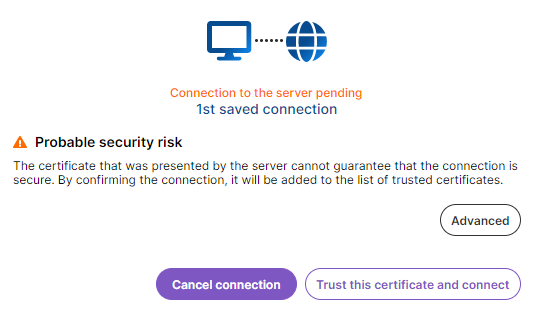
To do so, you need check whether the connection is secure. Click on Advanced > Show certificate, and verify the details of the certificate and its trust chain; If you are unable to decide, get in touch with an administrator from your organization.
If you choose to trust the certificate and connect, this decision will be saved for the connection used. The message will appear again if you use another saved connection or a connection from the Direct connection menu.
Other errors
-
Ensure that the Stormshield SSL VPN client can reach the SNS firewall (this can be done by an administrator from your organization):
-
Check the configuration of the SSL VPN service and associated elements by referring to the SSL VPN administration guide for Stormshield SNS firewalls and SSL VPN clients.
-
If a hardened configuration is used on the organization's workstations (use of a firewall, for example), the Stormshield SSL VPN client may be unable to connect if some ports are unreachable. For further information on ports and protocols, refer to the Stormshield SSL VPN client v5 installation guide.
-