Controlling storage on USB devices
This protection makes it possible to control access to files stored on USB storage devices (external hard disks, USB keys, etc.).
Rules may cover devices filtered by vendor ID or product ID, or devices known to SES Evolution with a trust level.
If overall access to USB devices is blocked, files on USB mass storage devices cannot be accessed even when a rule specifically applying to these devices allows it. To monitor overall access, refer to the section Controlling access to USB devices.
For more information on trust levels, refer to the section Managing USB storage devices.
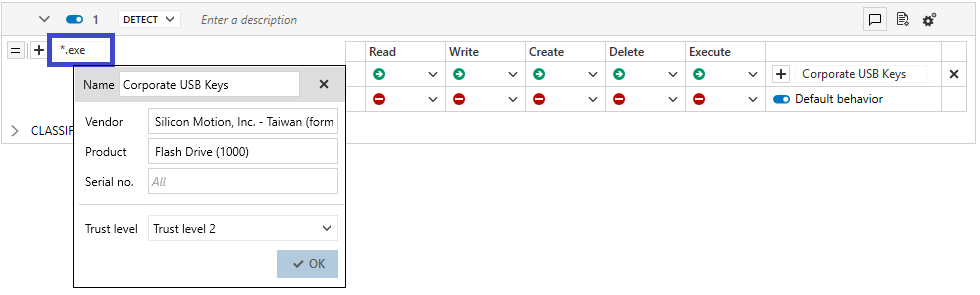
The left side of a rule covers files that may be found on USB devices, while the right side covers the devices themselves.
To create rules that regulate access to files on USB storage devices:
- Select the Security > Policies menu and click on your policy.
- Select a rule set.
- Click on the Devices > USB storage tab.
- If you are in read-only mode, click on Edit in the upper banner.
- Click on Add > Rule (USB storage device). A new line appears.
- In the left side of the rule, click on
 to add file identifiers. Files can be identified by a path or an alternate data stream. Generic characters are allowed in this field.
 - Click on Apply to add the ID.
- For each type of operation, select the default behavior that applies to the devices when files match the rule: allow or block (protection rule).
You can also:- Skip behavior to ignore the subrule if the behavior is detected and move on to the next behavior.
- Skip rule set to ignore all the rules contained in this rule set and evaluate the next rule set.
- To exclude specific devices from the default behavior, click on + Add specific behavior:
- Add one or several device IDs. Devices can either be identified by their vendor or product IDs, or the trust level that SES Evolution assigned to the device. Click on Select an existing device to view the list previously defined in the Security > Device menu, otherwise fill in the fields manually.
- To find out the vendor or product IDs, or the serial numbers of devices, look up the Windows device manager when the device in question is plugged in or use the dedicated utilities.
- For more information on trust levels, refer to the section Managing USB storage devices.
- Select the behavior for these IDs.
- Add one or several device IDs. Devices can either be identified by their vendor or product IDs, or the trust level that SES Evolution assigned to the device. Click on Select an existing device to view the list previously defined in the Security > Device menu, otherwise fill in the fields manually.
- In the upper banner in the rule, you can:
- If necessary, rearrange the order of the rules by clicking on
 when the cursor hovers the rule. Each rule displays its line number in the banner.
 - Disable rule. For more information, refer to the section Disabling security rules.
- Indicate the intent of the rule, according to predefined categories:

Unclassified: unclassified rule.
Nominal: non-blocking rule conforming to nominal application behavior.
Protect: blocking rule with a high log severity level.
Protect silent: blocking rule with a severity level below the log thresholds displayed by default on the agent and console. Protects access to resources deemed sensitive, even if carried out by programs with no malicious intent. As there may be many such programs, a rule with too high a log severity could trigger massive log generation.
Detect: non-blocking audit rule or passive rule.
Context: rule used to build an attack graph.
Syslog: rule triggering logs sent exclusively to a Syslog server.
Watch: rule for monitoring behavior in order to fine-tune the security policy or gain a better understanding of technical events occurring in the pool.
- Enter a description to explain what this rule aims to achieve.
- Make the rule passive. Passive rules behave like standard rules but do not actually block any actions. The agent only generates logs that indicate which actions security rules would have blocked.
Use this mode to test new restriction rules, determine their impact, and make the necessary adjustments before disabling Passive rule mode. For further information on testing rules and policies, refer to Testing security policies. - Indicate whether the rule must generate a context when it is applied. By default, if a rule generates Emergency or Alert logs, it will generate a context, but you can disable this feature. In case of mass generation of similar logs, the context is not generated. For more information on mass log generation, refer to the section Monitoring SES Evolution agent activity.
- Adding a comment.
- Select the log settings that this rule will send.
- Specify whether an action must be performed when a log is sent for this rule. You can request that a script be run and/or that a Yara or IoC scan be triggered. You can also request that a notification be displayed on the agent, provided that it is associated with a an Alert or Emergency level blocking log.
- Deleting the rule.
- If necessary, rearrange the order of the rules by clicking on
- Expand the Classification in logs part to indicate the intent of the suspected attack when the rule applies, along with the tags for associating the rule with the MITRE repository. This information is then visible in the logs generated by the rule. For more information, see Classifying attacks according to the MITRE repository.
- Click on Save at the top right of the window to save changes.