Protection against keylogging
Keylogging enables hackers to capture all of a user’s keystrokes in order to steal passwords, confidential data, etc. It acts on targeted applications.
SES Evolution prevents foreground applications from sending their keystrokes to other applications. However, it can receive its own keystrokes.
For more global protection against any use of the SetWindowsHookEx API, enable protection against application hooking instead. For more information, refer to Protection against various threats and Configuring threat protection.
EXAMPLE
You can use this protection to block keylogging on web browsers, password managers, and the Windows file explorer. Allow them only for legitimate applications such as virtualization and remote control tools.
An application identifier must be created beforehand for every application to be protected and for every application allowed to log keystrokes. For more information, refer to the section Creating application identifiers.
- Select the Security > Policies menu and click on your policy.
- Select a rule set.
- Click on the Application > Keylogging tab.
- If you are in read-only mode, click on Edit in the upper banner.
- Click on Add > Rule (Keylogger).
A new line is displayed. - Click on
 in the application ID area and select the application(s) to protect.
Add Internet Explorer, Windows Explorer and password manager for example. - Click on the
 icon to select the application(s) to be excluded from protection.
 - In the Status field of the Default behavior area, choose a behavior from among those available for this rule type: :
- Allow to allow the action by default,
- Block to block the action by default,
- Block and kill to block the action by default, and shut down the process that launched the action.
- Block, kill and quarantine to block the action by default, kill the process that triggered the action, and quarantine suspicious files. For more information, see the section Managing file quarantine.
- Ask for the user to be consulted.
- Skip behavior to ignore the subrule if the behavior is detected and move on to the next behavior.
- Skip rule to ignore the rule contained in this rule set and evaluate the next rule.
- Skip rule group to ignore the rules contained in the rule group and evaluate the next rule group or rule.
- Skip rule set to ignore all the rules contained in this rule set and evaluate the next rule set.
- Click on the + Add a specific behavior icon and select the application(s) that you want to allow.
Add applications that legitimately log keystrokes, e.g., remote control tools, and in the Status, select Allow so that the protection will allow these applications.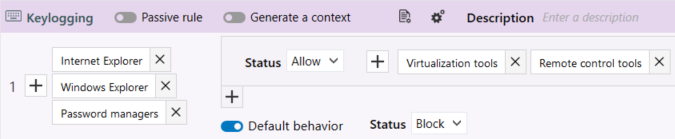

- In the upper banner in the rule, you can:
- If necessary, rearrange the order of the rules by clicking on
 when the cursor hovers the rule. Each rule displays its line number in the banner.
 - Disable rule. For more information, refer to the section Disabling security rules.
- Indicate the intent of the rule, according to predefined categories:

Unclassified: unclassified rule.
Nominal: non-blocking rule conforming to nominal application behavior.
Protect: blocking rule with a high log severity level.
Protect silent: blocking rule with a severity level below the log thresholds displayed by default on the agent and console. Protects access to resources deemed sensitive, even if carried out by programs with no malicious intent. As there may be many such programs, a rule with too high a log severity could trigger massive log generation.
Detect: non-blocking audit rule or passive rule.
Context: rule used to build an attack graph.
Syslog: rule triggering logs sent exclusively to a Syslog server.
Watch: rule for monitoring behavior in order to fine-tune the security policy or gain a better understanding of technical events occurring in the pool.
- Enter a description to explain what this rule aims to achieve.
- Make the rule passive. Passive rules behave like standard rules but do not actually block any actions. The agent only generates logs that indicate which actions security rules would have blocked.
Use this mode to test new restriction rules, determine their impact, and make the necessary adjustments before disabling Passive rule mode. For further information on testing rules and policies, refer to Testing security policies. - Indicate whether the rule must generate a context when it is applied. By default, if a rule generates Emergency or Alert logs, it will generate a context, but you can disable this feature. In case of mass generation of similar logs, the context is not generated. For more information on mass log generation, refer to the section Monitoring SES Evolution agent activity.
- Adding a comment.
- Select the log settings that this rule will send.
- Specify whether an action must be performed when a log is sent for this rule. You can request that a script be run and/or that a Yara or IoC scan be triggered. You can also request that a notification be displayed on the agent, provided that it is associated with a an Alert or Emergency level blocking log.
- Deleting the rule.
- If necessary, rearrange the order of the rules by clicking on
- Expand the Classification in logs part to indicate the intent of the suspected attack when the rule applies, along with the tags for associating the rule with the MITRE repository. This information is then visible in the logs generated by the rule. For more information, see Classifying attacks according to the MITRE repository.
- Click on Save at the top right of the window to save changes.