Installation in a 19" rack and cabinet
All Stormshield Network Security appliances can be installed in 19-inch cabinets (except SNi20, SNi40 and Snxr1200 models). A rack-mounting system, in the form of a rackable shelf that can hold two firewalls, can be supplied upon request on SN160, SN160W, SN210, SN210W, SN310, SN-XS-Series-170, SN-S-Series-220, SN-S-Series-320 and SNi10 models.
SN510, SN-M-Series-520, SN710, SN910, SN-M-Series-720, SN-M-Series-920, SN2100 and SN3100 models come with a set of brackets. The SN1100 model is sold with a set of brackets and rails. SN2100, SN3100, SN-L-Series-2200, SN-L-Series-3200, SN6100, SN-XL-Series-5200 and SN-XL-Series-6200 models come with a set of slide rails.
REMINDER
Ensure that the cabinet complies with temperature and humidity conditions indicated in the section Conditions of use.
NOTE
SN160, SN160W, SN-XS-Series-170 and SNi10 models can also be installed vertically (screws and fasteners not provided).
Installing SN160, SN160W, SN210, SN210, SN310, SN-XS-Series-170, SN-S-Series-220, SN-S-Series-320 and SNi10 models on a 19" cabinet shelf
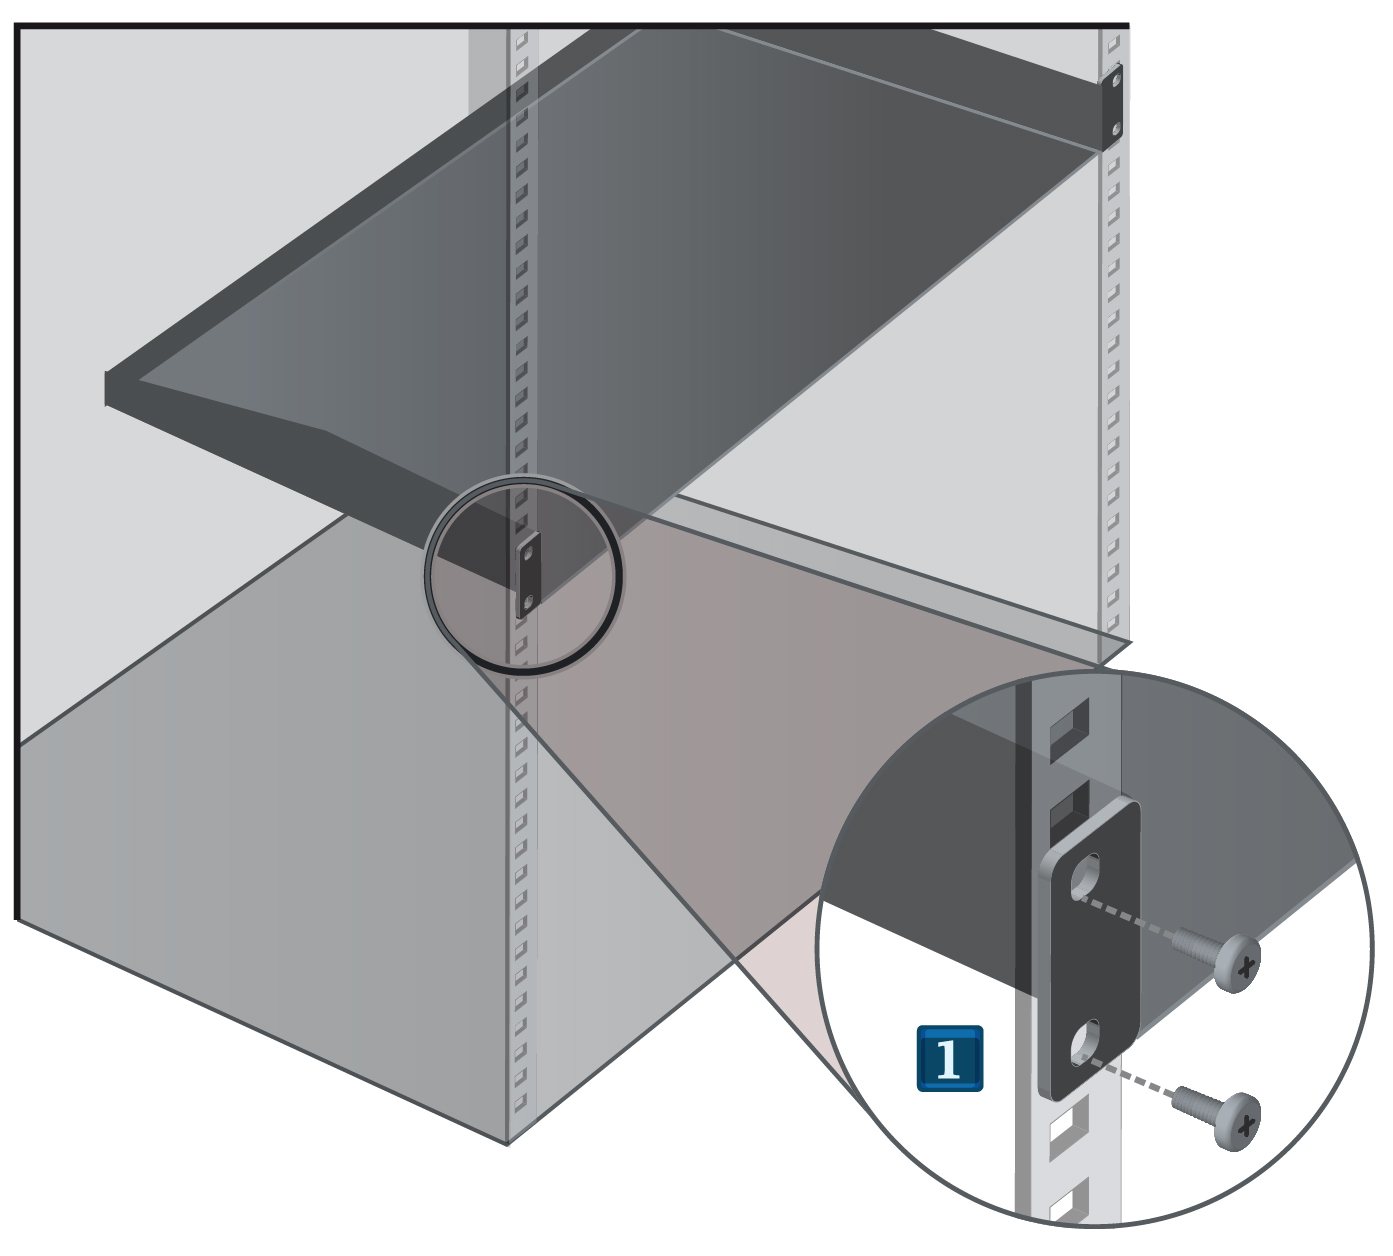
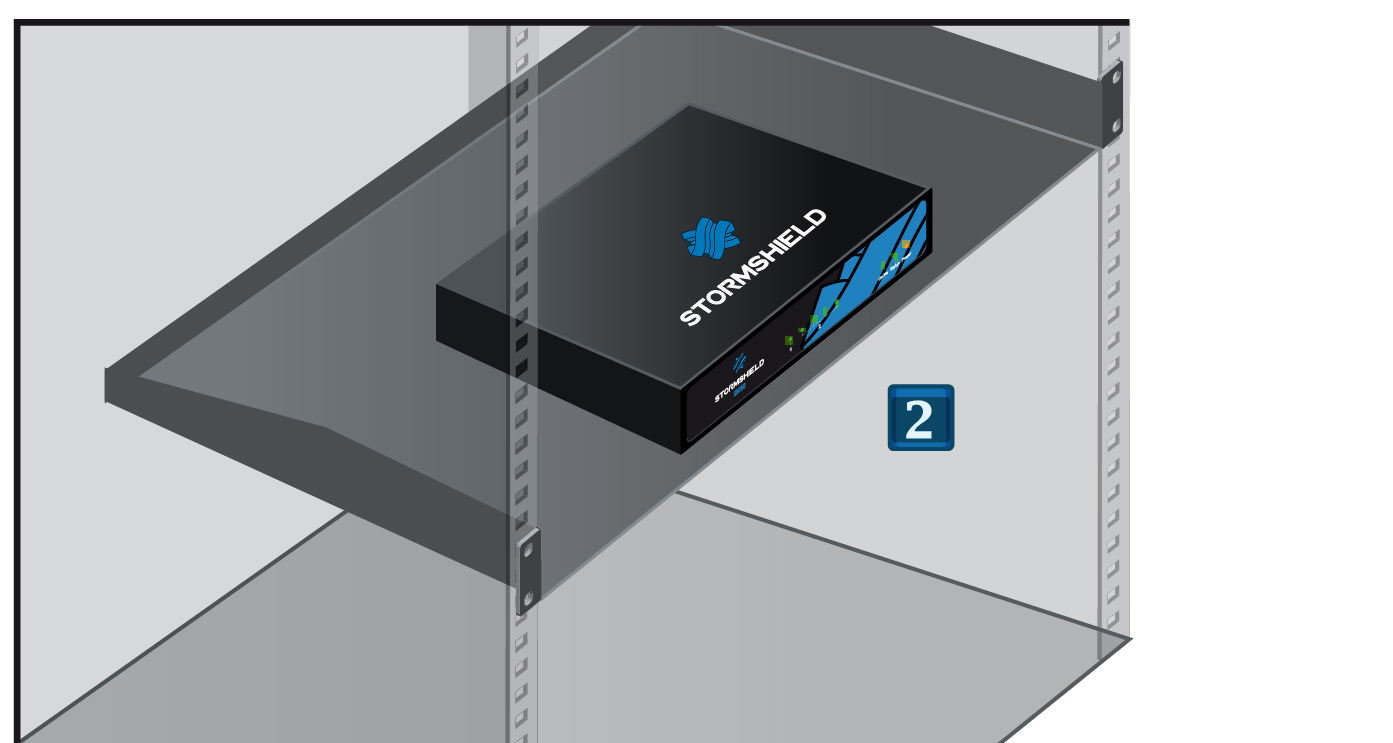
In this non-standard installation, allow a height of more than 1U due to the thickness of the shelf, the presence of rubber feet below the appliance as well as antennae on Wi-Fi products. The procedure is as follows:
|
|
|
|
WARNING
If you are installing two firewalls on the same rack mount shelf, you will need to leave enough space between the firewalls to avoid obstructing the flow of air from the sides.
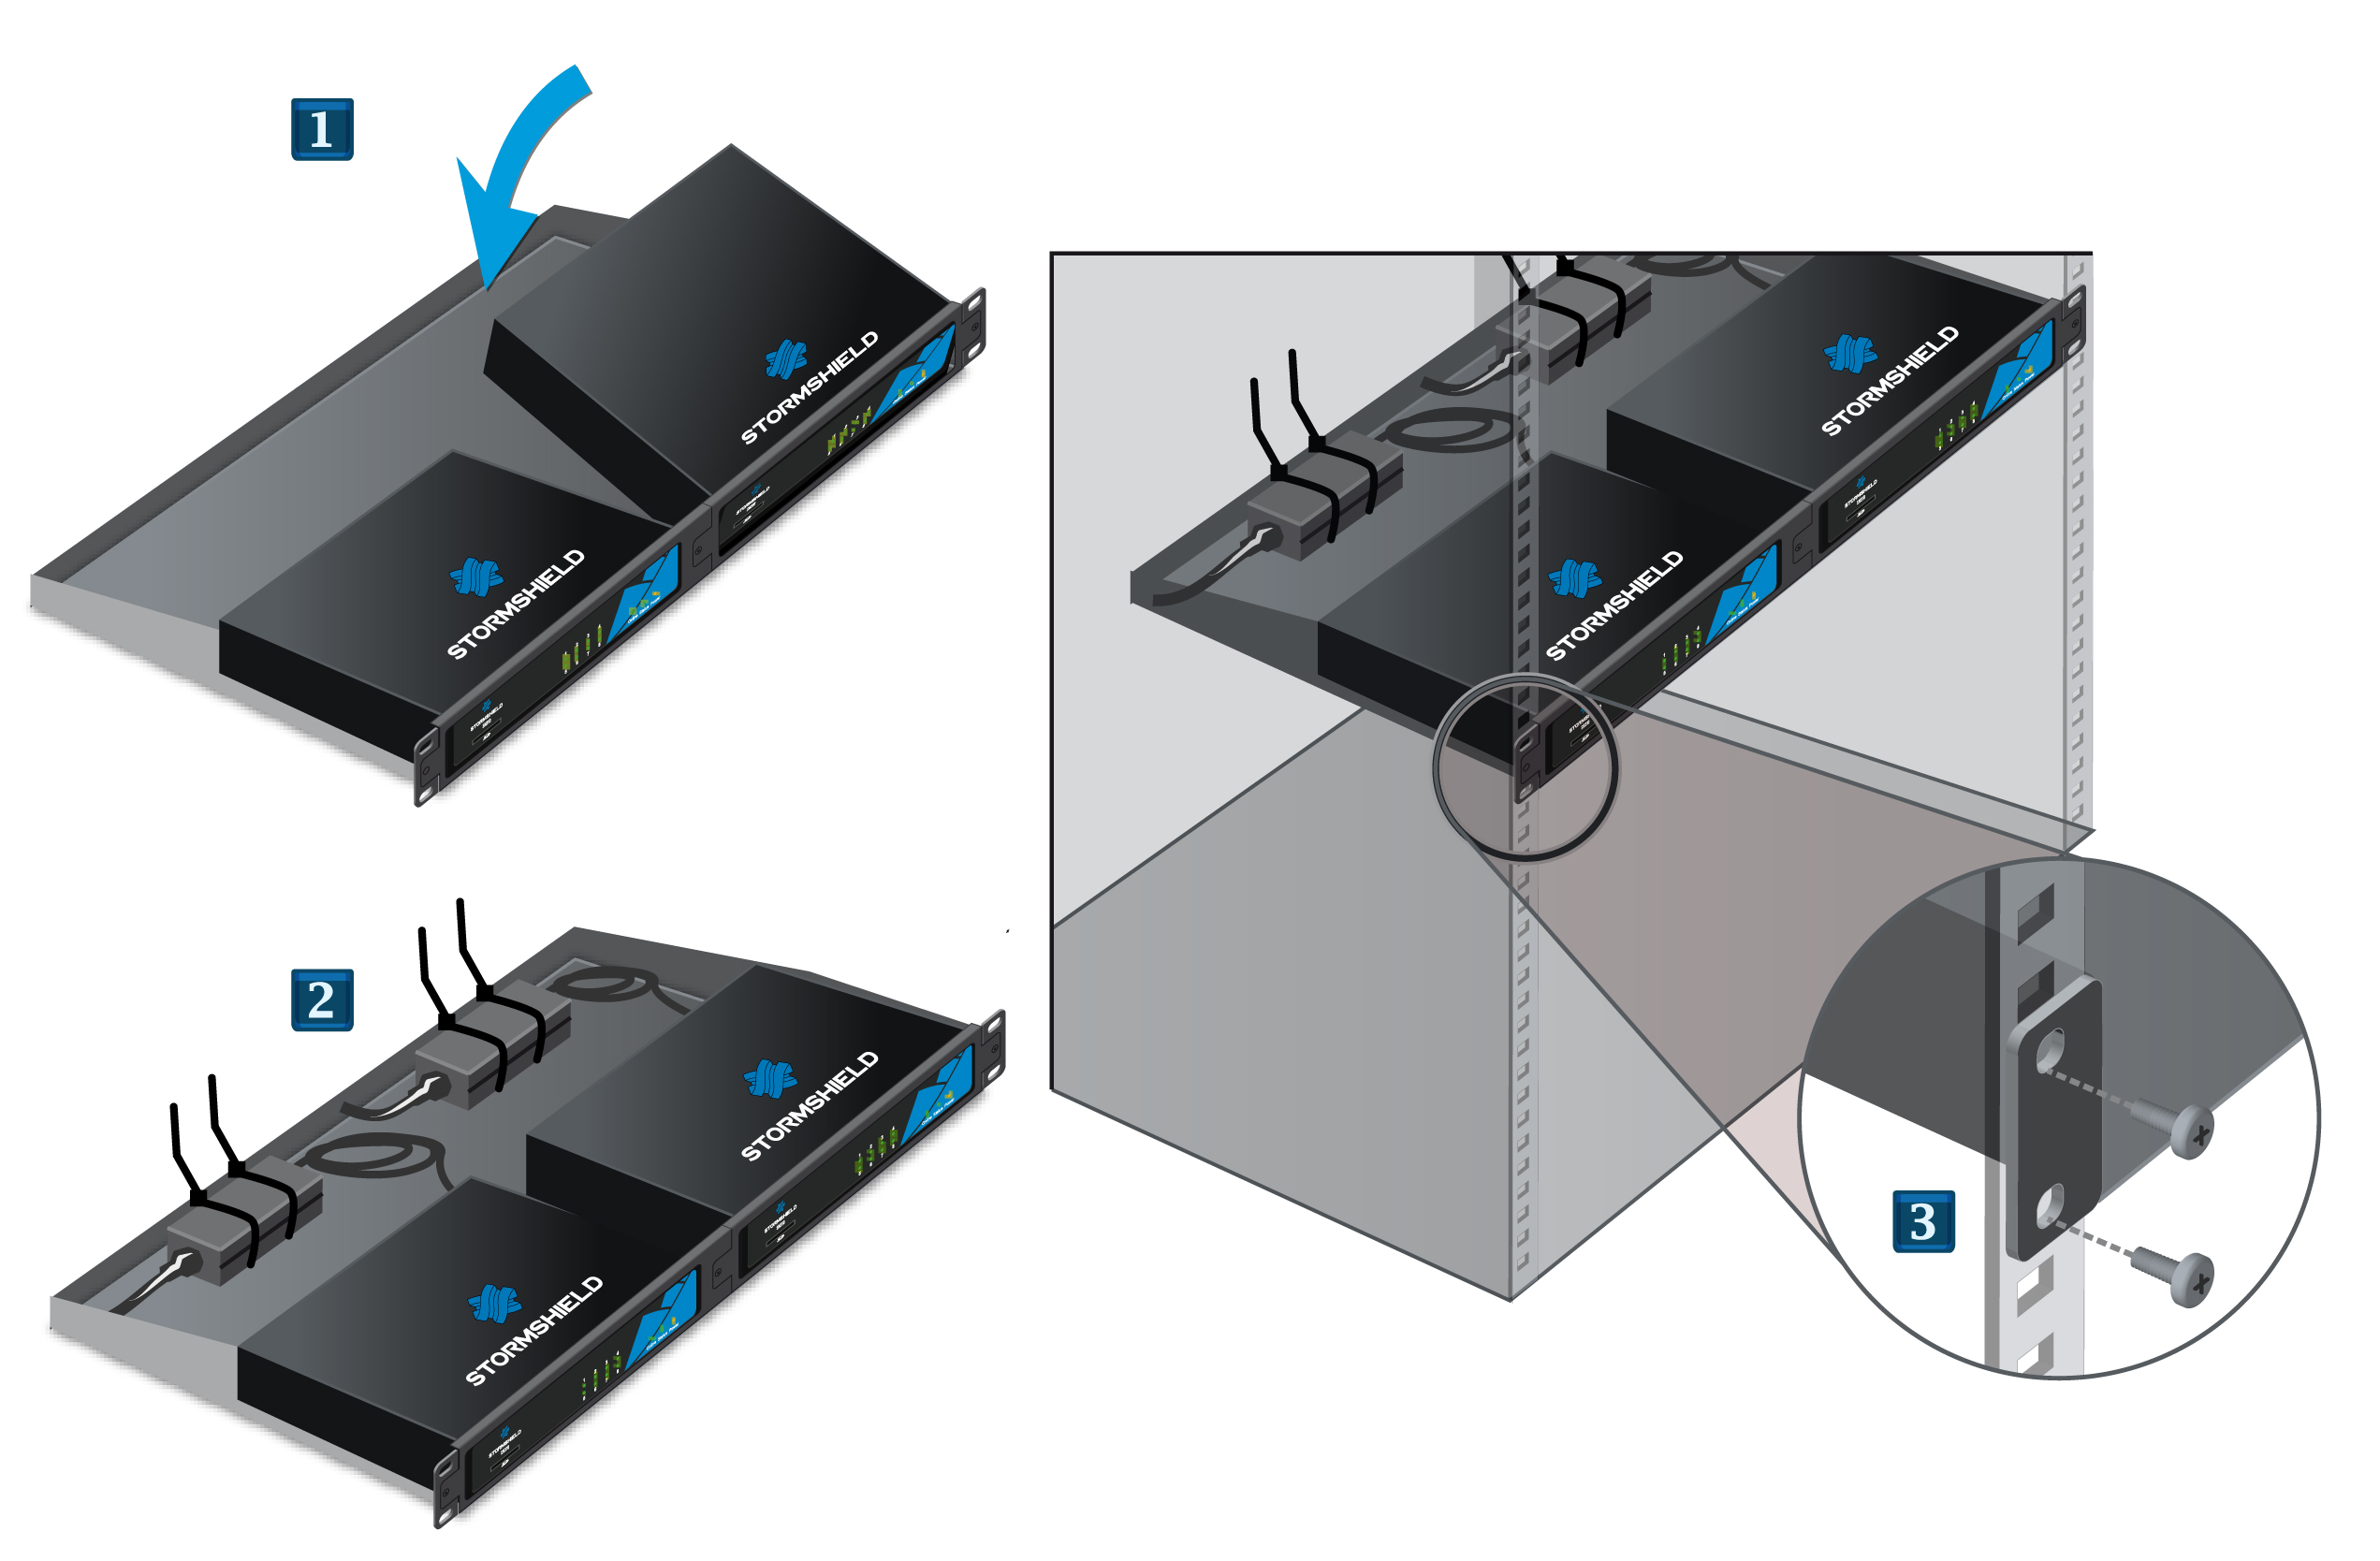
Installing SN210, SN210W, SN310, SN-XS-Series-170, SN-S-Series-220, SN-S-Series-320 and SNi10 models on a 19" cabinet 1U shelf
The minimum vertical space needed for installing the shelf is 1U. In this configuration, the shelf makes it possible to install one or two products. There are indentations to ensure that products and power adapters are held securely in place.
WARNING
Before any installation, ensure that you have removed the four non-slip rubber feet under each product.
NOTE
Fasteners for two power adapters are provided with the shelf.
|
|
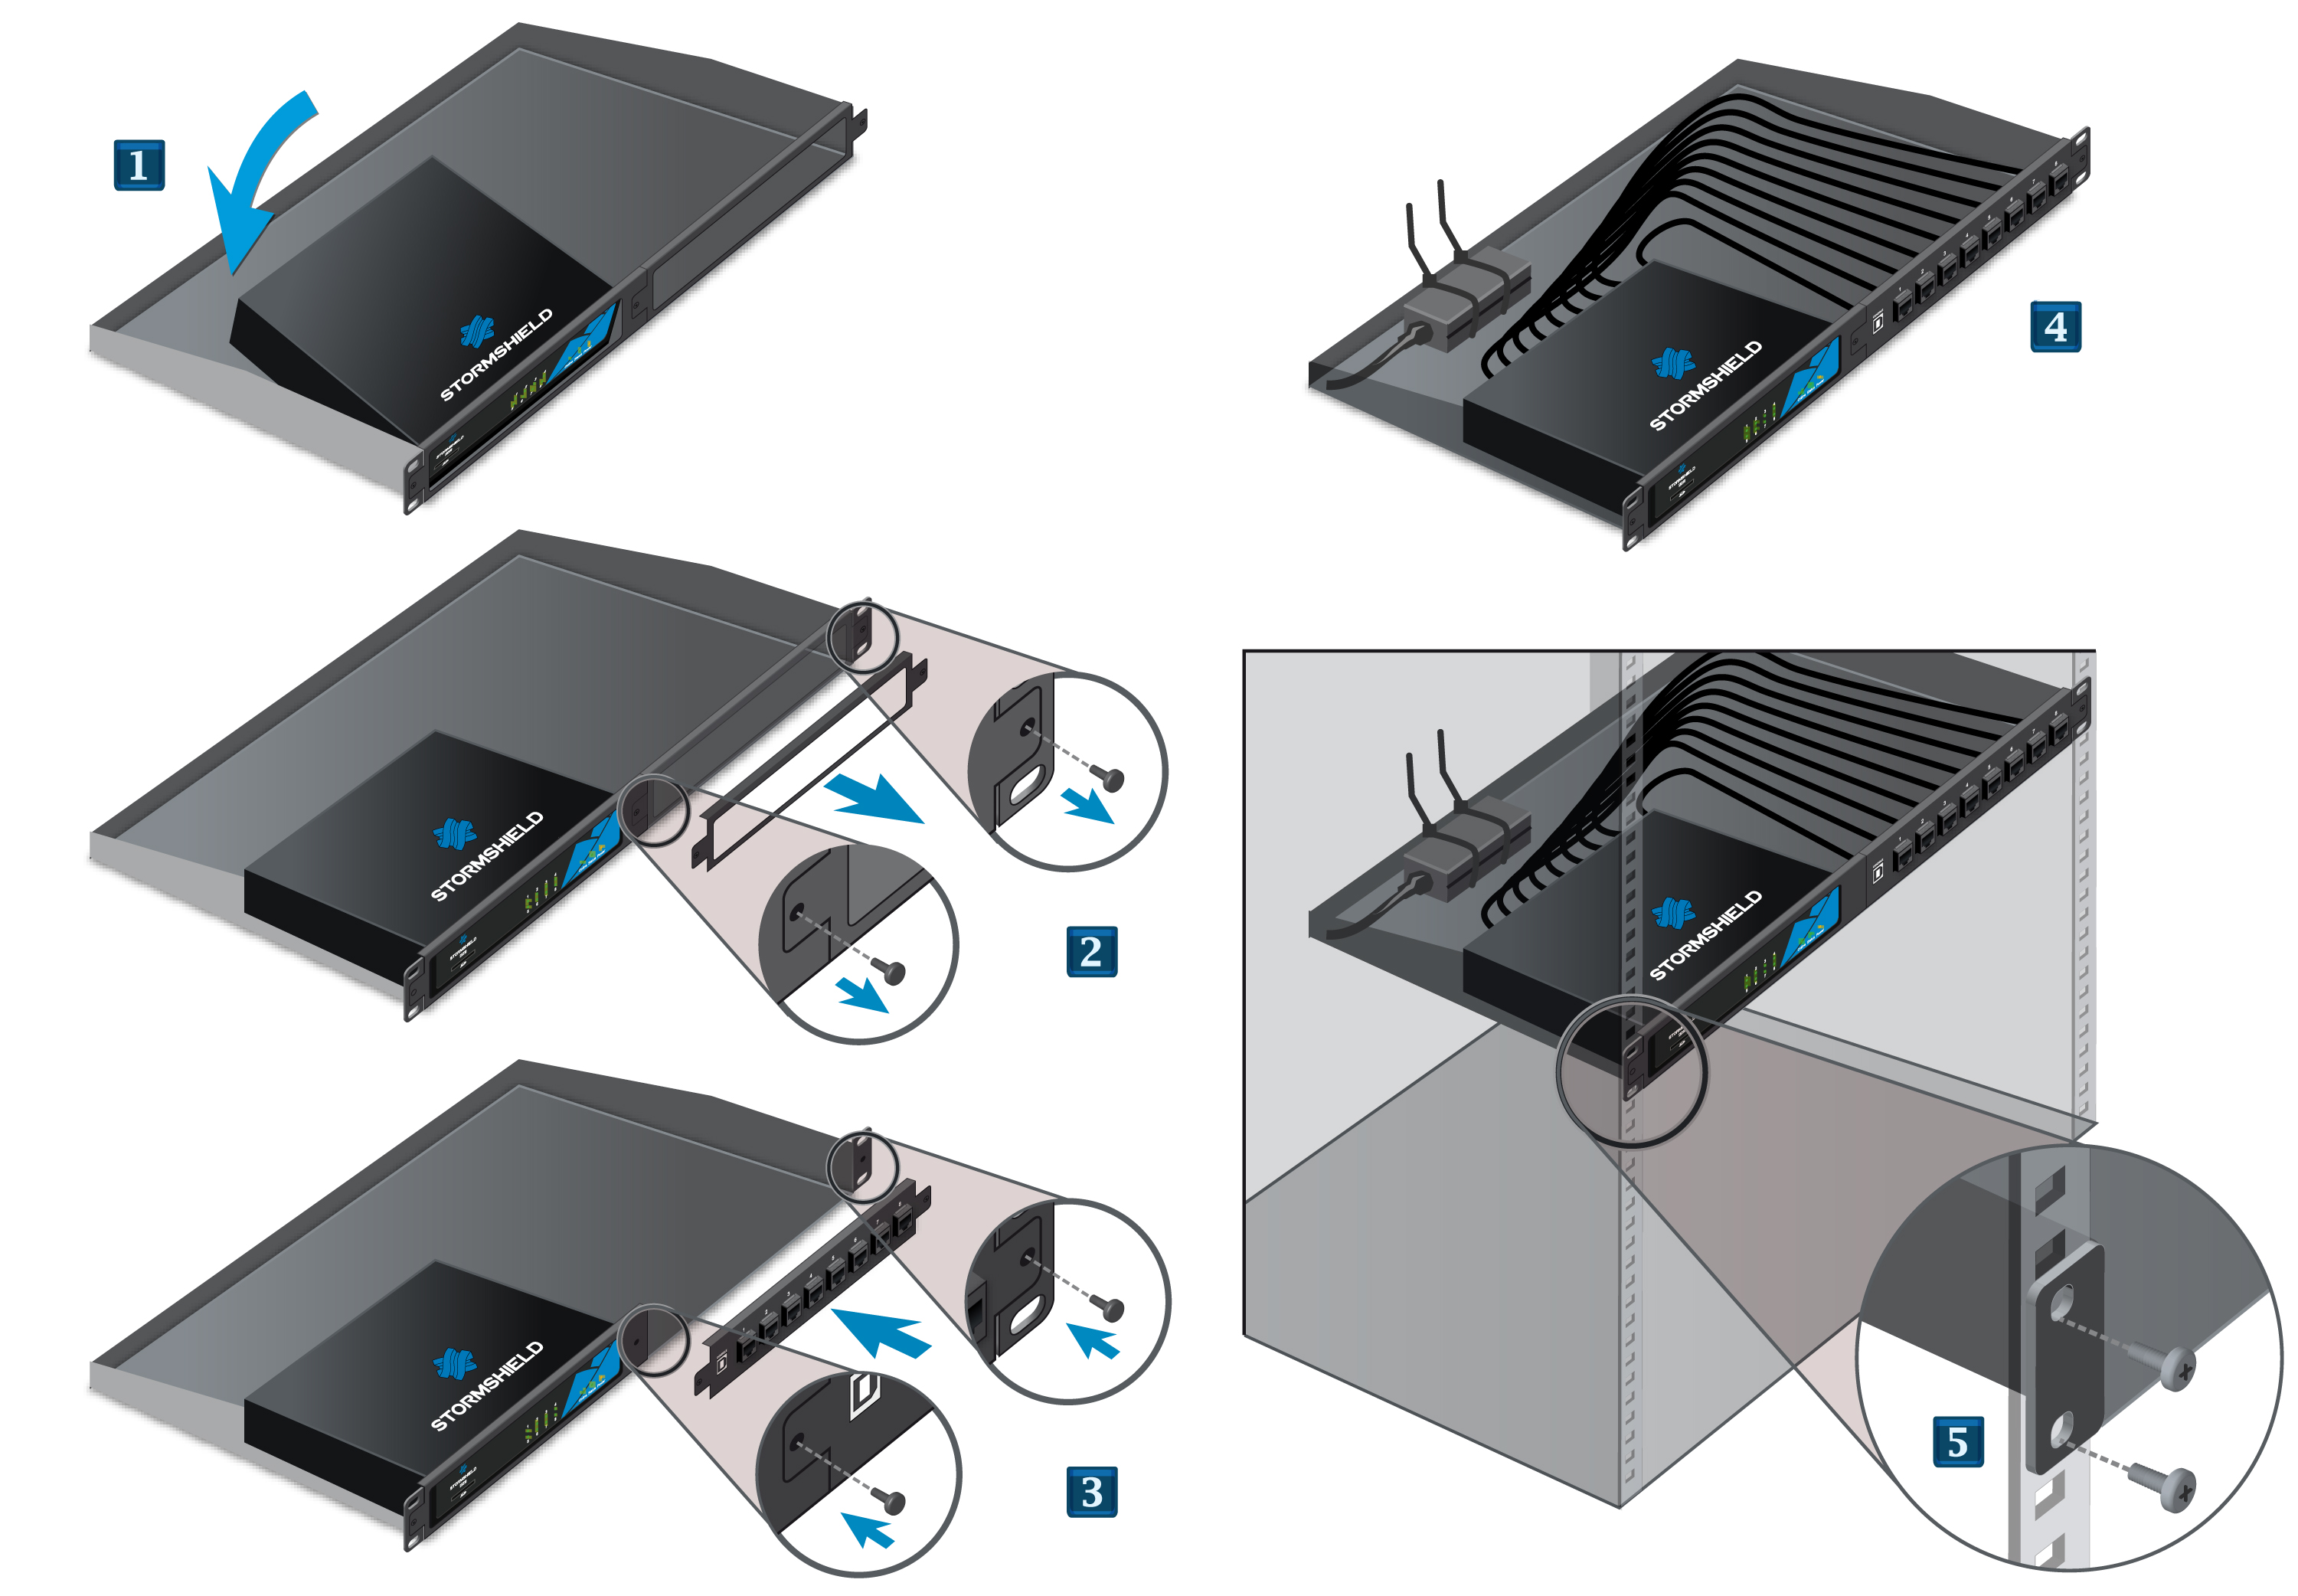
Kit for USB and network interfaces on the front panel option (not available on SN-XS-Series-170 and SNi10 models)
In this configuration, the shelf makes it possible to install one product. There are indentations to ensure that product and power adapter are held securely in place.
NOTE
This kit must be ordered separately.
NOTE
This kit allows you to connect the console, via a USB port, and network interfaces on the front panel of the shelf (cables provided).
|
|
Fastening SN160, SN160W, SN-XS-Series-170 and SNi10 models to a wall
|
SN160, SN160W, SN-XS-Series-170 and SNi10 models can also be installed vertically using screws and fasteners (not provided). The screw heads must be narrower than 8mm in diameter and the diameter of the shank must not exceed 4mm. The procedure is as follows:
|
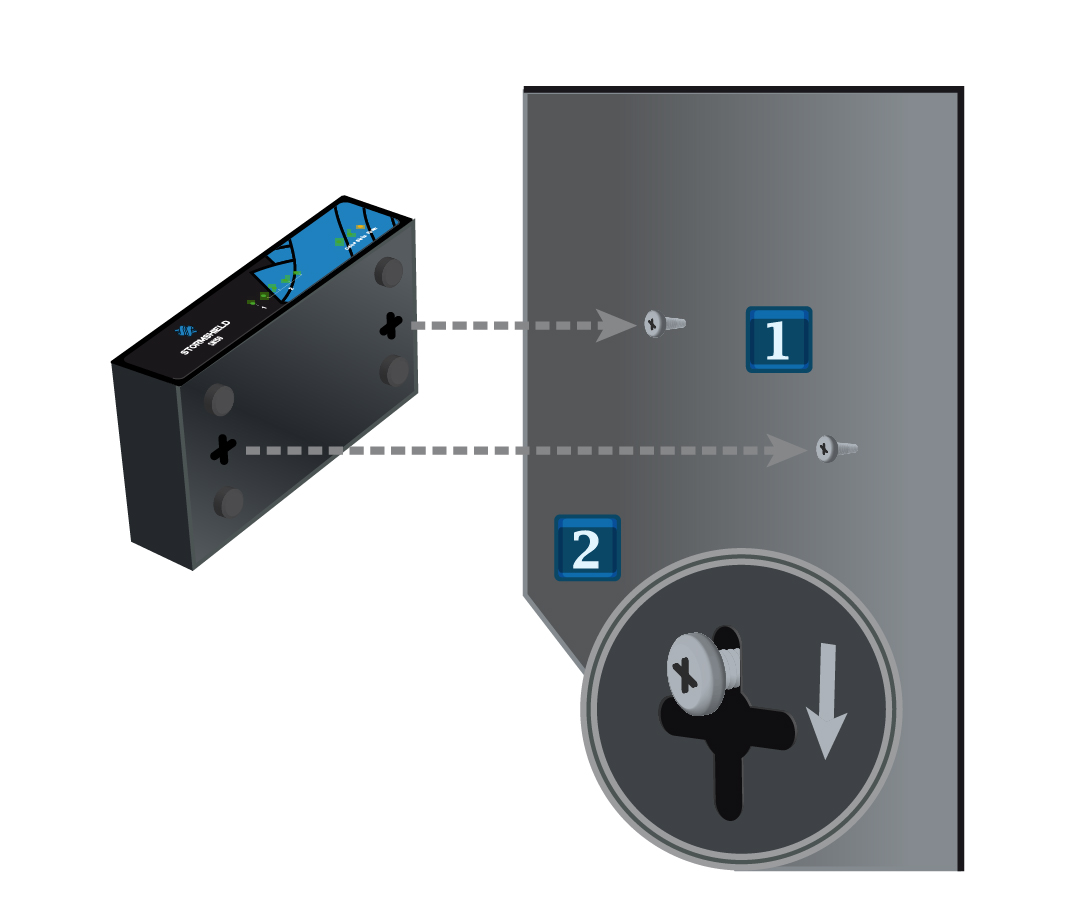
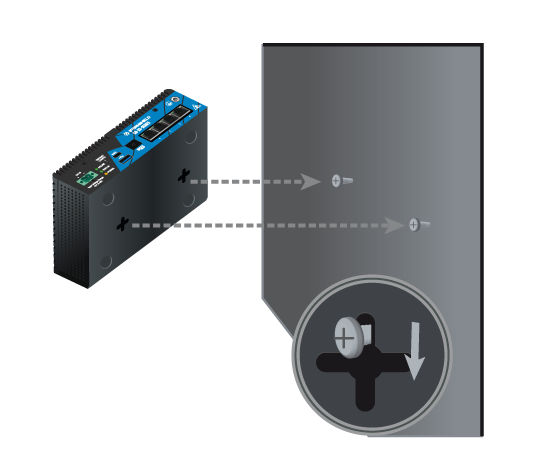
|
Installing SN510, SN-M-Series-520, SN710, SN910, SN-M-Series-720 and SN-M-Series-920 models in a 19" cabinet
|
The minimum vertical space needed for installing an SNS firewall is 1U. Once the brackets have been installed, you can fasten the firewall to the vertical rails located at the front of your cabinet using screws and the caged nuts (not provided with the appliance). |
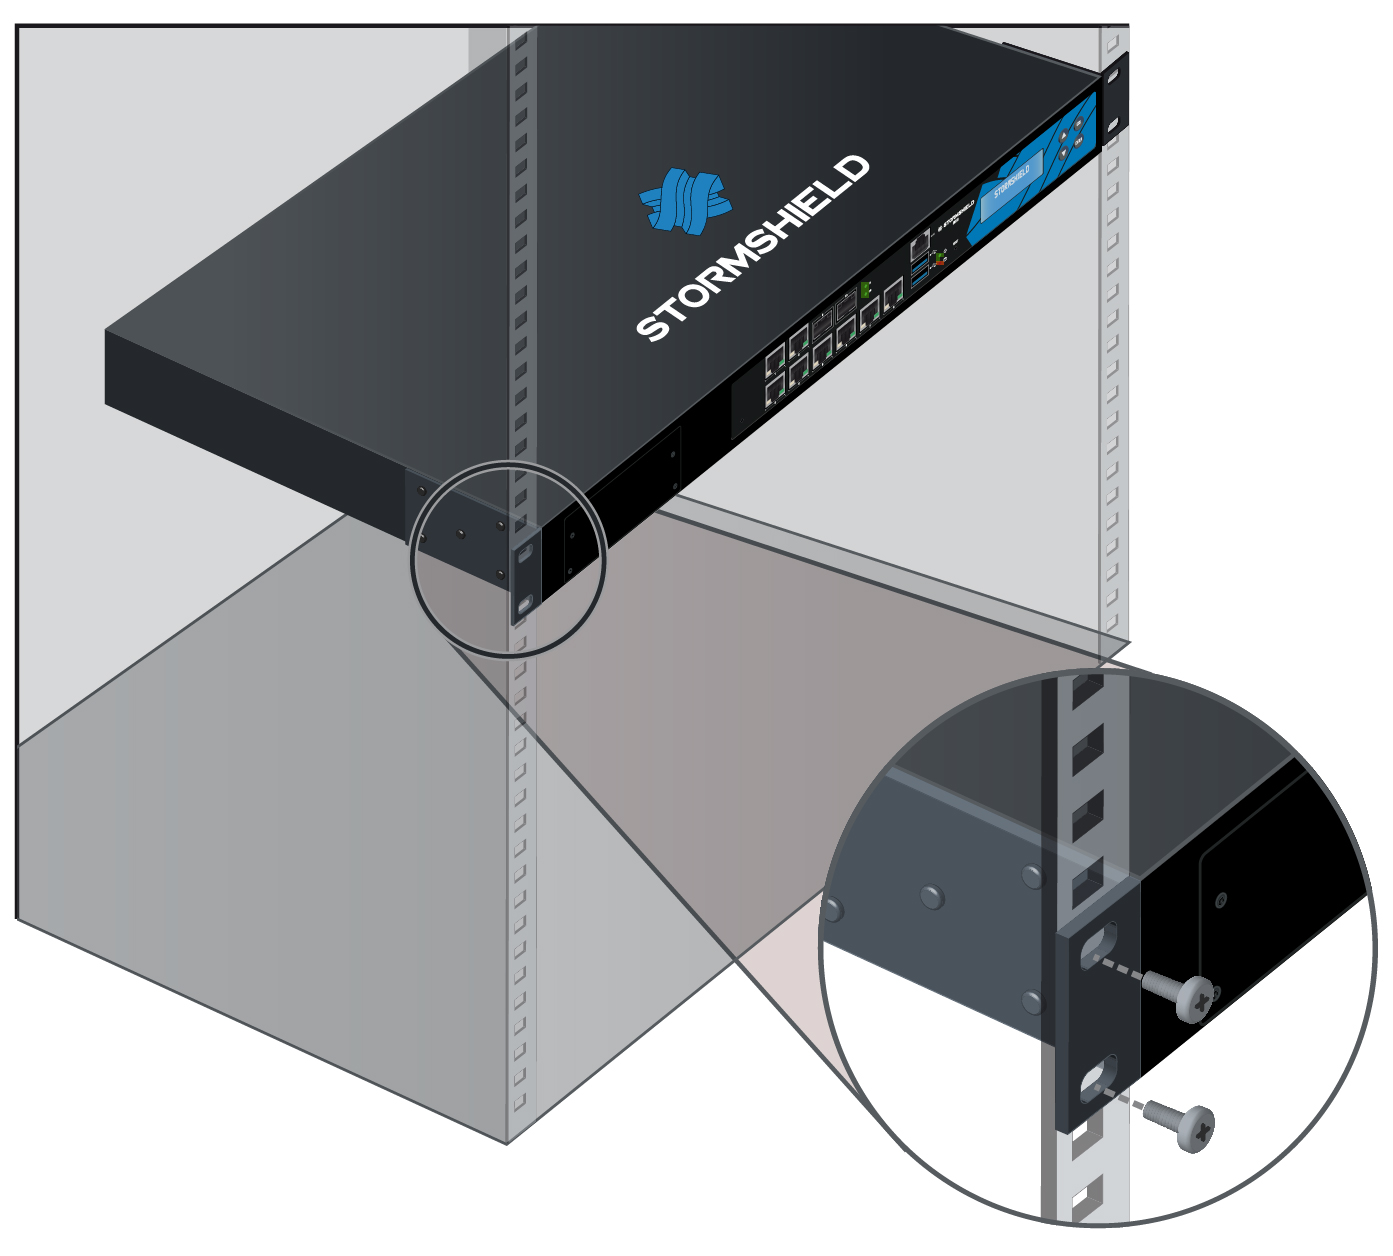
|
Installing SN1100, SN2100, SN3100, SN-L-Series-2200, SN-L-Series-3200, SN6100, SN-XL-Series-5200 and SN-XL-Series-6200 model in a 19" cabinet
The minimum vertical space needed to install an SN1100, SN2100, SN3100, SN-L-Series-2200 or SN-L-Series-3200 model is 1U, and 2U for an SN6100, SN-XL-Series-5200 or SN-XL-Series-6200. The processes of mounting lateral rails and installing appliances in racks are described in SN1100 rack mounting, SN2100-SN3100 rack mounting, SN-L-Series rack mounting, SN6100 rack mounting and SN-XL-Series rack mounting. These documents are delivered with SN1100, SN2100, SN3100, SN-L-Series-2200, SN-L-Series-3200, SN6100, SN-XL-Series-5200 and SN-XL-Series-6200 models.
The rails that come with the product make it possible to install firewalls in a 19" rack. The depth between the vertical rails located in the front and back are:
-
SN1100: between 655 and 745mm,
- SN2100/SN3100: between 735 and 850mm,
- SN6100: between 620 and 808mm,
-
SN-L-Series-2200/SN-L-Series-3200: between 635 and 920mm,
-
SN-XL-Series-5200/SN-XL-Series-6200: between 715 and 810mm.
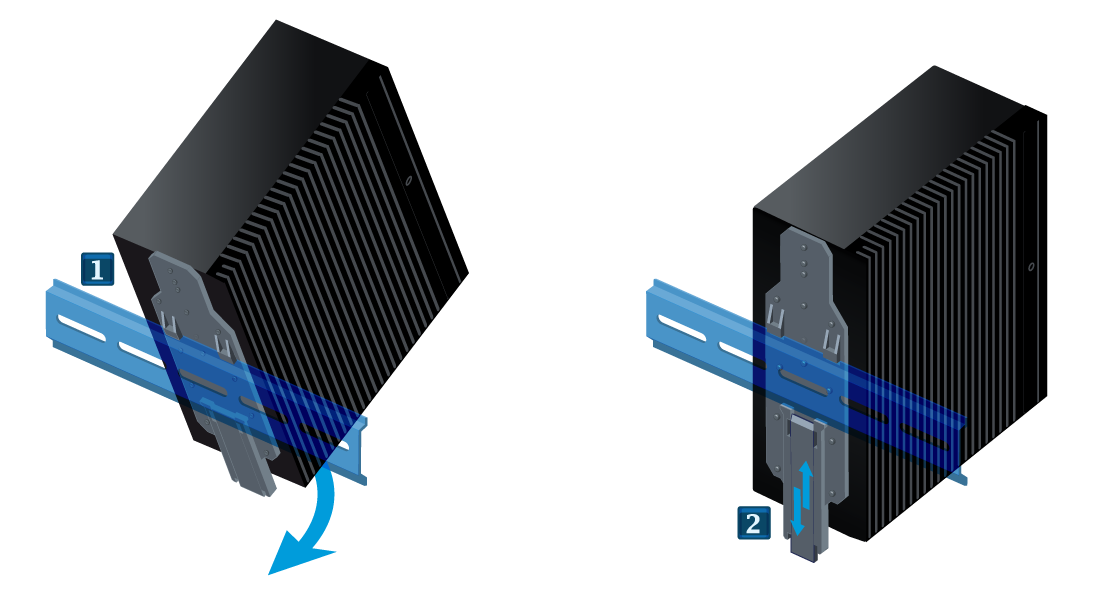
Installing SN-XS-Series-170, SNi10, SNi20 and SNi40 models on DIN rails
To install the appliance in a cabinet, SN-XS-Series-170, SNi10, SNi20 and SNi40 models have a fastener on a 35mm-wide DIN rail (EN50022 standard).
REMINDER
Ensure that the cabinet complies with temperature and humidity conditions indicated in the section Conditions of use. Equipment has to be installed by a qualified electrician.
NOTE
SNi20 and SNi40 models must be installed vertically.
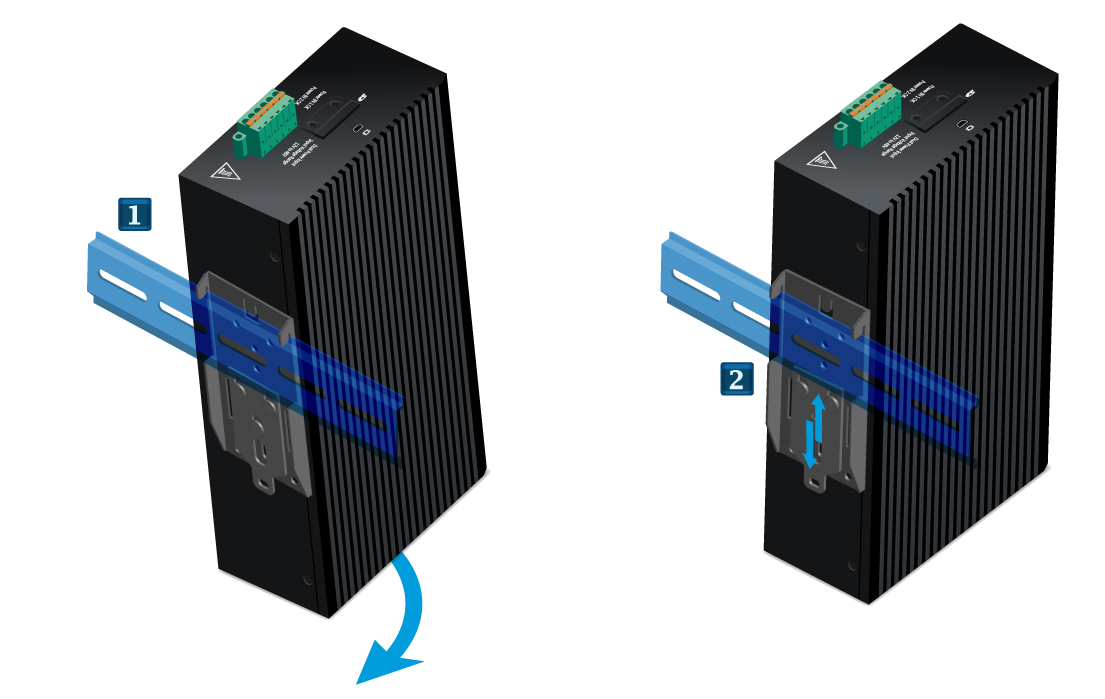
|
|