TrustedConnect Panel
Introduction
The TrustedConnect Panel allows you to permanently keep a secure connection to the trusted network thanks to the following features:
-
Trusted Network Detection (TND): Used to determine whether the workstation is within the trusted network based on the DNS suffixes and on beacon identification
-
Always-On: Ensures that the connection remains secure whenever the network interface changes, for example, between Ethernet, Wi-Fi and 4G/5G.
NOTE
As of SN VPN Client Exclusive version 7.5, the TrustedConnect Panel’s behavior changes according to the compliance level reported by the Secure Connection Agent (SCA), which determines whether a workstation should be allowed to access the corporate network (see section Selecting the tunnel to open according to the compliance level).
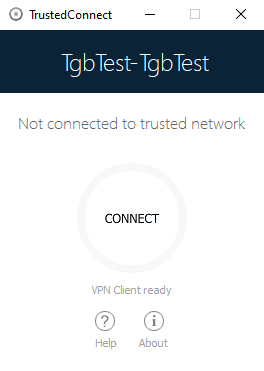
Interface
When it is used for the first time, the TrustedConnect Panel is displayed in the center of the screen.
For subsequent uses, the TrustedConnect Panel memorizes the place to which the user has moved it.
The interface of the TrustedConnect Panel includes the following items:
-
A title that identifies the name of the connection being managed
-
An information message about the connection status
-
A Connect button
-
A message that indicates the current status of the software and displays possible error codes
-
A help button that gives access to a document with help for the user
-
An information button that displays essential information about the software
-
A set of icons whose color reflects the connection status
NOTE
As of version SN VPN Client Exclusive 7.4, you can enable an option that allows users to select the desired connection by clicking the title banner (see section Choosing the connection).
You can minimize the TrustedConnect Panel at any time either to the taskbar, by clicking the Minimize button in the title bar, or to the notification area, by clicking on the Close button in the title bar.
Conversely, you can display the TrustedConnect Panel at any time by clicking the TrustedConnect icon in the taskbar or in the notification area.
To quit the software right-click the TrustedConnect icon in the notification area and then select Quit.
NOTE
Administrators can disable the disconnect button. In this case, a tunnel can no longer be closed once it is open. Refer to section Disabling the disconnect button for more details.
Taskbar icon and color codes
The taskbar icon of the TrustedConnect Panel application is slightly different from that of the SN VPN Client Exclusive Configuration Panel/Connection Panel.
The various icons in the TrustedConnect Panel have the following meaning:

|
This state means that the TrustedConnect Panel is not managing any connection on the workstation. Generally, this state is encountered when the user explicitly requests the VPN connection to be closed. |

|
This state means that the workstation is directly connected to the corporate network, which is considered as a trusted network. |

|
This state means that the workstation is connected to the corporate network through a VPN connection. The workstation thus is physically located on a network that is not considered as trusted. |

|
This state means that the VPN connection could not be established. |
Contextual menu
Right clicking the TrustedConnect Panel icon in the taskbar opens the contextual menu associated with the icon:
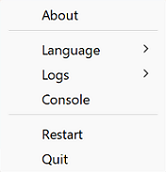
The contextual menu contains the following items:
|
About… |
Opens the About… window. |
| Language |
Used to switch between French and English. |
| Logs |
Used to start logging. Once logging is started, two additional options are shown to display the logs and stop logging. |
| Console | Opens the VPN Console window with VPN traces. |
| Restart | Restarts the tunnel. |
| Quit | Closes the VPN tunnel and quits the software. |
NOTE
Administrators can disable the menu or some of its options. Refer to section Removing menu items for more details.
Usage
There are two types of use depending on whether the workstation is already connected to the corporate network or not.
NOTE
As of version SN VPN Client Exclusive 7.3, you can disable the TND function to open a tunnel even when the workstation is located on the trusted network. Refer to section Disabling TND for more details.
Workstation connected to corporate network
The TrustedConnect Panel switches to the CONNECTED status after having detected trusted networks:

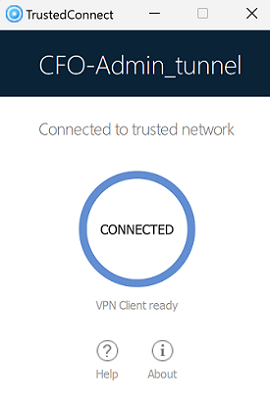
The window of the TrustedConnect Panel then automatically minimizes either to the taskbar or to the notification area, depending on the behavior that the administrator has configured.
Refer to the “Deployment Guide”.
To display the window again, select the application in the taskbar. When connected to the corporate network, users cannot perform any action on the connection status.
Workstation not connected to corporate network
When switching to a network that is not considered as trusted, the TrustedConnect Panel will automatically open the VPN tunnel.
The button’s animation shows the progress of the connection being established until it is established.

Once the connection is established, the window of the TrustedConnect Panel automatically minimizes either to the taskbar or to the notification area, depending on the behavior that the administrator has configured.
The connection may not be established for various reasons. The information message below the button provides a first level of information. The various possible cases of connection failure are detailed in the next section.
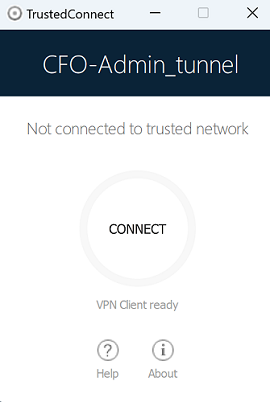
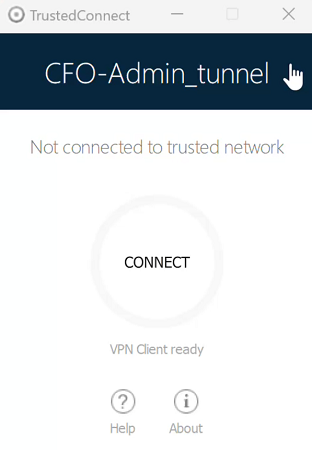
When the tunnel is mounted and the workstation is shown as being on the corporate network, you can click inside the connection status indicator ring to stop the tunnel.
The application then switches to the state Not connected and you can click the button to manually open the tunnel again:
Error cases
An orange Connect button, an error code, and a brief message describing the error are shown in the TrustedConnect Panel interface to identify the main error cases.
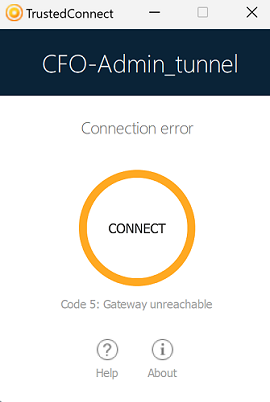
Contact the network administrator to resolve the issue. The error code shown may provide some indication or explanation as to the issue encountered. If the administrator requests the logs, refer to the procedure described in the next section.
The list of error codes is provided in the appendix of this document (see section TrustedConnect Panel diagnostics).
Generating logs and Console
The TrustedConnect Panel allows you to create and view logs.
To initiate the creation of log files, right click the TrustedConnect icon in the notification area, select Logs. A check mark next to the menu item indicates that logging is enabled:
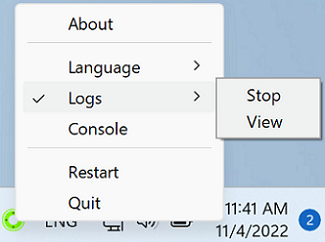
To view the logs, access the system menu and select the item Access logs. A window with the log folder is shown with a certain number of files. You can send these files to the administrator when you encounter any issues.
You can now also display the Console window with VPN traces directly from the TrustedConnect Panel’s contextual menu.

To find out how to use the Console window, refer to section Console.
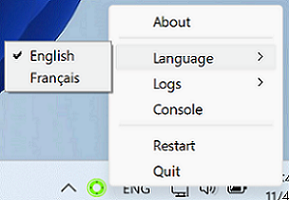
Selecting the language
The TrustedConnect Panel allows you to select the software’s display language: French or English. To select the language, access the menu and select the Languages item. In the submenu, select English or Français:
Choosing the connection
If you enabled this option using the MSI property DIALERBEHAVIOR when you installed the VPN Client (refer to the “Deployment Guide”), as of version SN VPN Client Exclusive 7.4, users can choose between the connections available in the VPN configuration, if it contains two or more.
When this option is enabled, users will see the mouse pointer change into a hand when it hovers over the connection name in the TrustedConnect Panel’s title banner after having closed any open tunnel.
IMPORTANT
The pointer does not change into a hand and users cannot change active connections while a connection is open or being initialized or closed.
To change connection, follow these steps:
-
If the TrustedConnect Panel is not displayed on the screen, click its icon in the taskbar to display it.
-
If a connection is open, click the CONNECTED button to close the tunnel. The connection status indicator ring becomes gray, and the button label changes to CONNECT.
-
Click the connection name in the blue title banner. The name of the next connection available in the configuration is displayed. Keep clicking to scroll through the names of all the connections available in the configuration until you reach the one you want to enable.
-
Click the CONNECT button. The VPN Client will attempt to establish the connection. If it succeeds, the connection status indicator ring becomes green and the button label changes to CONNECTED. The TrustedConnect Panel is then minimized to the taskbar.
NOTE
The TrustedConnect Panel stores the last connection that has been enabled. If you quit the TrustedConnect Panel, this connection will open automatically the next time you start.
NOTE
When the TrustedConnect Panel is configured with several connections of which at least one is in GINA mode, make sure to account for the information provided in the paragraph entitled Special use case in section Overview.
For error cases, refer to section Error cases.
Current limitations
The TrustedConnect Panel (run using the VpnDialer.exe executable file) cannot be run at the same time as the Configuration Panel or the Connection Panel (both run using the VpnConf.exe executable file, the desktop shortcut, or the Start menu).
When VpnConf.exe is running and you are running VpnDialer.exe, all tunnels opened in VpnConf.exe will be closed and VpnDialer.exe (TrustedConnect) will attempt to automatically launch the configured tunnel.
However, when VpnDialer.exe (TrustedConnect) is running, you cannot run VpnConf.exe immediately. You must first quit VpnDialer.exe before you can run VpnConf.exe.
The TrustedConnect Panel (VpnDialer.exe) is currently only available in French and English.