Configuring the TrustedConnect Panel
The TrustedConnect Panel is described in chapter TrustedConnect Panel. It allows you to automatically open a VPN connection when you’re outside the trusted network and keep the connection open even if the network interface changes.
For it to be taken into account, this VPN connection must meet the following conditions:
-
The VPN connection must be the first VPN connection defined in the Connection Panel. To configure this first connection, refer to chapter Configuring the Connection Panel above.
-
The VPN connection must be configured in IKEv2.
The following functions of the TrustedConnect Panel can be configured:
-
Exclude network interfaces from Always-On
-
Trusted Network Detection (TND)
-
Manage token or smart card removal
-
Manage scripts linked to the VPN tunnel
-
Minimize the HMI
-
Purge log files
Always-On
Operating principle
The Always-On feature, which is always enabled with the TrustedConnect Panel, ensures that the connection remains secure whenever the network interface changes.
The following network interfaces are supported:
-
Virtual adapter (e.g. vmware)
-
Wi-Fi
-
Ethernet
-
USB modem (i.e. smartphone)
-
Bluetooth modem (i.e. smartphone)
The following network events trigger automatic tunnel reconnection (and, where appropriate, detection of the trusted network), unless they have been explicitly excluded (see section Configuring Always-On):
-
Connection to a network (API addresses ignored)
-
Disconnection from a network
-
An adapter changes IP address or DHCP switches to static or vice versa
-
ipconfig /release
-
ipconfig /renew
-
Switch to airplane mode
Configuring Always-On
The Always-On feature is enabled as soon as the TrustedConnect Panel is used for open a VPN tunnel. You can configure it to exclude certain network interfaces from automatic reconnection to the VPN tunnel.
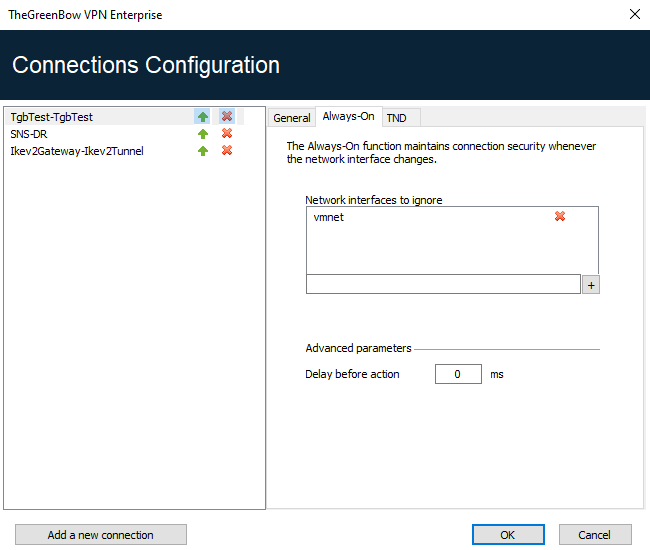
The Always-On tab in the Connections Configuration window allows you to configure the settings for the Always-On feature:
| Network interfaces to ignore |
Network interfaces can be excluded from Always-On monitoring. An interface is excluded using the description property (visible with ipconfig /all). The value of this parameter must contain part or all of the description field of the network interface to be excluded. If the value only contains part of the description, then any interface whose description field contains the value defined will be excluded from monitoring. The values of this parameter are not case sensitive (all character strings are converted to lowercase before comparison). You can specify several network interfaces to exclude. To do this, enter the name of the network interface you want to exclude, and then click the + button to the right of the input field. The network interface name is added to the exclusion list. Repeat these steps as many times as necessary. |
| Delay before action |
The time required to take into account a new network interface varies from one system to the next. If it is too long, it may interfere with the TND mechanism, which may lead the VPN Client to attempt establishing a VPN connection even though the workstation is connected to the trusted network. To avoid this issue, this parameter is used to delay the triggering of the TND mechanism (see next section). It is expressed in milliseconds. If the default value needs to be changed, we recommend specifying a value greater than or equal to 3000 ms. By default, the value is equal to 0 and the TND mechanism is started immediately, which is suitable in most cases. |
Trusted Network Detection (TND)
Operating principle
General information
This feature consists in detecting whether the workstation is connected to the corporate network (trusted network) or not.
When the VPN Client detects that workstation is not on the corporate network, the predefined tunnel is opened automatically. This feature is referred to as Trusted Network Detection (TND) in this document.
The TrustedConnect Panel uses one of the following two methods to detect whether the workstation is on a trusted network:
- If it detects a trusted DNS suffix, it verifies whether it can access a trusted web server and whether the server’s certificate is valid (see section 21.2.1.2 HTTPS method)
- If it detects an Active Directory (AD) server, it searches for a domain name that matches a list of trusted domains (see section 21.2.1.3 AD method).
HTTPS method
The existing HTTPS method remains available. It is carried out in two steps:
-
The TrustedConnect Panel checks whether the DNS suffixes of the network interfaces available on the workstation are part of the list of trusted DNS suffixes (list configured in the software, see below).
-
It then automatically accesses a trusted web server in HTTPS mode and checks that its certificate is valid.
Both methods are required and must be combined to detect whether the workstation is on a trusted network. To achieve this, the VPN Client starts by testing whether a trusted DNS suffix is available:
- if none are found, the VPN Client does not continue the test and concludes that the workstation is not connected to the trusted network;
- if it does find one, it continues the test sequence by verifying the access to the trusted server and the validity of its certificate.
At the first accessible trusted server found whose certificate is valid, the VPN Client concludes that the workstation is connected to the trusted network.
In all the other cases listed below, the VPN Client concludes that the workstation is not connected to the trusted network and automatically attempts to open the configured VPN connection:
-
No DNS suffix has been found in the list of trusted DNS suffixes
-
The list of trusted DNS suffixes is empty
-
The list of trusted server URLs is empty
-
No trusted server is accessible or none has a valid certificate
Therefore, to enable the Trusted Network Detection (TND) feature, the following parameters must be configured:
-
A list of DNS suffixes
-
A list of trusted server URLs
NOTE
On some workstations, a few seconds are required before the interface is ready to transmit when a network interface appears. To mitigate this time delay, there is a Delay before action option on the Always-On tab (see previous section).
AD method
This Trusted Network Detection (TND) method, introduced with SN VPN Client Exclusive version 7.5, allows you to use connection to an Active Directory (AD) server to determine whether the workstation is on a trusted network. This method comes in three variants:
- AD only: checks whether the workstation is joined to a domain and, if this is the case, the domain name is checked against a list of trusted domain names (if the list is empty, any domain is accepted)
- LDAP: same as AD only, plus additional validation by connecting to an LDAP directory service
- LDAPS: same as AD only, plus additional secure validation by connecting to an LDAPS directory service
NOTE
In GINA mode, the workstation must be declared as not being part of a trusted network as long as no user has logged on to Windows.
Configuring TND
The TND tab in the Connections Configuration window allows you to configure the settings for the Trusted Network Detection feature.
Four radio buttons allow you to select the type of detection to be performed:
- HTTPS
- AD only
- LDAP
- LDAPS
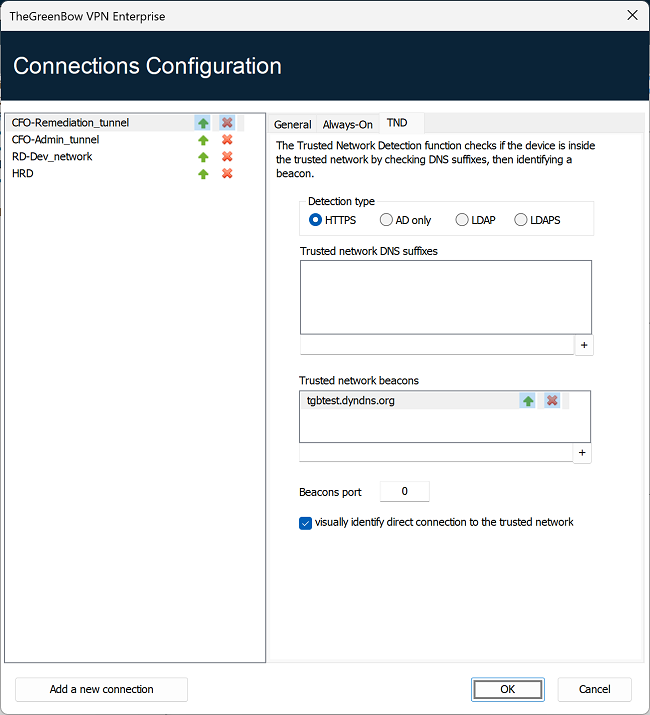
The following are the options detection type HTTPS:
| Trusted network DNS suffixes |
This parameter defines the list of trusted DNS suffixes. This list can contain several DNS suffixes. To do this, enter the DNS suffix name you want to add, and then click the + button to the right of the input field. Repeat these steps as many times as necessary. |
| Trusted network beacons |
This parameter defines the list of IP addresses (or DNS names) of the trusted servers to be used. This list can contain several IP addresses (or DNS names). The VPN Client will then successively test all IP addresses (or DNS names) and all certificates associated with each server until it finds one that is accessible and valid. The IP addresses (or DNS names) must be separate by a comma in the list, without any blank spaces. You do not need to add the https:// prefix to IP address (or DNS name). IMPORTANT
|
| Beacons port |
This parameter defines the port to be used to reach trusted servers. Only a single port can be configured, and it will be used with all IP addresses (or DNS names). If this parameter is not configured, the VPN Client will use the port 443 by default. |
| Visually identify direct connection to the trusted network |
This option adds a visual cue to the TrustedConnect Panel to indicate that the VPN Client is connected to the trusted network. If the box is checked, the taskbar icon and the color of the circle in the panel is blue when the machine is connected to the trusted network and green when a tunnel is open. If the box is unchecked, the taskbar icon and the color of the circle in the panel remains green in both cases. No distinction is made between the trusted network and an open tunnel. |
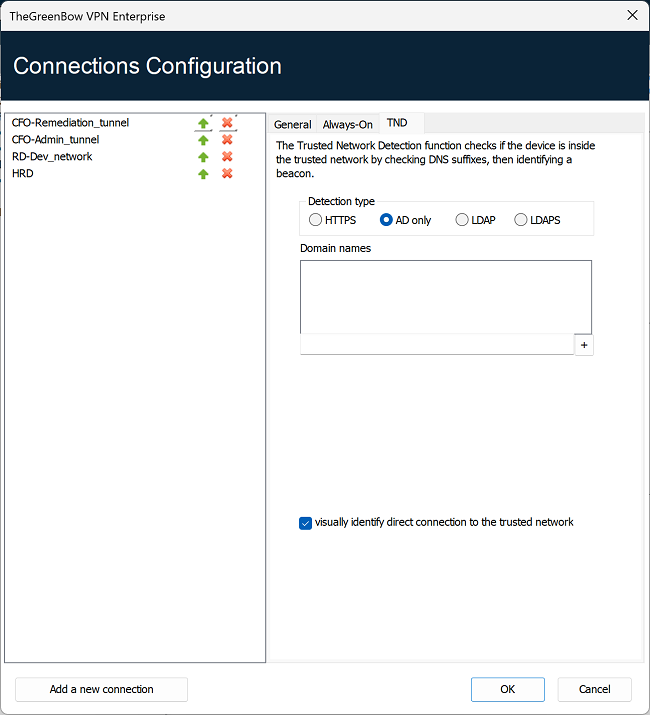
The following are the options detection type AD only:
| Domain names |
This parameter defines the list of trusted domain names. This list can contain several domain names. To do this, enter the domain name you want to add, and then click the + button to the right of the input field. Repeat these steps as many times as necessary. Domain names are not case sensitive. |
| Visually identify direct connection to the trusted network |
This option adds a visual cue to the TrustedConnect Panel to indicate that the VPN Client is connected to the trusted network. If the box is checked, the taskbar icon and the color of the circle in the panel is blue when the machine is connected to the trusted network and green when a tunnel is open. If the box is unchecked, the taskbar icon and the color of the circle in the panel remains green in both cases. No distinction is made between the trusted network and an open tunnel. |
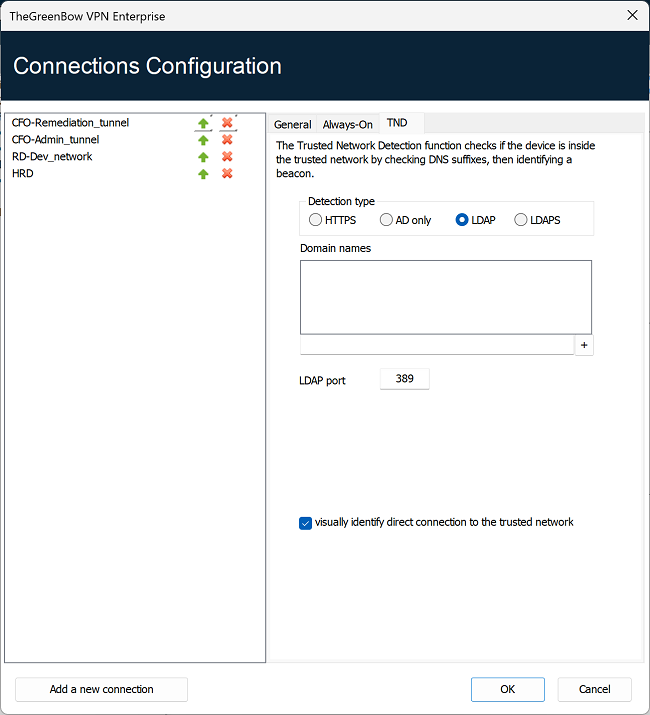
The following are the options detection type LDAP:
| Domain names |
This parameter defines the list of trusted domain names. This list can contain several domain names. To do this, enter the domain name you want to add, and then click the + button to the right of the input field. Repeat these steps as many times as necessary. Domain names are not case sensitive. |
| LDAP port |
This parameter defines the port to use to reach the LDAP server. You can only configure one port, which will be used for all domain names. The default value is 389. |
| Visually identify direct connection to the trusted network |
This option adds a visual cue to the TrustedConnect Panel to indicate that the VPN Client is connected to the trusted network. If the box is checked, the taskbar icon and the color of the circle in the panel is blue when the machine is connected to the trusted network and green when a tunnel is open. If the box is unchecked, the taskbar icon and the color of the circle in the panel remains green in both cases. No distinction is made between the trusted network and an open tunnel. |
The following are the options detection type LDAPS:
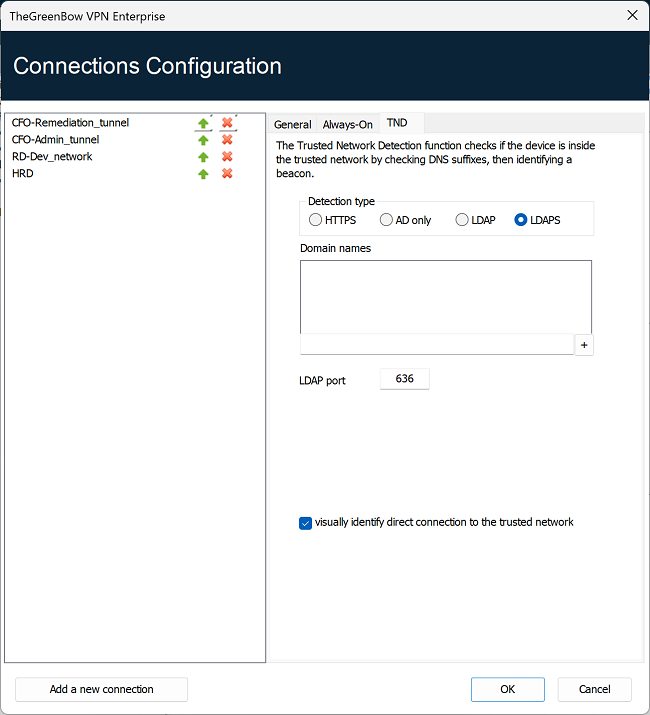
| Domain names |
This parameter defines the list of trusted domain names. This list can contain several domain names. To do this, enter the domain name you want to add, and then click the + button to the right of the input field. Repeat these steps as many times as necessary. Domain names are not case sensitive. |
| LDAPS port |
This parameter defines the port to use to reach the LDAPS server. You can only configure one port, which will be used for all domain names. The default value is 636. |
| Visually identify direct connection to the trusted network |
This option adds a visual cue to the TrustedConnect Panel to indicate that the VPN Client is connected to the trusted network. If the box is checked, the taskbar icon and the color of the circle in the panel is blue when the machine is connected to the trusted network and green when a tunnel is open. If the box is unchecked, the taskbar icon and the color of the circle in the panel remains green in both cases. No distinction is made between the trusted network and an open tunnel. |
Disabling TND
In some cases, it may be useful to be able to open a tunnel to access certain resources even when the trusted network has been detected.
The MSI property DIALERBEHAVIOR, to be configured during installation, adds an option in the status bar that allows users to disable and later re enable the TND function.
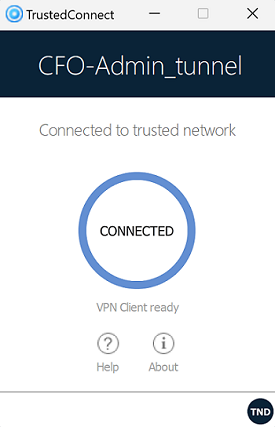
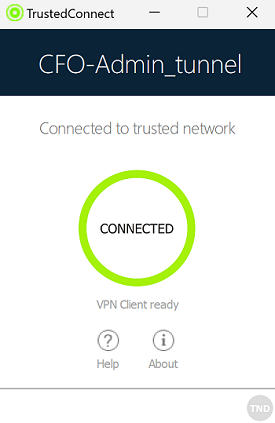
When the TND function is disabled (gray TND icon), the tunnel will be mounted systematically. When it is enabled (blue TND icon), no tunnel can be mounted when a trusted network has been detected (default behavior).
Refer to the “Deployment Guide” for the corresponding instructions.
Scripts
The TrustedConnect Panel can run scripts when a tunnel is opened or closed. To configure this feature, refer to chapter Automation.
Minimizing the panel
By default, the TrustedConnect Panel is automatically minimized to the notification area (systray) after two seconds, when the workstation has been detected as being connected to the trusted network (either physically or through the VPN tunnel).
You can set the time delay before the VPN Client’s HMI is minimized, as well as the type of minimization. The TrustedConnect Panel can be minimized to the taskbar or to the notification area (systray, by default).
NOTE
The time delay and minimization type only apply to automatic minimization of the TrustedConnect Panel when a connection to the trusted network is detected.
These configurations must be made using the properties of the VPN Client installer.
Refer to the “Deployment Guide” for the corresponding instructions.
Disabling the disconnect button
For better workstation protection, administrators can disable the disconnect button as soon as a connection is being established (TND check, opening a tunnel, etc.). To do this, you must use the MSI property BTNBEHAVIORTC or the corresponding parameter in the vpnsetup.ini file during installation.
When this option is enabled, clicking on the Connecting or Connected button on the TrustedConnect Panel will have no effect. Users cannot close the tunnel.
Refer to the “Deployment Guide” for the corresponding instructions.
Removing menu items
For better workstation protection, administrators can disable all or part of the menu options. To do this, you must use the MSI property MENUITEMTC or the corresponding parameter in the vpnsetup.ini file during installation.
When this option is enabled, users will only have access to some menu options (to access logs, quit the interface, etc.), or will have no menu access at all.
Refer to the “Deployment Guide” for the corresponding instructions.
Automatically restarting the TrustedConnect Panel
To enhance workstation protection, administrators can force the TrustedConnect Panel to automatically restart when it is shut down. To do this, you must use the MSI property RESTARTGUITC or the corresponding parameter in the vpnsetup.ini file during installation.
When this option is enabled, the TrustedConnect Panel will be automatically restarted when users quit the software or if it crashes.
Refer to the “Deployment Guide” for the corresponding instructions.
Purging logs
You can configure the number of days during which log files are kept. The default value is 10 days.
This configuration must be made using the VPNLOGPURGE property of the VPN Client installer.
Refer to the “Deployment Guide” for the corresponding instructions.
Behavior when smart card or token is removed
You can configure the behavior of the TrustedConnect Panel when the smart card or token is removed from the reader while a VPN tunnel is open.
This configuration must be made using the properties of the VPN Client installer.
Refer to the “Deployment Guide” for the corresponding instructions.