Managing protection on private keys in SNS firewall certificates
This section explains how to protect the private keys of certificates on an SNS firewall using the TPM, and how to check whether a private key is protected.
Managing protection on private keys in a certificate that already exists
From the web administration interface
This use case is exclusive to SNS 4.8.7 and higher versions.
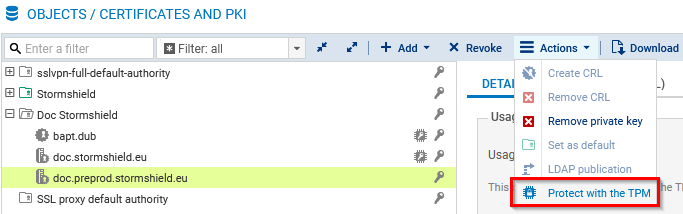
- Go to Configuration > Objects > Certificates and PKI.
- Select the certificate (identity) in question.
- To protect the private key of the certificate, click on Actions > Protect with the TPM. To remove its protection, refer to the section From the CLI console.
- Click on OK.
From the CLI console
-
Show certification authorities with the command:
PKI CA LIST
If required, you can show the list of intermediate certification authorities that were signed by the root authority in question, by adding
CANAME=<RootCA>in the command. -
Show the certificates issued by the certification authority (
<CA>) with the command:PKI CERT LIST CANAME=<CA>
-
Depending on what you wish to do with the certificate (
<CERTNAME>) in question:-
To protect its private key, run the command:
PKI CERT PROTECT CANAME=<CA> NAME=<CERTNAME> tpm=ondisk
-
To remove its protection, run the command:
PKI CERT PROTECT CANAME=<CA> NAME=<CERTNAME> tpm=none tpmpassword=<password>
Replace
<password>with the TPM password.
-
-
Activate the new configuration with the command:
PKI ACTIVATE
Adding a certificate and protecting its private key
From the web administration interface
- Go to Configuration > Objects > Certificates and PKI.
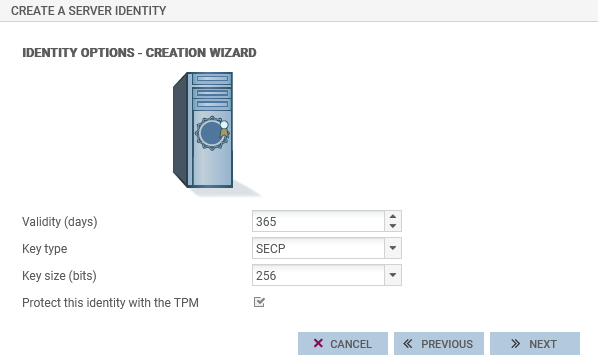
- Click on Add and select the certificate (identity) in question.
-
Fill out the requested information. Select the Protect this identity with the TPM checkbox throughout the steps.
- Click on Finish.
For more information, refer to the section on Certificates and PKI in the SNS v4.8 LTSB or v4.3 LTSB user guide, depending on the version used.
From the CLI console
-
Add a new certificate with the command:
PKI CERT CREATE
Use the token
tpm=ondiskto protect the private key of the certificate.If required, show command help with:
PKI CERT CREATE HELP
-
Activate the new configuration with the command:
PKI ACTIVATE
Importing a certificate and protecting its private key
From the web administration interface
- Go to Configuration > Objects > Certificates and PKI.
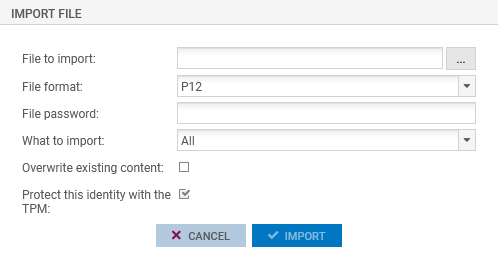
- Click on Add > Import a file.
-
Fill out the requested information. Select the Protect this identity with the TPM checkbox throughout the steps.
- Click on Finish.
For more information, refer to the section on Certificates and PKI in the SNS v4.8 LTSB or v4.3 LTSB user guide, depending on the version used.
From the CLI console
-
Import a certificate by using the command:
PKI IMPORT type=<req|cert|pkey|crl|ca|all> format=<p12|pem|der> password=<pass> force=<0|1> tpm=ondisk < /tmp/myfile.p12
- Customize the configuration tokens,
- In the example above, the file myfile.p12, uploaded to the SNS firewall earlier in the /tpm/ directory, will be imported.
If required, show command help with:
PKI IMPORT HELP
-
Activate the new configuration with the command:
PKI ACTIVATE
Checking whether the private key of a certificate is protected
From the web administration interface
This use case is exclusive to SNS 4.8.7 and higher versions.
Go to Configuration > Objects > Certificates and PKI.
-
The
 icon indicates that the private key of the certificate is protected by the TPM. This information is also available in the Details tab of the certificate, and in the tooltip that appears when scrolling over the certificate.
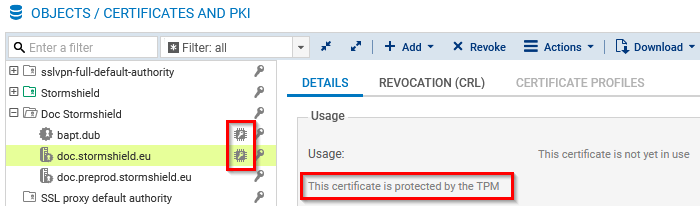
-
The
 icon indicates that the certificate is used in the SNS firewall configuration, but its private key is not protected by the TPM. This information is also available in the tooltip that appears when scrolling over the certificate.
From the CLI console
-
To verify the certificates that are currently being used in the SNS firewall configuration, run the command:
MONITOR CERT
In the result,
tpm=Usedindicates that the private key is protected by the TPM. -
To verify a particular certificate, run the command:
PKI CERT SHOW CANAME=<CA> NAME=<CERTNAME>
In the result,
tpm=ondiskindicates that the private key is protected by the TPM. -
To verify the certificates of a certification authority on an SNS firewall:
-
Show certification authorities with the command:
PKI CA LIST
If required, you can show the list of intermediate certification authorities that were signed by the root authority in question, by adding
CANAME=<RootCA>in the command. -
Show the certificates issued by the certification authority (
<CA>) with the command:PKI CERT LIST CANAME=<CA>
In the result,
tpm=ondiskindicates that the private key is protected by the TPM.
-
Firewall pools managed by an SMC server
Managing protection on the private key of the certificate that is used to communicate with the SMC server
This use case is exclusive to SNS 4.8.7 and higher versions.
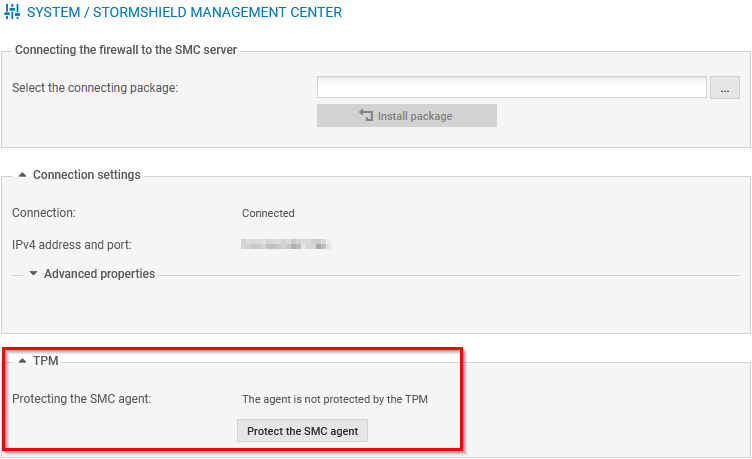
- Go to Configuration > System > Management Center.
-
In the TPM section, to protect the private key of the certificate that is used to communicate with the SMC server, click on Protect the SMC agent. To remove its protection, click on Unprotect the SMC agent.
-
Confirm changes.
IMPORTANT
If the private key of the certificate that is used to communicate with the SMC server is protected and access to the TPM is denied in the future, communications with the SMC server will no longer be possible until the TPM has been resealed. In the meantime, the SNS firewall can no longer be managed through the SMC server.
These operations can also be performed from the CLI console using these commands:
-
To protect the private key of the certificate:
CONFIG FWADMIN PROTECT tpm=ondisk
-
To remove protection on the certificate's private key:
CONFIG FWADMIN PROTECT tpm=none tpmpassword=<password>
Replace
<password>with the SNS firewall's TPM password.
You can run these commands on a pool of SNS firewalls from the SMC server. For more information, refer to the section Running SNS CLI commands on a pool of firewalls in the SMC administration guide.
Managing protection on the private key of the SNS firewall's certificates from the SMC server
For more information on protecting the private key in SNS firewall certificates from the SMC server, refer to the following sections of the SMC administration guide:
- Enabling TPM protection on existing private keys,
- Importing or declaring a certificate for a firewall,
- Finding out whether a private key is TPM-protected.
NOTE
When the TPM is initialized, the private key in certificates that the SMC server declared on the SNS firewall are protected by the TPM by default. To change this setting, refer to the section Disabling TPM private key protection in the SMC administration guide.