Setting up a VPN tunnel with the Stormshield SSL VPN client v4
Now that the SNS firewall and SSL VPN client v4 have been configured, you can proceed with setting up a VPN tunnel.
NOTE
If you are using the Stormshield VPN SSL client in version 5, refer to the Stormshield SSL VPN Client v5 documentation.
Setting up VPN tunnels in Automatic mode
-
Double-click on the
 icon in the Windows system tray to open the connection window.
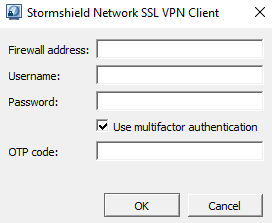
-
In the Firewall address field, indicate the IPv4 address or FQDN of the SNS firewall to reach in order to set up the VPN tunnel. If the port of the firewall’s captive portal is different from the default port (TCP/443), enter the address and listening port separated by colons (address:port),
-
In the User name field, enter the user’s login.
-
Fill in the remaining fields according to the authentication method used.
In the table,
 means that the fields are mandatory,
  means that they have to remain blank, and - means that they are not visible.
| Authentication method | Password | Multifactor authentication | OTP |
|---|---|---|---|
|
Standard |
|
|
- |
|
Password + OTP multifactor authentication |
|
|
|
|
OTP only multifactor authentication |
|
|
|
|
Push mode multifactor authentication |
|
|
|
-
Click on OK.
The Stormshield SSL VPN client will authenticate on the SNS firewall. If the authentication is unsuccessful, refer to the section When VPN tunnel fails to set up.
Setting up VPN tunnels by using the address book
-
Right-click on the
icon in the Windows system tray, then click on Address book. As a reminder, Automatic mode must be enabled.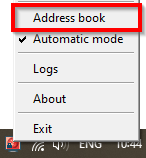
-
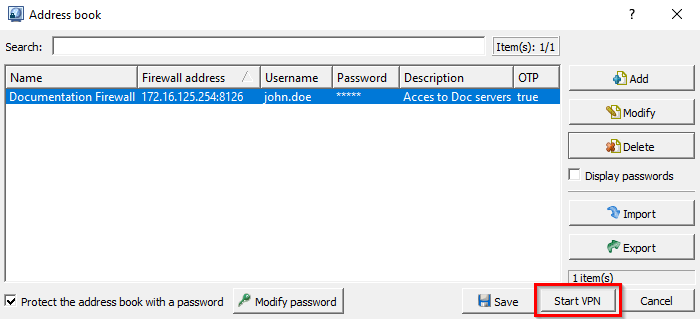
If the address book is protected by a password, enter it to open the address book.
-
Select the address from which you are connecting and click on Log in.
-
The connection window will appear.
- In a standard authentication, the connection will automatically launch,
-
In a Password + OTP or OTP only multifactor authentication, enter an OTP (one-time password) and click on OK,
-
For Push mode multifactor authentication, click on OK and approve the connection to the third-party application.

The Stormshield SSL VPN client will authenticate on the SNS firewall. If the authentication is unsuccessful, refer to the section When VPN tunnel fails to set up.
Setting up VPN tunnels in Manual mode
-
Right-click on the
icon in the Windows system tray, then click on Manual mode and on the relevant profile.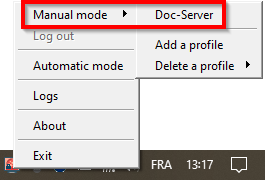
The connection window will open.

-
In the User name field, enter the user’s login.
-
Fill in the remaining fields according to the authentication method used.
In the table,
means that the fields are mandatory, means that they have to remain blank, and - means that they are not visible.
| Authentication method | Password | Multifactor authentication | OTP |
|---|---|---|---|
|
Standard |
|
|
- |
|
Password + OTP multifactor authentication |
|
|
|
|
OTP only multifactor authentication |
|
|
|
|
Push mode multifactor authentication |
|
|
|
-
Click on OK.
The Stormshield SSL VPN client will authenticate on the SNS firewall. If the authentication is unsuccessful, refer to the section When VPN tunnel fails to set up.
Showing the connection information of SSL VPN tunnels
The color of the Stormshield SSL VPN client icon in the Windows system tray indicates its connection status.
| Icon | Description |
|---|---|
|
|
The Stormshield VPN SSL client is connected. Scroll over the icon to show information about the SSL VPN tunnel (user name and address of the SNS firewall, time at which the connection was set up with the SNS firewall, IP address of the workstation through the SSL VPN tunnel and number of bytes exchanged). |
|
|
The Stormshield SSL VPN client is connecting. |
|
|
The Stormshield SSL VPN client is not connected or a connection attempt failed. |
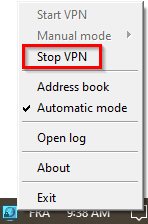
Disconnecting SSL VPN tunnels
-
Right-click on the
 icon in the Windows system tray.
 -
Click on Log out.
When VPN tunnel fails to set up
When a VPN tunnel fails to set up, follow these recommendations:
- Read the error message that appears,
- Check the connection information in the connection window, and in the address book, if one is used,
- Check the validity of the OTP if it has been entered. The Stormshield SSL VPN client will make several attempts to connect if no response is received, but the OTP may expire in the meantime,
- Check the configuration of the imported connection profile (in Manual mode). For example, if the SNS firewall's SSL VPN configuration has been modified, it will be imported on the Stormshield SSL VPN client,
- Refer to the Troubleshooting section.