Configuring the Stormshield SSL VPN client
NOTE
For further information on the VPN solutions that Stormshield offers and how to configure them (IPsec VPN and SSL VPN), refer to the page Focus - VPN topologies.
The Stormshield SSL VPN client has to be configured according to the desired connection mode. Refer to the section Connection mode compatibility table for the list of compatible features based on the connection mode used.
Enabling Automatic mode
In Automatic mode, the Stormshield SSL VPN client automatically retrieves the VPN configuration after authenticating the user and validating permission to use the SSL VPN.
-
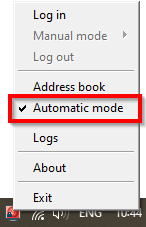
Right-click on the
 icon in the Windows system tray.
 -
Click on Automatic mode.
To log in, continue to the section Setting up VPN tunnels in Automatic mode.
Configuring the address book (Automatic mode required)
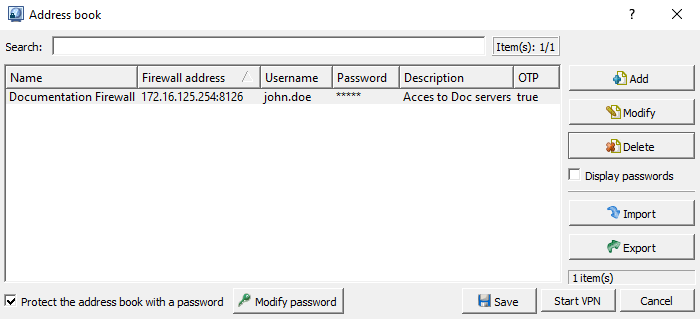
The Stormshield SSL VPN client has an address book that makes it possible to remember the login information to various firewalls: address to connect to the firewall (IPv4 address or FQDN), login, password and the use of multifactor authentication.
Opening the address book
-
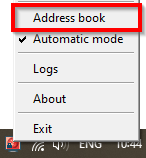
Right-click on the
icon in the Windows system tray. -
Click on Address book. Automatic mode must be enabled.
-
If the address book is protected by a password, enter it to open the address book. You can protect the address book by using the options Protect the address book with a password and Modify password.
Adding or changing an address in the address book
-
Click on Add to add a new address. To change an existing address, select it and click on Edit.
-
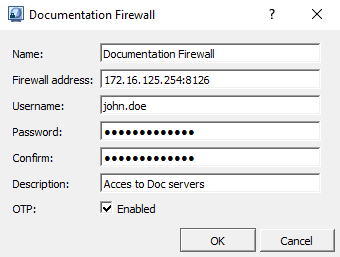
Fill in the required fields.
| Field/checkbox | Description |
|---|---|
| Address name | Name of the firewall address. |
| Firewall address |
IPv4 address or FQDN of the SNS firewall to contact in order to set up the VPN tunnel. If the port of the firewall’s captive portal is different from the default port (TCP/443), enter the address and listening port separated by colons (address:port). |
| Login | User Identifier. |
| Password
Confirm |
User’s password. If OTP only or Push mode multifactor authentication is used, leave these fields empty. |
| Description | Description of the address, if necessary. |
| Multifactor authentication |
If multifactor authentication is used (Password + OTP, OTP only or Push mode), select Enabled. |
-
Click on OK, then on Save.
Configuring Manual mode
In Manual mode, import the configuration components (certification authority, certificate, private key, etc.) that the Stormshield SSL VPN client must use, compiled in an .ovpn file.
Retrieving the SSL VPN configuration (.ovpn file)
The configuration of the Stormshield SSL VPN can be retrieved from:
-
The captive portal of the SNS firewall that hosts the SSL VPN service.
Once you are connected to the corporate network, authenticate at https://firewall_IPaddress/auth, and in the Personal data tab, click on SSL VPN profile for mobile OpenVPN Connect clients (single .ovpn file),
-
The SNS firewall's administration interface.
Go to Configuration > VPN > SSL VPN > Advanced configuration, and click on Export the configuration file.
Adding a connection profile
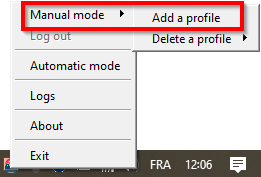
-
Right-click on the
icon in the Windows system tray. -
Click on Manual mode > Add a profile. Automatic mode must be disabled.
-
Select the .ovpn file.
-
Assign a name to the connection profile.
-
Click on OK.