Configuring the VPN client
On the user's Microsoft Windows workstation:, open the connection window of the VPN client:
- Right-click on the icon found in the Windows system tray (hidden icons):

- Select Connection panel.
Configuring Phase 1
- In the VPN configuration tree, right-click on IKEv2.
- Select New IKE auth.
An entry named Ikev2Gateway by default is added to the IKEv2 tree. - Right-click on Ikev2Gateway and select Rename to give this entry the name of your choice (IKEv2GwConfig in the example).
- Click on this entry.
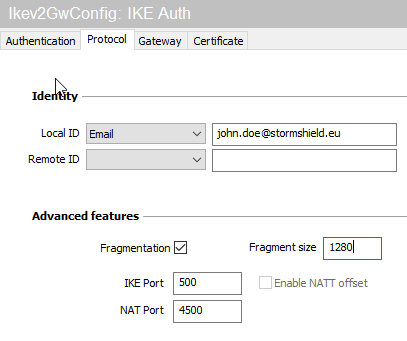
- In the Protocol tab > Identity > Local ID field, select E-mail from the drop-down list and enter the e-mail address of the workstation user.
- In the Protocol tab > Advanced features section, select the Fragmentation checkbox and indicate the size of IKE fragments as defined on the firewall (1280 bytes according to Stormshield’s recommendations).
- In the Authentication tab > Remote router address > Remote router address field, enter the public IP address or FQDN of the firewall with which the VPN client must set up a tunnel.
If you choose to use an FQDN, ensure that the DNS servers on the workstation have resolved it before you set up the tunnel. - In the Authentication tab > Authentication > Preshared key field, enter and confirm the pre-shared key defined for this user on the firewall.

- Click on the upper menu Configuration > Save to save this configuration.
Configuring Phase 2
- In the VPN configuration > IKEv2 tree, right-click on the Phase 1 configuration created earlier (IKEv2GwConfig in the example).
- Select New Child SA.
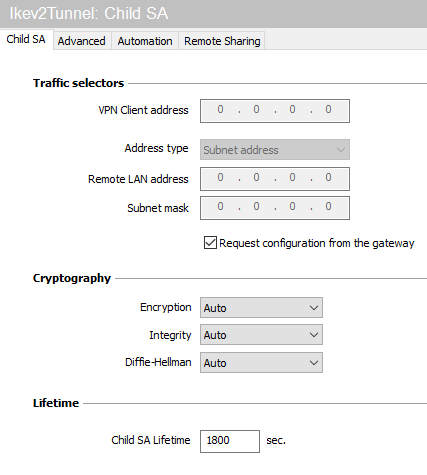
An entry named Ikev2Tunnel by default is added to the selected Phase 1 configuration. - Right-click on Ikev2Tunnel and select Rename to give this entry the name of your choice.
- In the Child SA tab > Traffic selectors section, select Request configuration from the gateway.
- Click on the upper menu Configuration > Save to save this configuration.
The VPN client is now configured to set up an IKEv2 tunnel in Config mode with the firewall.