IMPORTANT
SNS 3.x versions have reached End of Maintenance since July 1st, 2024.
We recommend that you update your SNS firewalls to a version with maintenance to guarantee the protection of your infrastructure.
Configuring the firewall to allow traffic to and from the server
Retrieving the public IP address of the EVA
On the portal's homepage:
- Click on Resource group.
- Select the EVA's resource group (SNS-Documentation in the example).
- Click on the public IP address entry (sns-gateway-public-ip in the example),
- Take note of the public IP address that has been assigned.
- Likewise, take note of the private IP address assigned to the Web-Documentation-Server server (192.168.1.4 in the example).
Configuring the firewall to allow traffic between the Internet and the web server
- In a web browser, log on to the firewall's administration interface at https://firewall_public_ip_address/admin.
- Authenticate with the admin account and password defined during the creation of the EVA.
-
Remember to install your EVA activation kit as soon as possible in order to benefit from all the features you have subscribed with your Stormshield distributor (see EVA Installation Guide: Downloading the activation kit and Activating the virtual firewall).
Creating the necessary network objects
In the Configuration > Objects > Network objects module, create:
- Two network objects. In the example: Private_Net (192.168.1.0/24) and Public_Net (192.168.0.0/24).
- A host object corresponding to the web server (in the example: Web_Documentation_Server - 192.168.1.4).
- A port object for the customized SSH port (in the example: sshwebsrv - 222/TCP).
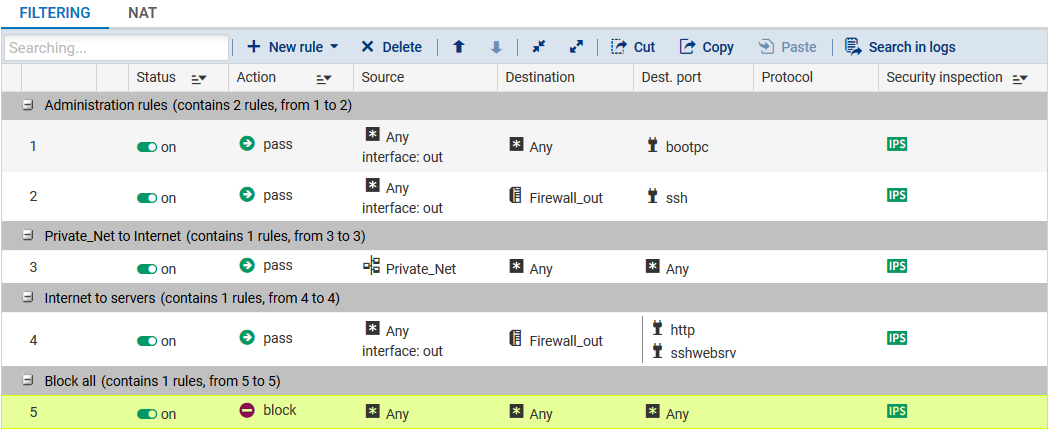
Creating filter rules and updating the security policy
- In the Filtering tab of the Configuration > Security policy > Filter - NAT module, select the the filter policy created by default ((9) Azure default).
- Create a rule that allows hosts hosted on the private network to access all hosts using the following values:
- Action: pass,
- Source: the Private_Net object,
- Destination: the Any object,
- Destination port: the Any object,
- Security inspection: IPS.
- Create a rule that allows all machines to log on to your web server in HTTP and SSH:
- Action: pass,
- Source: the Any object via the out incoming interface,
- Destination: the Firewall_out object,
- Destination port: the http and sshwebsrv objects,
- Security inspection: IPS.
- Using the Up and Down buttons, place these two rules above the block rule. You may also add rule separators to organize your filter policy.
The filter policy will then look like this:
Creating address translation (NAT) rules
- In the NAT tab, create a rule that redirects SSH traffic meant for the firewall's public interface to the web server:
Original traffic (before translation)
- Source: the Any object via the out incoming interface,
- Destination: the Firewall_out object.
- Destination port: the sshwebsrv object,
Traffic after translation
- Source: the Any object,
- Destination: the Web-Documentation-Server object.
- Destination port: the ssh object,
- Create a rule that redirects HTTP traffic meant for the firewall's public interface to the web server:
Original traffic (before translation)
- Source: the Any object via the out interface,
- Destination: the Firewall_out object.
- Destination port: the http object.
Traffic after translation
- Source: the Any object,
- Destination: the Web-Documentation-Server object.
- Destination port: the http object.
- Cthe rule that redirects traffic from hosts in the DMZ to hosts located beyond the firewall:
Original traffic (before translation):
- Source: the Private_Net object,
- Destination: anything that is not the (
 ) Public_Net object and which leaves by the out interface,
 - Destination port: the Any object.
Traffic after translation:
- Source: the Firewall_out object.
- Source port: the ephemeral_fw object.
- Destination: the Any object.
The address translation policy will then look like this:

- Enable the modified security policy by clicking on Save and enable.