Adding, editing or deleting saved connections
This section explains how to add, edit or delete saved connections.
Adding a saved connection
-
Click on the
 button at the top to the right, or on the button Add a connection at the center if there are no existing saved connections.
 -
Choose between Stormshield mode and OpenVPN mode, and fill in the fields. If necessary, refer to the section Description of connection modes and available fields.
- Click on Add.
Editing a saved connection
-
For the saved connection in question, click on the
 button, and on Edit.
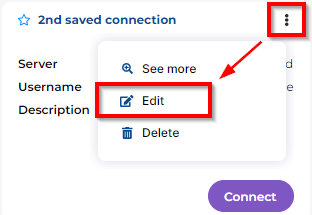
- Edit the information. If necessary, refer to the section Description of connection modes and available fields.
- Click on Edit to save changes.
Description of connection modes and available fields
Connection modes
| Mode | Description |
|---|---|
|
Stormshield mode |
In this mode, the Stormshield SSL VPN client can:
|
|
OpenVPN mode |
This mode makes it possible to import an OpenVPN (OVPN) configuration file provided by the SNS firewall, and to connect to its OpenVPN gateway. |
NOTE
The Stormshield SSL VPN client has been designed to connect to SNS firewalls in version 4 or 5. Methods that involve connecting to another OpenVPN gateway, or importing an OVPN file generated by another OpenVPN gateway, are not officially supported, and may not be guaranteed to function normally.
Available fields with Stormshield mode
| Field/checkbox | Description |
|---|---|
| Name |
Name of the saved connection. This field does not appear in the Direct connection menu. |
| Server | FQDN or IPv4 address of the SNS firewall to contact in order to set up the connection. |
| Port | Server port (443 by default). If the port of the SNS firewall’s captive portal is different from the default port (TCP/443), enter the port used in this field. |
| Description |
Description of the saved connection. This field does not appear in the Direct connection menu. |
| Connect with single sign-on |
Select this checkbox to set up the connection using single sign-on. You will then need to authenticate on a portal, which automatically opens in your web browser to set up the connection. For more information, see the section Setting up a connection using single sign-on. If this option is selected, the User name, Password and Use an OTP fields will be hidden. IMPORTANT
|
| Username |
User name. |
| Save password |
Select the checkbox to save the connection password. When a connection is being modified, if a password has already been saved, unselect the checkbox to stop saving it. |
| Password |
User’s password. Leave this field empty if you are not saving the password, or if you are using an authentication method that does not require a password (e.g., a solution using an application that has been installed on a trusted device, which makes it possible to generate OTPs or approve connection setups). |
| Use an OTP |
Select the checkbox to set up the connection by using an OTP (one-time password), as with the Stormshield TOTP solution. In this case, you will need to enter the OTP in the OTP field. |
| OTP |
This field appears when you are setting up a connection and the Use an OTP checkbox is selected. This field does not appear in the window to add or modify a saved connection. Enter an OTP, or leave the field empty if you are using a solution that approves the setup of a connection (push notification) in an application that is installed on a trusted device. |
| Connect automatically |
Select the checkbox to automatically set up the saved connection when the Stormshield SSL VPN client starts. This option can only be enabled on a single saved connection. It does not appear in the Direct connection menu. Auto login may require a manual operation in some cases. For more information, refer to the section Enabling the auto login option. |
Available fields with OpenVPN mode
| Field | Description |
|---|---|
| Drag & drop/Browse |
OVPN file that you wish to import. To retrieve the OVPN file from the SNS firewall’s SSL VPN service, refer to the section Appendix: Retrieving the SSL VPN configuration (OVPN file). |
| Name |
Name of the saved connection. Special characters cannot be entered when the connection is being added. However, they can be added when the connection is being edited. This field does not appear in the Direct connection menu. |
| Description |
Description of the saved connection. This field does not appear in the Direct connection menu. |
| Username |
User name. |
| Save password |
Select the checkbox to save the connection password. When a connection is being modified, if a password has already been saved, unselect the checkbox to stop saving it. |
| Password |
User’s password. Leave this field empty if you are not saving the password, or if you are using an authentication method that does not require a password (e.g., a solution using an application that has been installed on a trusted device, which makes it possible to generate OTPs or approve connection setups). |
| Use an OTP |
Select the checkbox to set up the connection by using an OTP, as with the Stormshield TOTP solution. In this case, you will need to enter the OTP in the OTP field. |
| OTP |
This field appears when you are setting up a connection and the Use an OTP checkbox is selected. This field does not appear in the window to add or modify a saved connection. Enter an OTP, or leave the field empty if you are using a solution that approves the setup of a connection (push notification) in an application that is installed on a trusted device. |
| Connect automatically |
Select the checkbox to automatically set up the saved connection when the Stormshield SSL VPN client starts. This option can only be enabled on a single saved connection. It does not appear in the Direct connection menu. Auto login may require a manual operation in some cases. For more information, refer to the section Enabling the auto login option. |
Deleting a saved connection
-
For the saved connection in question, click on the
button, and on Delete.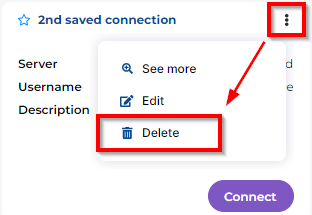
- Click on Delete to confirm.