Configuring the firewall for OIDC/Microsoft Entra ID authentication
Log in to the web administration interface of the firewall.
Setting the firewall FQDN for access to the captive portal
Browsers on client workstations must be able to resolve this FQDN.
In System > Configuration > General configuration tab > Captive portal section:
- In the Redirect to the captive portal field, select the value Specify a domain name (FQDN).
- In the Domain name (FQDN) field, enter the full name of the firewall (example: documentation-firewall.stormshield.eu).IMPORTANT
This FQDN must be identical to the one used when declaring URIs in the Stormshield application defined in the Microsoft Entra ID tenant.
Creating a server identity based on this FQDN
The certificate of this server identity is meant to be used by the firewall's captive portal.
NOTE
In SSL VPN access, it is preferable for the captive portal identity to come from a public CA, as it is already integrated into browsers.
In Objects > Certificates and PKI:
- Click on Add, then select Server identity.
- In the Fully Qualified Domain Name (FQDN) field, enter the FQDN specified in step Setting the firewall FQDN for access to the captive portal (e.g., documentation-firewall.stormshield.eu).
- The ID suggested by default for this identity corresponds to the FQDN defined in step 2.
This name can be changed. - Click on Next.
- Select the Parent authority that signs this identity, and enter the password for this CA.
This identity must be known to the browsers used for authentication. - Click on Next.
- Change the Validity (days), Key type and Key size (bits)fields if necessary.
The default values are those relating to the parent CA. - Click on Next.
- Aliases can be added to this identity.
- Click on Next.
You will be shown a summary of this identity's properties. - Confirm these properties by clicking on Finish.
Enabling the OIDC/Microsoft Entra ID authentication method
In Users > Authentication > Available methods tab:
- Click on Enable a method.
- Select OIDC/Microsoft Entra ID.
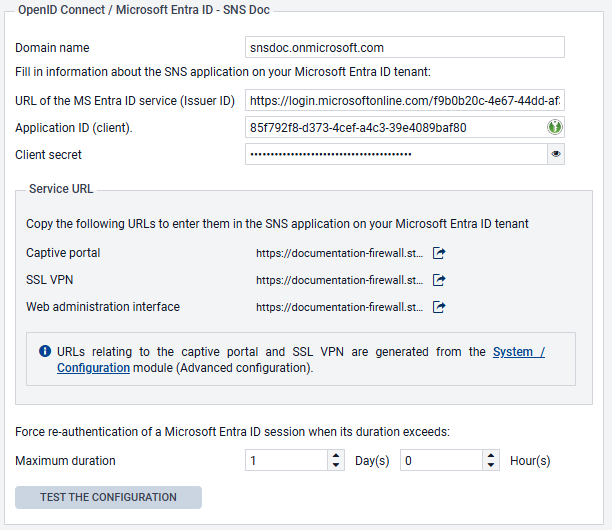
A configuration wizard will automatically launch: - Domain name: indicate the main domain name retrieved from your Microsoft Entra ID administration center (e.g., snsdoc.onmicrosoft.com).
- Tenant ID: enter the ID retrieved from your Microsoft Entra ID administration center in this field.
- Application ID (client): enter the value retrieved from your Microsoft Entra ID administration center in this field.
- Client secret: enter the value retrieved and saved when Creating a secret for the application during the creation of the SNS application on your Microsoft Entra ID tenant. If you did not save this value, you need to delete the Client secret that was created earlier for your application, and generate a new one, by following the procedure described in this step.
- Change the Authentication duration if necessary. This is how long an authenticated Microsoft Entra ID user will stay connected before needing to enter their login details again. The default setting is 1 day.
- Click on Next.
The wizard suggests URLs that correspond to the captive portal service, the SSL VPN service, and access to the firewall’s web administration interface. These URLs can be copied directly from this wizard to be entered as redirect URLs in your Microsoft Entra ID administration center if necessary.
They are also available in the OIDC/Microsoft Entra IDmethod editing panel. - If you do not wish to import user groups in the next step of the wizard, select the Skip group import checkbox and go directly to step 15 of this procedure.
- Click on Next.
- Select the CSV file containing the groups in your Microsoft Entra ID tenant, which was downloaded when Downloading user groups to import them into the SNS firewall, then click on Next. A summary of the group import operation then appears.
- Click on Next.
Configuring the firewall for OIDC/ authentication If an error is detected, click on Fix: you will be redirected to the configuration step in which the error was detected. - Fix the error and click on Next several times to return to the configuration verification step.
- Confirm your configuration by clicking on Finish.
You will be redirected to the OIDC/Microsoft Entra ID authentication method editing panel. - Click on Apply to save the configuration of the Microsoft Entra ID authentication method on the firewall.
In this example, the configuration of the OIDC/Microsoft Entra ID method on the firewall will therefore resemble the following:
Creating the authentication rule
Go to Configuration > Users > Authentication> Authentication policy tab:
- Click on New rule and select Standard rule.
- Select All users in the Users menu.
Permissions to connect to the captive portal, web administration interface or SSL VPN by authenticating through Microsoft Entra ID will be granted according to the privileges set in the tenant. - In the Sources menu: add the network interfaces through which users authenticated by Microsoft Entra ID will be presenting on the firewall. In this example, the following interfaces are used:
- in: interface to access the internal captive portal to authenticate administrators via the web administration interface,
- out: interface to access the external captive portal that SSL VPN clients use for retrieving their configuration files and setting up tunnels,
- sslvpn: interface used by SSL VPN clients to access the firewall's SSL VPN service when the tunnel is set up.
- In the Authentication methods menu: click on Enable a method and select the OIDC method.
- Likewise, add the other authentication methods for your users (e.g,: LDAP).
- Confirm this authentication rule by clicking on OK.
The rule will be added to the authentication policy but will not be enabled by default. - In the authentication rule grid, double click on the status of the rule to enable it.
The authentication rule will then look like this:

NOTE
During an authentication, rules are scanned in order of their appearance in the list.
As such, ensure that you organize them using the Up and Down buttons when necessary, as well as the associated actions (Allow/Block).
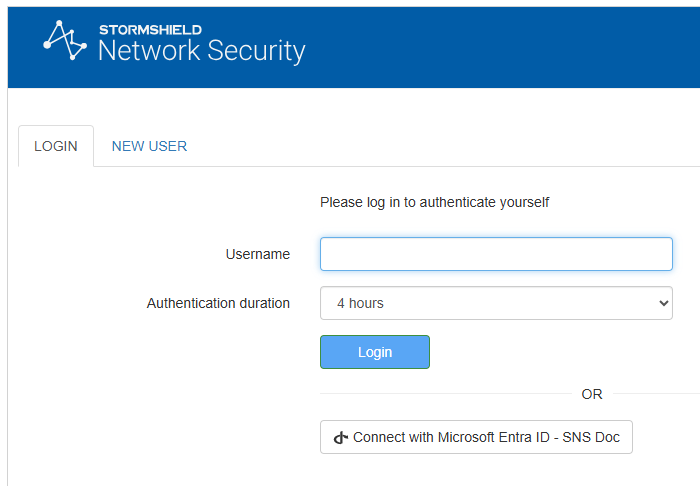
The firewall's captive portal will now offer Microsoft Entra ID authentication:
Configuring the captive portal
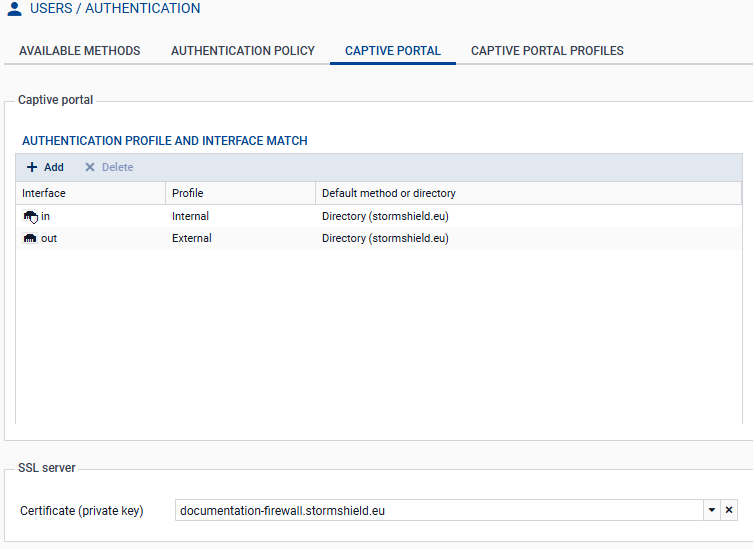
In Configuration > Users > Authentication > Captive portal tab:
- Add the in and out interfaces to respectively associate them with the Internal and External profiles of the captive portal.
- Select the server identity certificate based on the firewall’s FQDN.
The captive portal configuration will then look like this:
Viewing/importing Microsoft Entra ID security groups
Go to Configuration > Users > Users and Groups > Microsoft Entra ID tab.
The list of imported Microsoft Entra ID groups and their group IDs are displayed in the grid.
When you add or edit groups in your Microsoft Entra ID administration center, you can import these groups into this module by using the Import groups button, and selecting the CSV file that was exported from your Microsoft Entra ID tenant when Downloading user groups to import them into the SNS firewall.
NOTE
If custom groups were added through this module, they will not be overwritten when a CSV file is imported. If an imported group has the same name as a custom group, they will be differentiated by their unique identifiers (UIDs), and can coexist in the configuration.
Creating or editing application roles on the firewall (optional)
To use application roles to manage user permissions, these roles must have identical configurations on the firewall and in the Microsoft Entra ID tenant application.
Go to Users > Users > Microsoft Entra ID tab.
Creating an application role
-
Click on Add, then on Application role.
- Fill in the following fields:
- The Application role name (any text).
- The Application role UID, which has to use syntax in Actions.Permissions format (e.g., SNS.Config.All.Write, SNS.Config.All.Read).
- The optional Description (any text).
IMPORTANT
The role UID must be unique on the firewall, and identical to the UID of the corresponding application role that was created in your Microsoft Entra IDtenant.
- Click on Apply to confirm the creation of the role.
- Click on Apply to save changes to the configuration.
Editing an application role
- Select the role to edit, and click on Edit.
- Change the following parameters according to your requirements:
- The Application role name (any text).
- The Application role UID, which has to use syntax in Actions.Permissions format (e.g., SNS.Config.All.Write, SNS.Config.All.Read).
- The optional Description (any text).
IMPORTANT
The role UID must be unique on the firewall, and identical to the UID of the corresponding application role that was created in your Microsoft Entra IDtenant.
- Click on Apply to confirm the creation of the role.
- Click on Apply to save changes to the configuration.
Allowing SSL VPN for users authenticated through Microsoft Entra ID
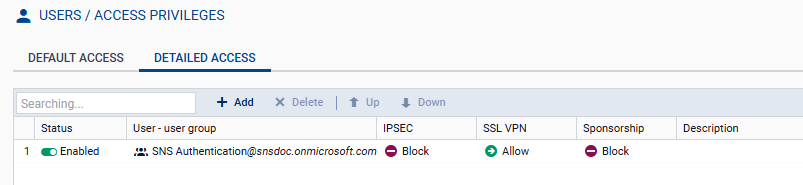
In Configuration > Users > Access privileges > Detailed access tab:
- Click on Add.
- Enable Microsoft Entra ID and select a group that has been imported from Microsoft Entra ID, a custom group or an application role.
- Click on Apply.
A rule is added to the grid. - Click in the SSL VPN column of this rule and select Allow.
- Double-click in the Status column of this rule to enable it.
- Click on Apply, then Save to confirm changes to the configuration.
Allowing administrators authenticated through Microsoft Entra ID to access the web administration interface
In System > Administrators:
- Click on Add an administrator.
- Select the type of permissions to be granted to the administrator group.
- Click on Microsoft Entra ID, then select a security group that was imported from Microsoft Entra ID, a custom security group or an application role.
- Confirm your selection by clicking on Apply.
- Click on Apply to confirm changes to the configuration.
