Updating BIOS and the Intel Management Engine firmware
This section sets out the steps to follow in order to update BIOS on SN1100 model firewalls to version R1.03 in console mode from a USB drive.
Connecting devices to SNS firewalls
-
Connect the computer to the SNS firewall using a USB-A to USB-C cable (SNS firewall side) or an RJ45 to DB9 serial cable (RS232). The connection to a USB-C port on the firewall side requires the installation of the PL23XX USB-to-Serial driver.
- or -
- Connect a USB keyboard and a monitor to the SNS firewall using an HDMI cable.
|
|
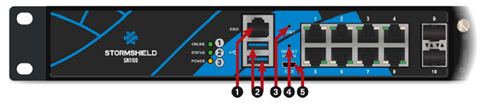
1: RJ45 serial port in console mode 2: USB 3.0 port 3: Reset button 4: Button to reset the appliance to its factory settings (defaultconfig). 5: Micro USB serial port in console mode |

|
|
1: HDMI port: for plugging in the monitor 2: USB 3.0 port 3: On/Off button 4: Mains socket 5: Alarm OFF button |
Checking the current BIOS version
- Log in to the SNS firewall system in console or SSH mode.
- Authenticate by using the admin account on the SNS firewall system.
-
Enter the command:
dmidecode -s bios-version
The SNS firewall should show version R1.00 or R1.01.
NOTE
You can also display the BIOS version by pressing [Del] several times during the firewall startup. Go to the MAIN menu > locate the BIOS Version line; the BIOS version installed on the firewall appears.
Disabling Secure Boot
The update procedure requires Secure Boot to be disabled so that the SNS firewall can start up on the USB drive that was prepared earlier .
To disable Secure Boot, refer to the technical note Managing Secure Boot in SNS firewalls' UEFI.
Updating BIOS and the Intel Management Engine firmware
IMPORTANT
The update process is automatic and lasts around five minutes. Once the process is run, it must never be interrupted, and the SNS firewall must not be disconnected from the power supply. If this occurs, the SNS firewall will be completely unable to run.
-
Ensure that you have plugged the SN1100 firewall into the electrical grid. If your firewall has an additional redundant power supply module (optional), ensure that you have plugged in both power supply modules.
- Insert the USB drive that was prepared earlier into a USB port.
-
Restart the SNS firewall by using the command:
reboot
The update process will then start:
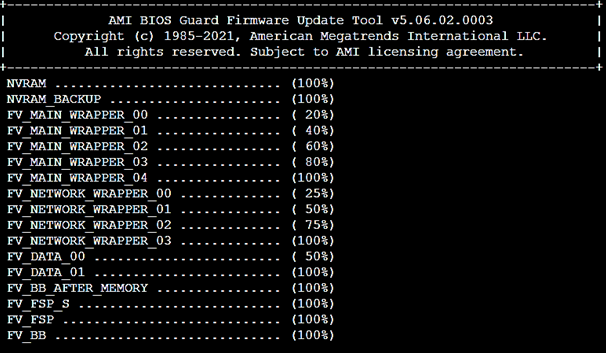
During the update, the SNS firewall will restart several times, which is normal.
-
Wait for the update to end. When the update process is complete, the SNS firewall will shut down.
-
Unplug the USB drive from the SNS firewall.
Checking the BIOS and Intel Management Engine firmware versions after the update
- Restart the SNS firewall. Once the SNS firewall starts up, press [Del] several times to stop its startup sequence, and access BIOS.
- Go to the Main tab and check the the BIOS version:
- BIOS Version field: the version that appears should be R1.03.
- Go to the Advanced > PCH-FW Configuration tab and check the version of the Intel Management Engine:
- ME Firmware Version field: the version that appears should be 14.1.74.2355.
- Quit BIOS.
Required operations following an update
Once you have updated BIOS, launch the following operations, in this order.
Configuring the password to access the UEFI control panel
If you had set a password to access the UEFI control panel, this password will be deleted. To set a new password, refer to the technical note Protecting access to the configuration panel of the UEFI on SNS firewalls.
Enabling Secure Boot
This feature is disabled by default on SN1100 firewalls. If it had been enabled on your firewall, you need to enable Secure Boot again by referring to the technical note Managing Secure Boot in SNS firewalls' UEFI.
Resealing the TPM
If you had initialized the TPM, the features that use certificates with TPM-protected private keys (VPN, SNS firewall managed by an SMC server, etc.) will no longer function. To restore the features in question, follow one of the procedures below to reseal the TPM.
From the web administration interface
This use case is exclusive to SNS 4.8.7 and higher versions. For earlier SNS versions, you must perform this operation from the CLI console.
-
Log in to the SNS firewall web administration interface. A window prompts you to seal the TPM module of the SNS firewall.
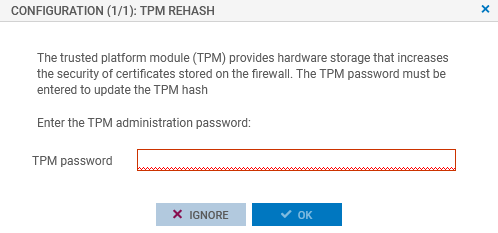
- Enter the TPM module administration password in the relevant field.
- Click on OK.
- If the SNS firewall is part of a high availability cluster, a second window prompts you to seal the TPM module of the passive firewall. Enter the TPM module administration password and click on OK.
From the CLI console
Seal the TPM on the SNS firewall with the command:
SYSTEM TPM PCRSEAL tpmpassword=<password>
Replace <password> with the TPM module administration password.
If the SNS firewall is part of a high availability cluster, seal the TPM on the passive firewall with the command:
SYSTEM TPM PCRSEAL tpmpassword=<password> serial=passive