Updating BIOS from the web administration interface
This section describes the procedure of updating BIOS on an SN-M-Series-520 firewall from version R1.04 to version R1.05. This particular update can only be performed from the SNS firewall's web administration interface.
Required equipment
-
A computer with access to the SN-M-Series-520 firewall's web administration interface from a compatible web browser.
Important information regarding certain SNS firewall features
-
TPM: if you had initialized the TPM, the features that use certificates with TPM-protected private keys (VPN, SNS firewall managed by an SMC server, etc.) will no longer function. Reseal the TPM to restore the features in question.
This procedure is described in the section Required operation following an update.
Downloading the BIOS update file
- In your Mystormshield area, go to Downloads > STORMSHIELD NETWORK SECURITY > TOOLS > STORMSHIELD NETWORK SECURITY - TOOLS.
- Download the .maj file SN520_BIOS_R105_remote_update by clicking on its name.
-
Verify the integrity of the downloaded file using its SHA256 hash:
2184c8787c78e87e00e021a0f4ed6985930ba8670a8b6ee769e8f09a85f1633d
The downloaded .maj file contains the BIOS update and Intel Management Engine firmware.
Updating BIOS and the Intel Management Engine firmware
Checking the current BIOS version
As of SNS versions 4.8.13 LTSB and 4.3.41 LTSB, the BIOS version can be checked in the CLI console:
- In the SNS firewall's web administration interface, go to Configuration > System > CLI console.
-
Enter the command:
SYSTEM PROPERTY
The BIOSVersion configuration token should show version R1.04.
In earlier SNS versions, the version has to be checked in the console or SSH:
- Log in to the SNS firewall system in console or SSH mode.
- Authenticate by using the admin account on the SNS firewall system.
-
Enter the command:
dmidecode -s bios-version
The SNS firewall should show version R1.04.
Updating BIOS and the Intel Management Engine firmware
IMPORTANT
The update process is automatic and lasts around five minutes. Once the process is run, it must never be interrupted, and the SNS firewall must not be disconnected from the power supply. If this occurs, the SNS firewall will be completely unable to run.
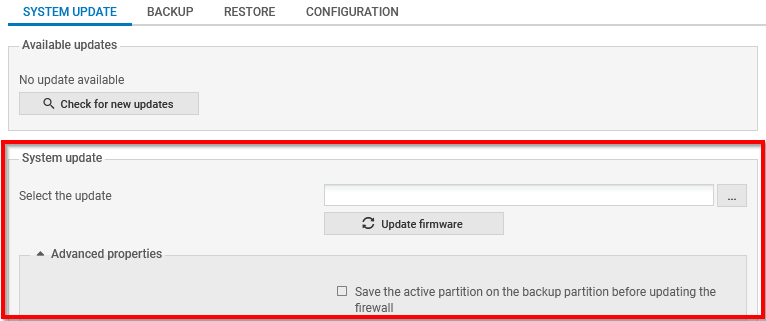
- In the SNS firewall's web administration interface, go to Configuration > System > Maintenance, System update tab.
- Select the update file (.maj) that was downloaded earlier.
- Expand the Advanced properties section, and unselect Save the active partition on the backup partition before updating the firewall.
-
Click on Update firmware.
-
Wait while the update proceeds. A pop-up window indicates the progress of the update. During the update, the SNS firewall will restart several times, which is normal.

By going back to the page to connect to the firewall's web administration interface, the SNS firewall will indicate that the update is complete.
Required operation following an update
Resealing the TPM
If you had initialized the TPM, the features that use certificates with TPM-protected private keys (VPN, SNS firewall managed by an SMC server, etc.) will no longer function. To restore the features in question, follow one of the procedures below to reseal the TPM.
From the web administration interface
This use case is exclusive to SNS 4.8.7 and higher versions. For earlier SNS versions, you must perform this operation from the CLI console.
-
Log in to the SNS firewall web administration interface. A window prompts you to seal the TPM module of the SNS firewall.
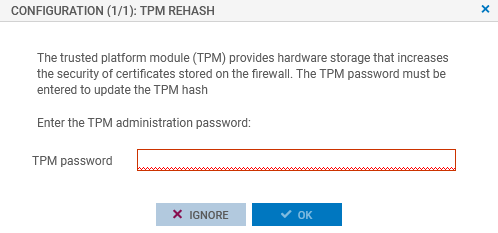
- Enter the TPM module administration password in the relevant field.
- Click on OK.
- If the SNS firewall is part of a high availability cluster, a second window prompts you to seal the TPM module of the passive firewall. Enter the TPM module administration password and click on OK.
From the CLI console
Seal the TPM on the SNS firewall with the command:
SYSTEM TPM PCRSEAL tpmpassword=<password>
Replace <password> with the TPM module administration password.
If the SNS firewall is part of a high availability cluster, seal the TPM on the passive firewall with the command:
SYSTEM TPM PCRSEAL tpmpassword=<password> serial=passive