Importing and exporting the VPN configuration
Importing a VPN configuration
SN VPN Client Exclusive allows you to import a VPN configuration in various ways:
-
From the Configuration menu in the Configuration Panel (main interface), choose Import
-
From the command line, use the /import option.
The use of command-line options within the software is covered in the “Deployment Guide”. In particular, it details all the options available for importing a VPN configuration: /import, /add, /replace or /importonce.
NOTE
SN VPN Client Exclusive can check the integrity of the VPN configuration file (see the MSI property SIGNFILE in the “Deployment Guide”). In this case, a signature is generated during export and the integrity of the file is checked during import.
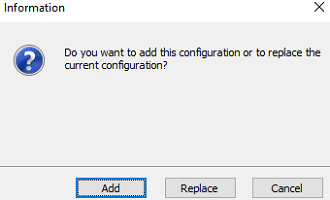
When importing a VPN configuration, users are prompted to specify whether they want to add the new VPN configuration to the current one or replace (overwrite) the current configuration with the new one:
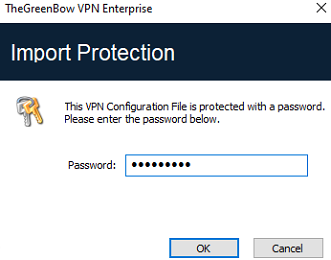
If the imported VPN configuration has been exported with a password protection (see section Exporting a VPN configuration below), users will have to provide the password.
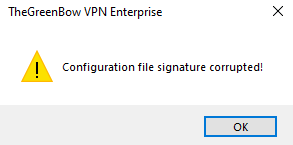
If the VPN configuration is exported with an integrity check (see section Exporting a VPN configuration below) and it has been corrupted, a warning will be displayed to the user and the software will not import the configuration.
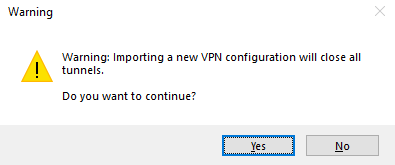
If one or several tunnels are open when importing, the following information window will be displayed to let you know that the import will close all open tunnels:
Once this message has been confirmed and the import has been completed, you will need to reopen the tunnels.
NOTE
If some of the VPN tunnels added have the same name as certain tunnels in the current configuration, they are automatically renamed during import (an increment will be added between brackets).
Exporting a VPN configuration
SN VPN Client Exclusive allows you to export a VPN configuration in various ways:
-
From the Configuration menu, choose Export: the complete VPN configuration is exported.
-
From the contextual menu at the root of the VPN configuration tree, choose Export: the complete VPN configuration is exported.
-
From the contextual menu associated with an IKE Auth, choose Export: the entire IKE Auth (including all Child SAs it contains) is exported.
-
From the contextual menu associated with a Child SA, choose Export: the Child SA is exported along with the IKE Auth with which it is associated.
-
From the contextual menu associated with a TLS, choose Export: the TLS is exported.
-
Using the /export option in the command line.
The use of command-line options within the software is covered in the “Deployment Guide”. In particular, it details all the options available for exporting a VPN configuration: /export or /exportonce. Regardless of the method used, the export starts with the choice of protection for the exported VPN configuration: it can be exported with (encryption) or without (clear text) password protection. If a password has been set, users will be required to enter it when importing.
NOTE
By default, the extension of exported VPN configuration files is .tgb.
NOTE
Whether it is exported with or without encryption, the exported VPN configuration can benefit from integrity protection.
Protecting the integrity of a VPN configuration when it is exported is a feature that can be enabled using an MSI installer property. This function is covered in the “Deployment Guide”.
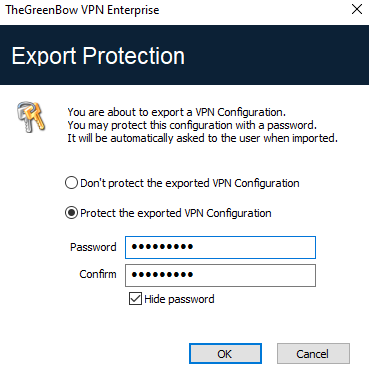
We recommend that you always export VPN configurations with a password protection (encrypted).
NOTE
As of version 7.3, the password must follow ANSSI recommendations, i.e. be at least 16 characters in length and use a 90-character alphabet, including at least one uppercase character, one lowercase character, and one special character.
If an exported VPN configuration is integrity-protected, but is corrupted subsequently, a warning will be displayed to the user during the import and the software will not import the configuration (see section Importing a VPN configuration above).
Merging VPN configurations
Several configurations can be merged by successively importing all VPN configurations and choosing Add each time (see section Importing a VPN configuration above).
Splitting a VPN configuration
Using the various export options available (exporting an IKE Auth/TLS with all the corresponding Child SAs/TLSs or exporting a single tunnel), a VPN configuration can be split into as many “sub-configurations” as desired (see section Exporting a VPN configuration above).
This method can be used to deploy the configurations for a pool of workstations: derive the VPN configurations for each individual workstation from a common VPN configuration prior to sending them to each user for import.