Managing the TPM on SNS firewalls
This section explains how to check the status of the TPM, change its administration password, seal it, and disable it.
Checking the status of the TPM
From the web administration interface
This use case is exclusive to SNS 4.8.7 and higher versions.
-
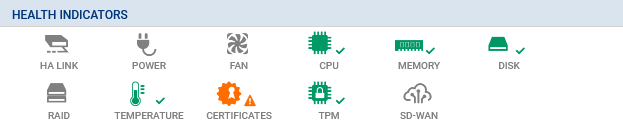
Go to Monitoring > Dashboard, in the Health indicators widget.
-
Check the color of the TPM health indicator icon to find out its status.
| Icon | Description |
|---|---|
| None |
The SNS firewall is not equipped with a TPM. |

|
The SNS firewall is equipped with a TPM, but it has not been initialized. |

|
The TPM is initialized, running and protects at least one private key. |

|
There are several possible statuses:
|

|
There are several possible statuses:
|
From the CLI console
-
Show TPM monitoring information with the command:
MONITOR TPM
-
Check the result.
| Token | Values/Description |
|---|---|
| ondisk_init |
NOTE
|
| secure_boot_enabled |
|
| ondisk_pkeys_present |
|
| pcr_access_status |
|
| message | Specify information on the status of the TPM if necessary. |
Changing the TPM administration password
From a CLI console, change the TPM administration password using the command:
SYSTEM TPM CHANGE currentpassword=<password> newpassword=<new_password>
- Replace
<password>with the current TPM password, -
Replace
<new_password>with the new TPM password, by following the recommendations in the section TPM administration password.
If you have forgotten the TPM password, refer to the section Troubleshooting.
Sealing the TPM
The TPM has to be sealed in the following cases:
- When the TPM can no longer be accessed,
- When a new TPM sealing policy is available and you wish to apply it.
The status of the TPM is key to identifying whether the TPM needs to be resealed. When the TPM is sealed, PCR hash values are recalculated.
From the web administration interface
This use case is exclusive to SNS 4.8.7 and higher versions.
IMPORTANT
As a reminder, the integrity of the SNS firewall and its TPM will be compromised if Secure Boot is not enabled. As such, you are advised to enable it before resealing the TPM.
-
Log in to the SNS firewall web administration interface.
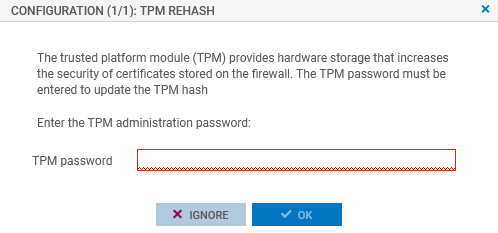
A window automatically appears when the TPM needs to be sealed. In a high availability configuration, a window also appears if the TPM on the passive firewall needs to be sealed. If both members of the cluster are concerned, two windows will appear one after the other.
-
Enter the TPM password in the relevant field.
-
Click on OK.
From the CLI console
-
Seal the TPM on the SNS firewall with the command:
SYSTEM TPM PCRSEAL tpmpassword=<password>
Replace <password> with the TPM password.
-
If the SNS firewall is part of a high availability cluster, seal the TPM on the passive firewall with the command:
SYSTEM TPM PCRSEAL tpmpassword=<password> serial=passive
From the SSH console
SSH access must be allowed on the firewall. Only the admin account can perform this operation.
Seal the TPM on the SNS firewall with the command:
tpmctl -svp <tpmpassword>
Replace <password> with the TPM password.
Disabling the TPM
From a CLI console, disable the TPM using the command:
SYSTEM TPM RESET tpmpassword=<password> force=<on|off>
- Replace <password> with the TPM password,
- Enter force=on if private keys in certificates are protected by the TPM, and you wish to disable it by force anyway. The protected private keys will then be decrypted.