Settings for Firewall FW1
Even though the firewall performs routing in the filter policy (Policy Based Routing) in this configuration, a default route or an explicit static route to the remote network needsto be defined.
The first action that the firewall performs is indeed to check that it has a route to the remote site before looking up its filter policy. The absence of a route will result in packets being rejected.
Create 4 routes that allow transporting return packets to the original firewall using its source MAC address:
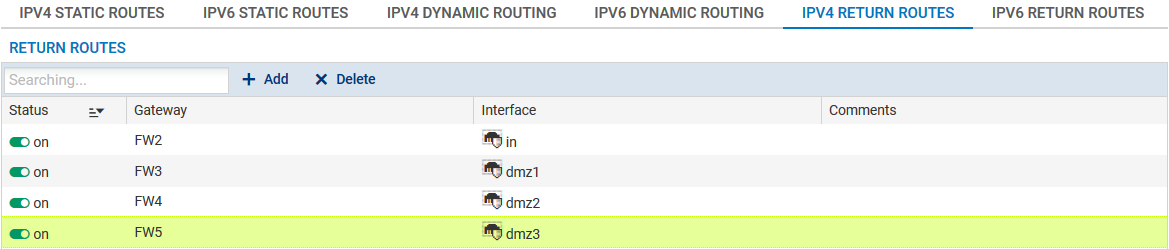
Return route to firewall FW2
In the Return routes tab in the Configuration > Network > Routing menu, click on Add and fill in the mandatory fields:
- Gateway: create (
 icon) the network object corresponding to firewall 2 on the site (FW2 in the example),
NOTE
The MAC address of firewall FW2 must be declared in this network object.
- Interface: select the interface on firewall FW1 through which return packets will be transported to firewall FW2 ("In" interface in the example).
Enable the route by double-clicking in the Status column.
Return route to firewall FW3
- Gateway: create the network object corresponding to firewall 3 on the site (FW3 in the example),
NOTE
The MAC address of firewall FW3 must be declared in this network object
- Interface: select the interface on firewall FW1 through which return packets will be transported to firewall FW3 ("dmz1" interface in the example).
Enable the route by double-clicking in the Status column.
Return route to firewall FW4
- Gateway: create the network object corresponding to firewall 4 on the site (FW4 in the example),
NOTE
The MAC address of firewall FW4 must be declared in this network object.
- Interface: select the interface on firewall FW1 through which return packets will be transported to firewall FW4 ("dmz2" interface in the example).
Enable the route by double-clicking in the Status column.
Return route to firewall FW5
- Gateway: create the network object corresponding to firewall 5 on the site (FW5 in the example),
NOTE
The MAC address of firewall FW5 must be declared in this network object.
- Interface: select the interface on firewall FW1 through which return packets will be transported to firewall FW5 ("dmz3" interface in the example).
Enable the route by double-clicking in the Status column.
Packets going to two firewalls on which the HTTP proxy has been enabled will be balanced on a router object made up of firewalls FW3 and FW4.
- In the Configuration > Objects > Network objects menu, click on Add and choose Router.
- Enter a name for this object (HTTP_Proxy_LB in the example).
- In the Gateways used tab, click on Add and select firewall 3 on the site (FW3). Leave the value Test the gateway directly for the column Device(s) for testing availability. Likewise, leave the value 1 in the Weight column.
- Repeat this operation to add gateway FW4:
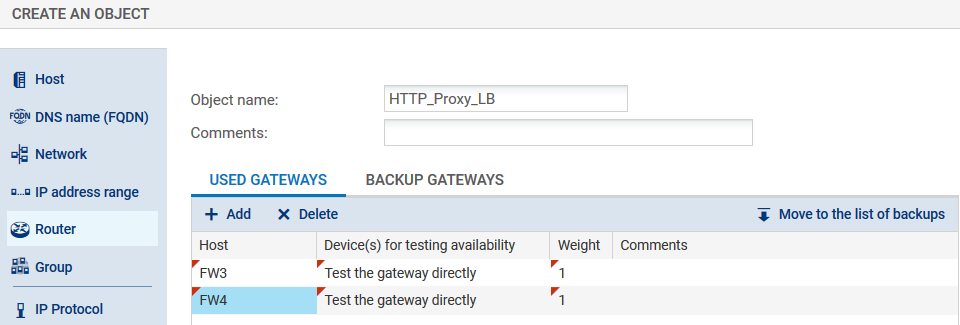
- In the Advanced properties panel, check that the various fields have been entered with the following values:
- Load balancing: By connection (each new HTTP connection will be sent to one of the gateways declared based on round robin scheduling),
- Enable backup gateways: When all gateways cannot be reached,
- Enable all backup gateways when unavailable: unselected
- If no gateways are available: Default route.
- Confirm the creation of the router object by clicking on Create.
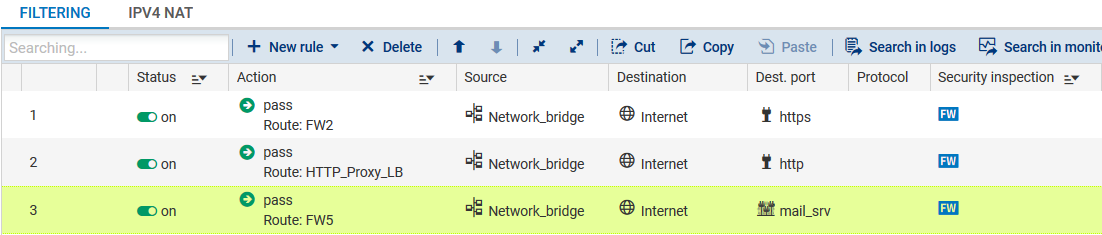
In order for traffic (HTTP, SSL, IMAP and POP3) to be directed to firewalls on which the right proxy has been enabled, create three filter rules (Configuration > Security policy > Filter and NAT menu) including a routing directive:
- HTTPS to firewall FW2 in order to request action from its SSL proxy,
- HTTP to the object HTTP_Proxy_LB in order to balance the load between the HTTP proxies on firewalls FW3 and FW4,
- SMTP/POP3/IMAP to firewall FW5 in order to request action from its SMTP proxy,
Since security inspections are conducted on firewalls that have enabled various proxies, security rules on firewall FW1 may be in Firewall mode.
HTTPS traffic
Action column
- Action: set the action to Pass,
- Gateway - router: select the object corresponding to the firewall that has enabled the SSL proxy (FW2 in the example).
Source column
- Source hosts: select the network at the source of the HTTPS traffic (Network_bridge in the example).
Destination column
- Destination hosts: select the Internet object.
Dest. port column
- Destination port: select the https object.
Security inspection column
- Inspection level: select the Firewall mode.
HTTP traffic
Action column
- Action: set the action to Pass,
- Gateway - router: select the router object made up of firewalls FW3 and FW4 which have enabled the HTTP proxy (HTTP_Proxy_LB in the example).
Source column
- Source hosts: select the network at the source of the HTTP traffic (Network_bridge in the example).
Destination column
- Destination hosts: select the Internet object.
Dest. port column
- Destination port: select the http object.
Security inspection column
- Inspection level: select the Firewall mode.
SMTP/IMAP/POP traffic
Action column
- Action: set the action to Pass,
- Gateway - router: select the object corresponding to the firewall that has enabled the SMTP proxy (FW5 in the example).
Source column
- Source hosts: select the network at the source of the mail traffic (Network_bridge in the example).
Destination column
- Destination hosts: select the Internet object.
Dest. port column
- Destination port: select the object mail_srv (this object covers SMTP, IMAP and POP3).
Security inspection column
- Inspection level: select the Firewall mode.
The filter policy will then look like this: