Windows
Low level formatting the USB drive
The USB drive must be low level formatted. The larger the USB drive used, the longer it takes to low level format it. Reminder: Stormshield recommends using 8 GB USB drives or larger.
- Install a low level formatting program such as Hard Disk Low level format tool or Rufus.
- Low level format the USB drive.
IMPORTANT
Do not select Quick formatting.
Installing Win32DiskImager
- Unzip the Win32DiskImager.zip archive.
- Double-click on the file "Win32DiskImager.exe" to run the application.
- The Win32DiskImager tool opens in English.
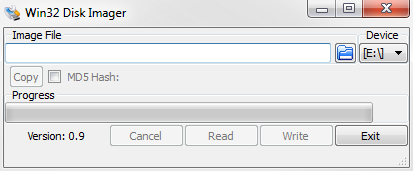
Copying files with Win32DiskImager
Step 1: select the file to be copied
When you click on the  button, a file explorer will open, allowing you to select the disk image. The full path to this file will appear.
The name of the file matches the serial number of the product to be restored (e.g.: usb-recovery-sn3kxa94f0035a8.img)
Step 2: select the destination USB drive
The tool will list all the USB drives connected to the PC in the Device drop-down list.
If the field is empty, this means that the program did not detect any valid USB drives. Check that your USB drive has been correctly plugged in and that it is not being used by another program, or replace it with another USB drive.
You must select the destination disk from the ones that have been detected. Determine the letter that identifies the USB drive (for example "F:/" or "E:/"). To find out which identifier corresponds to the USB drive you wish to use from the list of connected drives, unplug it and take note of those displayed by the program. Then plug it back in and see which identifier appears.
IMPORTANT
When files are copied, all data on the USB drive will be erased, so ensure that you have the right identifier.
Step 3: start copying
- Click on the Write button to start copying on the selected USB drive. If the button remains grayed out, check the source disk image (Step 1) as well as the destination USB drive (Step 2).
- A window will open indicating that the copy operation will erase all data on the USB drive. Click on Yes to start copying.
- A progress bar will show you the status of the copy.
- Another window will then inform you that the files were copied successfully.
The USB drive is now ready to use; unplug it.
Continue to the section Cabling SNS firewalls and booting on a USB drive.