Creating filter and NAT rules
The SNS firewall's security policy has to be configured.
Go to Configuration > Security policy > Filter - NAT.
Configuring the filter policy
In the Filtering tab, set the rules that make it possible to grant or deny SSL VPN client access to the company's internal resources.
When ZTNA is used, you will need to set up granular filtering to restrict users' access to only what is necessary.
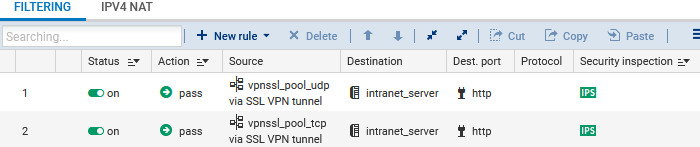
In the example below, we are adding two rules to allow all user connections from UDP and TCP SSL VPN clients to an HTTP intranet. For greater security, you can set specific rules for different user groups (User field).
Do note that rules will be scanned in the order of their appearance in the list. You can also use advanced filter functions (inspection profiles, application proxies, antivirus scans, etc.).
To add rules:
-
Click on New rule > Single rule, and double-click on the number of the rule to edit it; a new window will open.
-
In the General tab, Status field, select On.
-
In the Action tab, Action field, select pass.
-
In the Source tab:
-
In the General tab, Source hosts field, select the object that represents the IP addresses of UDP SSL VPN clients,
-
In the Advanced properties sub-tab, Via field, select SSL VPN tunnel.
-
-
In the Destination tab, Destination hosts field, select the object that represents the internal server or the intranet.
-
In the Port - Protocol tab, Destination port field, select https.
-
Click on OK.
For the second rule, in the Source tab, General sub-tab, Source hosts field, select the object that represents the IP addresses of TCP SSL VPN clients.
Configuring the NAT policy
In the NAT or IPv4 NAT tab, if UDP and TCP SSL VPN clients must access the Internet, you will need to set up a network address translation (NAT) rule.
-
Click on New rule > Source address sharing rule (masquerading), and double-click on the number of the rule to edit it; a new window will open.
-
In the General tab, Status field, select On.
-
In the Original source tab:
-
Source hosts field, select the objects that represent the IP addresses of UDP and TCP SSL VPN clients,
-
Incoming interface field, select SSL VPN.
-
-
In the Original destination tab, Destination hosts field, select Internet.
-
In the Translated source tab, Translated source host field, select the object that represents the public IP address.
-
In the Translated source port field, select the option Choose random translated source port.
-
Click on OK.
