Configuring filter rules on the firewall
To define the various filter rules needed:
- Go to the menu Configuration > Security policy > Filter - NAT > Filtering tab.
- Select the desired security policy using the drop-down list.
- Click on New rule.
- Select Single rule.
- Double-click on the newly added rule.
- In the General menu, set the Status to On.
- In the Action menu > General tab, set the Action to pass.
You can also select the value Log (filter log) for the Log level field. - In the Source menu > General tab, click on Add and select the network object App-Tier.
- Repeat the operation to add the objects Web-Tier and DB-Tier.
- For the Incoming interface field, select the transit interface.
- In the Destination menu > Advanced properties tab, select the out interface as the Outgoing interface.
- Validate the rule by clicking on OK.
- Click on New rule.
- Select Single rule.
- Double-click on the newly added rule.
- In the General menu, set the Status to On.
- In the Action menu > General tab, set the Action to pass.
You can also select the value Log (filter log) for the Log level field. - In the Source menu > General tab, select the out interface as the Incoming interface.
- In the Destination menu > General tab, click on Add and select the network object Web-NAT.
- In the Port / Protocol menu > under Port, click on Add and select the http object.
- Repeat the operation to add the https object.
- Validate the rule by clicking on OK.
- Click on New rule.
- Select Single rule.
- Double-click on the newly added rule.
- In the General menu, set the Status to On.
- Validate the rule by clicking on OK.
The newly added rule will therefore block all other traffic.
Ensure that this rule is the last in your filter policy (where necessary, you can select it and move it using the Up and Down buttons.
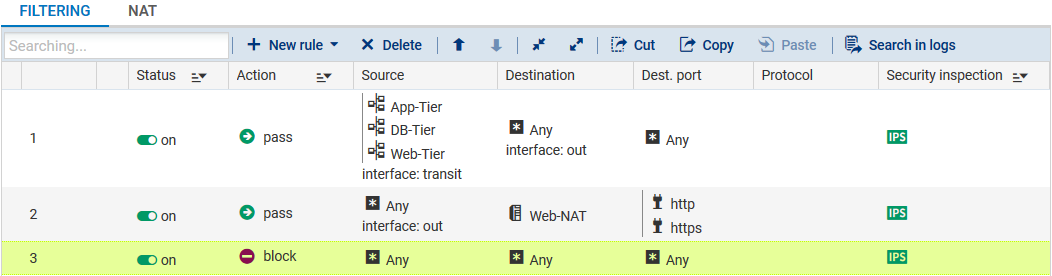
The filter policy on the peripheral firewall will then look like this: