Creating and activating a GRETAP interface
On each firewall that is part of the GRETAP tunnel, in Configuration > Network > Interfaces:
- Click on Add.
- Select GRETAP interface.
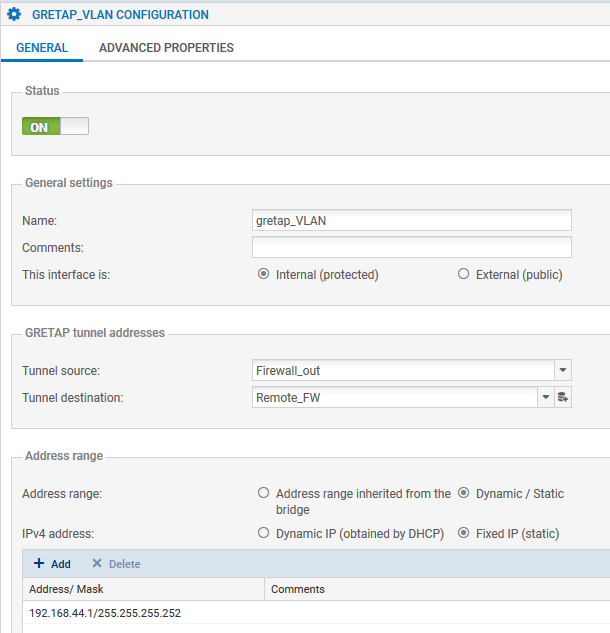
The configuration window of the interface appears. - Go to the General configuration tab.
- In the Status section, put the cursor on ON.
- In General settings > Name field, name the GRETAP interface (GretapVLAN in the example).
- In General settings > This interface is field, select External (public).
- In GRETAP tunnel addresses > Tunnel source field: select the physical interface that GRE traffic will pass through on its way out of the firewall. In the example shown, this will be the Firewall_out interface.
- In GRETAP tunnel addresses > Tunnel destination field: select (or create) an object with the public IP address of the remote firewall (Remote_FW in the example).
- In Address range > Address range field, select Dynamic / Static.
NOTE
Not attaching the GRETAP interface to a bridge makes it possible to allow only network packets through the GRE tunnel from VLANs attached to this interface (VLAN10 and 20 in the example).
- In Address range > IPv4 address field, select Fixed IP (static).
- Click on Add, and enter the IP address and network mask of the GRETAP interface.
In this example, the IP address and network selected have the values 192.168.44.1 (192.168.44.2 on the remote firewall) and 255.255.255.252 respectively:
- Click on Apply, then Save to confirm the creation of the GRETAP interface.