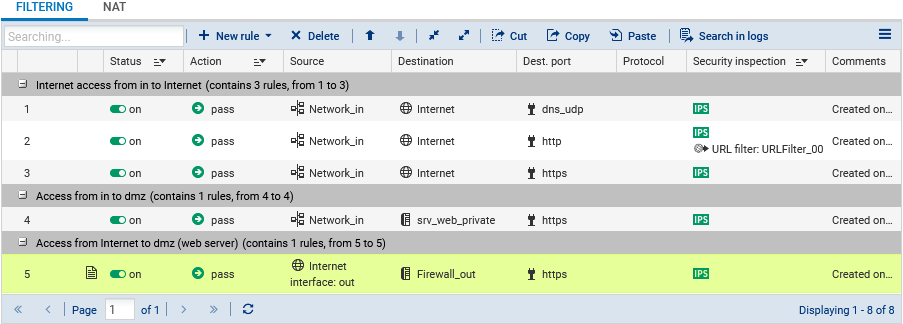
Configuring the filter policy
The filter policy can be configured in Configuration > Security Policy > Filter - NAT, Filtering tab.
Create the following rules for the purposes of our reference architecture:
-
A rule allowing DNS resolution,
-
A rule allowing the “in” network to access the "Internet" using HTTP,
-
A rule allowing the “in” network to access the "Internet" using HTTPS,
-
A rule allowing the “in” network to access the web server using HTTPS,
-
A rule allowing the “Internet” to reach the web server using HTTPS.
TIP
Add separators to your filter policy for better organization.
Enabling DNS resolution
- Click on New rule > Single rule.
- Double-click on the number of the new rule to edit it; a new window will open.
- In the General tab, Status field: select On.
- In the Action tab, Action field: select pass.
- In the Source tab, Source hosts field: select Network_in.
- In the Destination tab, Destination hosts field: select Internet.
- In the Port - Protocol tab, Port field: select dns_udp.
- Click on OK.

Allowing the “in” network to access the "Internet” using HTTP
- Click on New rule > Single rule.
- Double-click on the number of the new rule to edit it; a new window will open.
- In the General tab, Status field: select On.
- In the Action tab, Action field: select pass.
- In the Source tab, Source hosts field: select Network_in.
- In the Destination tab, Destination hosts field: select Internet.
- In the Port - Protocol tab, Port field: select http.
- In the Inspection tab, under Application inspection, URL filtering field: select a URL filter policy (URLFilter_00 in our example).
- Click on OK.

Allowing the “in” network to access the "Internet” using HTTPS
- Click on New rule > Single rule.
- Double-click on the number of the new rule to edit it; a new window will open.
- In the General tab, Status field: select On.
- In the Action tab, Action field: select pass.
- In the Source tab, Source hosts field: select Network_in.
- In the Destination tab, Destination hosts field: select Internet.
- In the Port - Protocol tab, Port field: select https.
- Click on OK.

Allowing the “in” network to access the web server using HTTPS
- Click on New rule > Single rule.
- Double-click on the number of the new rule to edit it; a new window will open.
- In the General tab, Status field: select On.
- In the Action tab, Action field: select pass.
- In the Source tab, Source hosts field: select Network_in.
- In the Destination tab, Destination hosts field: select the object that represents the web server (srv_web_private in our example).
- In the Port - Protocol tab, Port field: select https.
- Click on OK.

Allowing the “Internet” to reach the web server using HTTPS
- Click on New rule > Single rule.
- Double-click on the number of the new rule to edit it; a new window will open.
- In the General tab, Status field: select On.
- In the Action tab, Action field: select pass.
- In the Source tab:
- Source hosts field: select Internet.
- Incoming interface field: select out.
- In the Destination tab, Destination hosts field: select Firewall_out.
- In the Port - Protocol tab, Port field: select https.
- Click on OK.
Click on Apply to save changes.
