Configuring the firewall’s interfaces
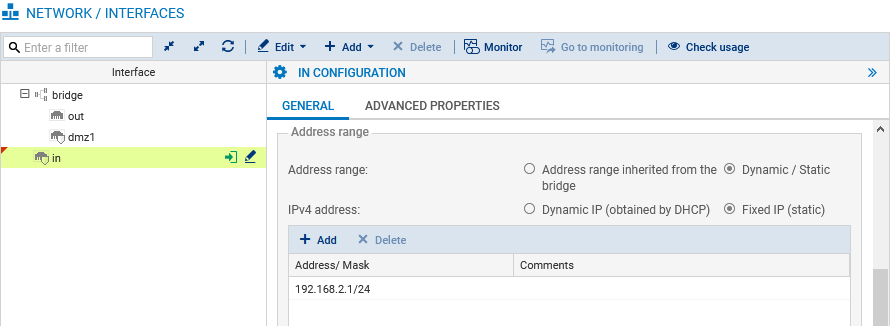
Configuring the in interface
- Go to Configuration > Network > Interfaces.
- Select the in interface, then click on Edit.
- In the General tab, fill out the information in the Address range area:
- Address range field: select Dynamic / Static.
- IPv4 address field: select Fixed IP (static).
- In the grid: click on Add, and enter 192.168.2.1/24.
- Click on Apply to confirm.
The connection to the firewall will then be lost. To continue, use the new IP address to connect to the firewall. If the device connected to the firewall uses manually entered IP settings, change them so that they belong to the new sub-network of the in interface.
Configuring the out and dmz1 interfaces
- Select the out interface and click on Edit.
- In the General tab, fill out the information in the Address range area:
- Address range field: select Dynamic / Static.
- IPv4 address field: select Fixed IP (static).
- In the grid: click on Add, and enter 203.0.113.1/24.
- Select the dmz1 interface, then click on Edit.
- In the General tab, fill out the information in the Address range area:
- Address range field: select Dynamic / Static.
- IPv4 address field: select Fixed IP (static).
- In the grid: click on Add, and enter 172.16.1.1/24.
- Click on Apply to confirm.
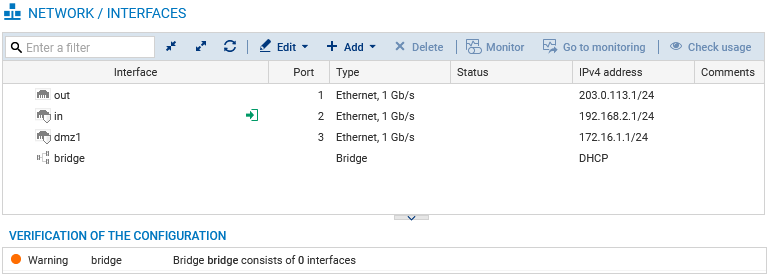
Deleting the bridge
- Select the remaining bridge, click on Delete and confirm.
- Click on Apply to confirm.
As a result, the in, out and dmz1 interfaces remain with a static IPv4 address.
