Configuring the central site (hub)
Virtual IPsec interfaces determine the tunnels through which traffic will pass.
You therefore need to create a local virtual IPsec interface that makes it possible to configure the tunnel's local and remote endpoints. In the example, this interface is named tunnel_to_spoke. The tunnel endpoints are defined by network objects (VTI_local_spoke and VTI_remote_spoke in the example).
Creating the local virtual IPsec interface
You will need to create the virtual IPsec interface allowing you to configure the tunnel.
-
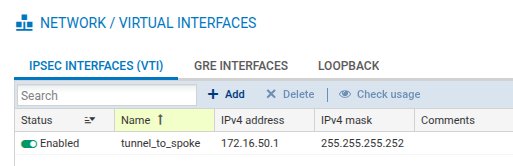
Go to Configuration > Network > Virtual interfaces and select the IPsec interfaces (VTI) tab.
-
Click on Add.
-
Fill in the following fields:
-
Name: tunnel_to_spoke in the example,
-
IP address: 172.16.50.1 in the example,
-
Network mask: the default value is a 255.255.255.252 mask (the mask retains its default value in the example).
-
Creating the local and remote tunnel endpoints
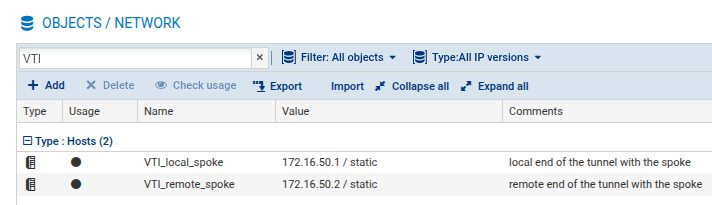
The virtual interfaces on the spoke are configured by using network objects. These interfaces are used as gateways in router objects on the hub, and in the configuration of IPsec tunnels. You need to define network objects that correspond to local and remote tunnel endpoints on the spoke.
-
Go to Configuration > Objects > Network.
-
Click on Add and select Host from the banner on the left.
-
Configure the network object that corresponds to the local tunnel endpoint, by filling in the following fields:
-
Object name: VTI_local_spoke in the example,
-
IPv4 address: 172.16.50.1 in the example,
-
MAC address: you can indicate a MAC address,
-
Comments: you can enter comments.
-
-
Click on Create and duplicate to finalize the creation of the object and create the next one.
-
Configure the network object that corresponds to the remote tunnel endpoint with the values indicated below.
-
Object name: VTI_remote_spoke in the example,
-
IPv4 address: 172.16.50.2 in the example.
-
-
Click on Create to finalize the creation of the object and close the wizard.
Configure routing
Routing has to be configured on the hub to allow traffic to reach its destination. To do so, you will need to create a network object that corresponds to the local network on the spoke, and configure routing.
Creating network objects
You will need to create a network object that corresponds to the local network on the spoke.
-
Go to Configuration > Objects > Network.
-
Click on Add and select Network from the banner on the left.
-
Fill in the following fields:
-
Object name: NET_spoke in the example,
-
Network IP address: 192.168.2.0/24 in the example,
-
Comments: you can add comments.
-
-
Click on Create to finalize the creation of the object and close the wizard.
Defining routing
You will need to configure the routing of traffic to the local network on the spoke.
-
Go to Configuration > Network > Routing and select the IPv4 static routes tab.
-
Click on Add.
-
Fill in the following fields:
-
Destination network: NET_spoke in the example,
-
Address range: 192.168.2.0/24 in the example,
-
Gateway: VTI_remote_spoke in the example,
-
Comments: you can enter comments.

-
Creating the dynamic (or anonymous) IPsec peer
To allow the hub to accurately identify the spoke, you will need to create the spoke peer. You can create it either by using certificate authentication (recommended), or by following the pre-shared key (PSK) authentication method.
Creating the peer with certificate authentication (recommended)
-
Go to Configuration > VPN > IPsec VPN > Peers tab.
-
Click on Add.
-
Select New mobile peer. A wizard will appear, prompting you to select the remote gateway.
-
Select Any.
-
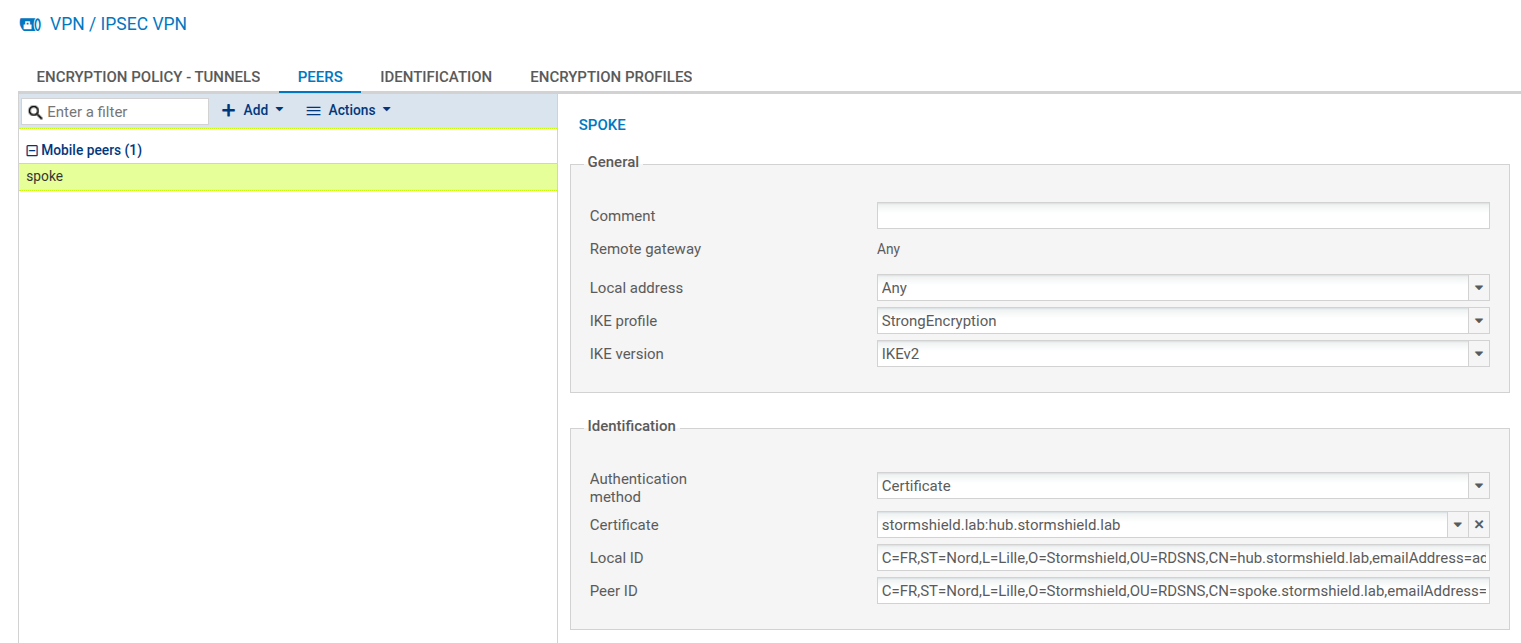
Enter the name of the peer. By default, its name has "mobile_" as a prefix, but the name can be customized (spoke in the example). Confirm.
-
Select IKEv2 as the IKE version, and click on Next.
-
Select Certificate authentication.
-
In the Certificate drop-down menu, select the certificate that the hub will present to set up the tunnel with its mobile peer, and click on Next.
-
In the window that opens, providing a summary of the peer's settings, check the information, then click on Finish.
-
In the Identification section, fill in the following fields:
-
Local ID (optional): this is the local ID that was specified when the peer was created. If you fill in this field, you need to enter the same value in the Peer ID field on the spoke.
-
Peer ID (optional): this is the ID that was assigned to the peer. We recommend specifying it to formally identify the mobile peer, and to associate the right IPsec policy with it during the tunnel negotiation. If you fill in this field, you need to enter the same value in the Local ID field on the spoke.
-
-
Click on Apply to confirm the creation of the peer.
Creating the peer with pre-shared key authentication (PSK)
-
Go to Configuration > VPN > IPsec VPN > Peers tab.
-
Click on Add.
-
Select New mobile peer. A wizard will appear, prompting you to select the remote gateway.
-
Select Any.
-
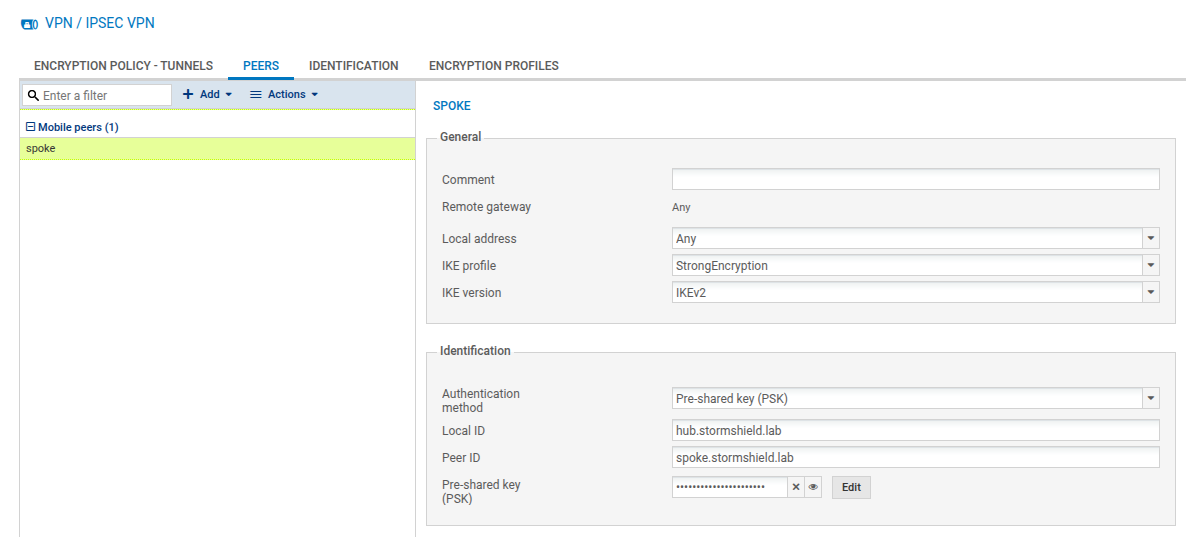
By default, the name of the peer will be created by adding a prefix “mobile_” to the object name, but this name can be customized (spoke in the example). Confirm.
-
Select the pre-shared key (PSK) as the authentication method.
-
In the Identification section, fill in the following fields:
-
Local ID (optional): this is the local ID that was specified when the peer was created. If you fill in this field, you need to enter the same value in the Peer ID field on the spoke.
-
Peer ID (optional): this is the ID that was assigned to the peer. We recommend specifying it to formally identify the peer, and to associate the right IPsec policy with it during the tunnel negotiation. If you fill in this field, you need to enter the same value in the Local ID field on the spoke.
-
Pre-shared key: click on Edit and in the fields Pre-shared key and Confirm, enter a complex key that will be exchanged between the hub and spoke to set up the IPsec tunnel.
To define a sufficiently secure pre-shared key:-
Keep to a minimum length of 15 characters,
-
Use uppercase and lowercase letters, numbers and special characters,
-
Do not use a word that can be found in a dictionary.
-
-
-
Click on Apply.
Configuring the IPsec VPN policy
You will need to define the rules of the encryption policy to be applied to traffic.
-
Go to Configuration > VPN > IPsec VPN > Encryption Policy - Tunnels tab > Mobile – Mobile users tab.
-
Click on Add, and then select New single mobile policy.
-
Select spoke as the Peer selection.
-
In the Local network field, select the object VTI_local_spoke.
-
In the Remote network field, select the object VTI_remote_spoke.
-
Enable the policy by setting the Status cursor to On.

You have completed the configuration of the hub, and can now proceed to the configuration of the spoke.