Case no.1: configuring the central site (Hub)
On the Hub site you will have to:
In the menu Configuration > VPN > IPsec VPN > Peers tab:
- Click on Add.
- Choose New remote site.
The wizard will ask you to select the remote gateway. In this case, this gateway will be the public address of the Firewall on the Spoke A site (object Pub_FW_Spoke_A). - By default, the name of the peer will be created by adding a prefix “Site_” to this object name; this name can be customized. Press Enter.
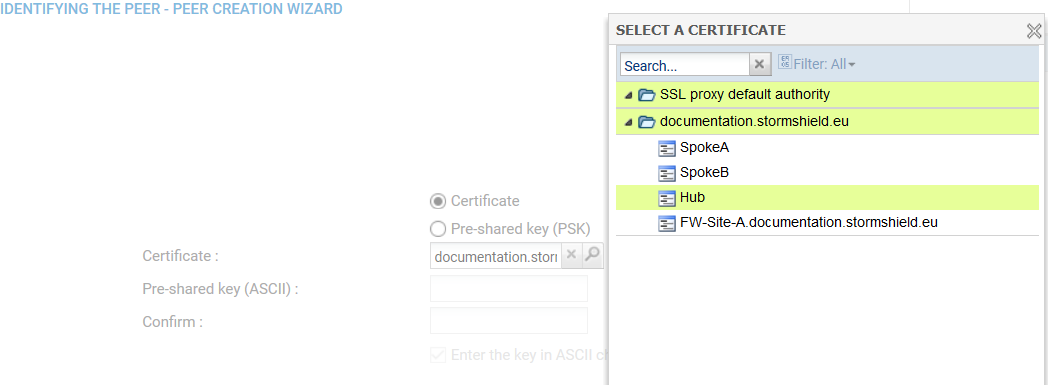
- Next, select the Certificate method.
- Click on the magnifying glass next to the Certificate field
- Select the certificate corresponding to the Hub Firewall.
The Trusted CA field is automatically entered by the certificate. -
In the same way, create the Site_Spoke_B peer using the following values:
- Remote gateway: the Firewall of the Spoke B site (object Pub_FW_Spoke_B),
- Certificate: the certificate of the Hub Firewall.
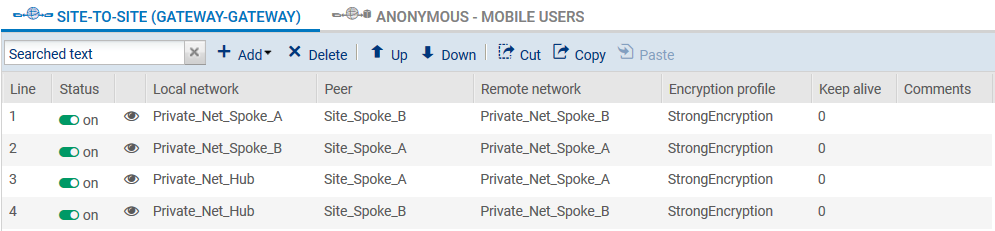
In the menu Configuration > VPN > IPsec VPN > Encryption policy – Tunnels tab:
- Click on Add.
- Select Site-to-site tunnel.
- Follow the instructions in the wizard to define the tunnel meant for traffic between the sites Spoke A and Spoke B:
- In the field Local network, select Private_Net_Spoke_A,
- In the field Peer selection, select Site_Spoke_B,
- In the field Remote network, select Private_Net_Spoke_B,
- Click Finish.
- Do the same thing to create the three other tunnels:
- Private_Net_Spoke_B => Site_Spoke_A => Private_Net_Spoke_A,
- Private_Net_Hub => Site_Spoke_A => Private_Net_Spoke_A,
- Private_Net_Hub => Site_Spoke_B => Private_Net_Spoke_B.
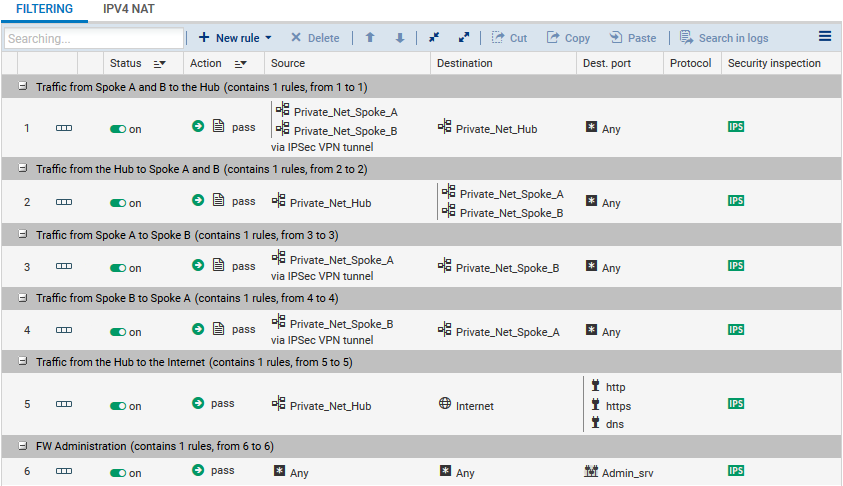
Define the filtering rules needed for exchanges between Spoke sites, Spoke sites and the Hub as well as local traffic to the Internet:
To allow hosts on the network Private_Net_Hub to access the internet, create the following NAT rule:
