Changing HA parameters
Some HA parameters can be changed and some options can be enabled in Configuration > System > High availability > Advanced properties.
Changing the pre-shared key between members of the cluster
- Go to the section Changing the pre-shared key between firewalls in the high availability cluster.
- Enter the New pre-shared key.
- Confirm it.
A gauge will indicate the security level of the chosen pre-shared key. - Click on Apply.
A message will suggest that you Save changes to the configuration. - As these changes to the configuration must be synchronized in the cluster, confirm that you wish to Apply changes.
The icon will then appear in the upper panel of the web administration interface, indicating that the configuration requires synchronization.
 - Click on this icon to start synchronizing.
A message will inform you that this synchronization may restart the passive firewall. - Confirm by clicking on Synchronize the configuration.
Both members of the cluster are now synchronized.
Selecting the active firewall when both are equal (firewall priority)
The quality factor is a parameter that is calculated from the firewall’s health status (more details in the section Understanding how the quality factor is calculated).
If this quality factor is the same on both members of the cluster, you can force a member to be the active firewall (Automatic is selected by default).
Do note that this action applies only when the quality factor is the same on both members of the cluster: if the quality factor starts to fall on the selected member, it will still become passive.
- Go to the section Quality index.
- Select one of the members of the cluster for the Active firewall if equal field:
- This firewall (serial_number_of_this_firewall),
- The other firewall (remote) (serial_number_of_the_remote_firewall).
- Click on Apply.
A message will suggest that you Save changes to the configuration. - As these changes to the configuration must be synchronized in the cluster, confirm that you wish to Apply changes.
- If you selected The other firewall (remote) (serial_number_of_the_remote_firewall), a message will inform you that changing the priority may swap the statuses of the firewalls. Confirm by clicking on Apply.
If the equality factor was the same on both members of the cluster, the firewalls will be swapped and you will be logged out of the web administration interface.
When a firewall is chosen as the default active firewall, its priority will then become 50 (no priority is defined for the other member of the cluster):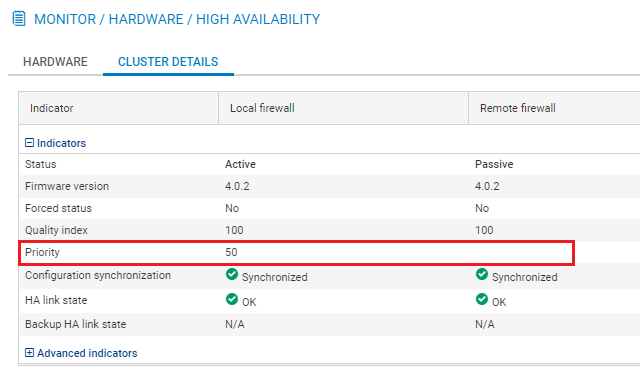
Enabling session synchronization according to duration
With this option, the number of synchronized connections can be restricted by prioritizing connections that last longer than the value indicated.
Very short and very frequent connections such as DNS requests will therefore not be synchronized.
- Go to the section Session synchronization.
- Select the checkbox Enable synchronization based on connection duration.
- Indicate the minimum duration (in seconds) of connections that need to be synchronized.
- Click on Apply.
A message will suggest that you Save changes to the configuration. - As these changes to the configuration must be synchronized in the cluster, confirm that you wish to Apply changes.
The icon will then appear in the upper panel of the web administration interface, indicating that the configuration requires synchronization. - Click on this icon to start synchronizing.
A message will inform you that this synchronization may restart the passive firewall. - Confirm by clicking on Synchronize the configuration.
Both members of the cluster are now synchronized.
Changing the swap configuration
Three options can be enabled or disabled:
- Reboot all interfaces during switchover (except HA interfaces): when this option is enabled, bridge interfaces will be reinitialized during the swap to force the switches connected to the firewall to renew their ARP tables.
- Enable link aggregation when the firewall is passive: when this option is enabled, in configurations that use link aggregation (LACP), aggregates will be enabled even on the passive member of the cluster.
- Periodically send gratuitous ARP requests: if this option is selected, you will send ARP announcements at regular intervals so that the various devices on the network (switch, routers, etc) can update their own ARP tables.
- Go to the section Swap configuration.
- Enable or disable the relevant options.
- Click on Apply.
A message will suggest that you Save changes to the configuration. - As these changes to the configuration must be synchronized in the cluster, confirm that you wish to Apply changes.
The icon will then appear in the upper panel of the web administration interface, indicating that the configuration requires synchronization. - Click on this icon to start synchronizing.
A message will inform you that this synchronization may restart the passive firewall. - Confirm by clicking on Synchronize the configuration.
Both members of the cluster are now synchronized.
Changing the weight of an interface in the calculation of the quality factor
The role and components of the quality factor are explained in Understanding how the quality factor is calculated.
To give an interface more importance in this calculation, simply increase its weight (set to 100 by default):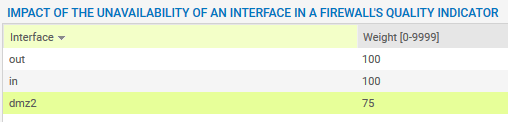
- Go to the section Impact of the unavailability of an interface on a firewall's quality indicator.
- Double-click in the Weight column of the interface that you wish to modify.
- Enter the desired value.
- Click on Apply.
A message will suggest that you Save changes to the configuration. - As these changes to the configuration must be synchronized in the cluster, confirm that you wish to Apply changes.
The icon will then appear in the upper panel of the web administration interface, indicating that the configuration requires synchronization. - Click on this icon to start synchronizing.
A message will inform you that this synchronization may restart the passive firewall. - Confirm by clicking on Synchronize the configuration.
Both members of the cluster are now synchronized.