Configuring HA
The setup of an HA firewall cluster involves two steps:
- Creating the cluster on the firewall that is already running,
- Adding the other firewall to the cluster.
Do note that this operation will restart the firewall that was added to the cluster, but will not affect production (traffic will not be disrupted).
HA can be configured either via USB key (see the Technical Note Initial configuration via USB key), or via the firewall web administration interface, by following the procedure below.
Preparing the firewalls
- Both firewalls must be interconnected via their HA interfaces before you start to create the cluster.
- On the firewall to be added to the cluster, all network interfaces other than those dedicated to HA must not be connected before the cluster has been fully defined, to avoid disrupting the production network.
Creating the cluster
- Log in to the web administration interface of the firewall on which you wish to create the cluster.
- Click on System > High availability.
The first step of the cluster creation wizard appears. - Select Create a group of firewalls (cluster).
- Click on Next.
- In Configure the main link, select the Interface dedicated to high availability (dmz1 in the example).
- Give this interface a clear name (HA-main in the example).
- Define the IP address and network mask for this interface (192.168.69.1/30 in the example).
Do note that point-to-point links accept /31 network masks. In this case, for a 192.168.69.0/31 network, the respective addresses of the firewalls are 192.168.69.0 and 192.168.69.1 on the HA link. - If you wish to define a backup HA link, in the section Secondary link (optional), select the checkbox Use a second communication link.
- Give this interface a clear name (HA-backup in the example).
- Define the IP address and network mask for this interface (192.168.70.1/30 in the example).
- Click on Next.
- Enter and confirm the Pre-shared key that secures communications between members of the cluster.
For greater security, use passwords longer than 12 characters containing a combination of uppercase and lowercase letters, numbers and special characters. For more information on password security, refer to the recommendations given by the French National Cybersecurity Agency (ANSSI) (in French). - You can choose to Encrypt communication between firewalls, which is recommended if members of the cluster were interconnected through switches.
Do note that this option may impact performance in configurations that support many connections per second or many IPsec tunnels. - The Enable link aggregation when the firewall is passive option is selected by default. In a configuration that uses link aggregation (LACP), this option makes it possible to enable aggregates even on the passive member of the cluster. Disable it by unselecting the checkbox.
- Click on Next.
- Confirm the recap of the configuration by clicking on Finish.
Adding the second firewall to the cluster
- Log in to the web administration interface of the firewall that needs to join the cluster created earlier.
- Click on System > High availability.
The first step of the cluster creation wizard appears. - Select Join an existing firewall cluster.
- Click on Next.
- In Configure the main link, select the Interface dedicated to high availability.
This interface must be the same as the one selected on the first firewall (dmz1 in the example). - Define the IP address and network mask for this interface. This address must belong to the network chosen for the main link of the first firewall (192.168.69.2/30 in the example).
- If you have defined a backup HA link, in the section Secondary link (optional), select the checkbox Use a second communication link.
- Select the Interface dedicated to high availability.
This interface must be the same as the one selected on the first firewall (dmz2 in the example). - Define the IP address and network mask for this interface. This address must belong to the network chosen for the secondary link of the first firewall (192.168.70.2/30 in the example).
- Click on Next.
- Enter the IP address of the firewall to contact (address assigned to the HA link of the firewall on which the cluster was created).
- Enter the pre-shared key defined during the creation of the cluster.
- Click on Next.
- Confirm the recap of the configuration by clicking on Finish.
A confirmation message will appear. - Confirm the operation by clicking on Join the firewall cluster and reboot.
After you have applied the new network configuration, the firewall that joined the cluster will restart. - Once this step is over, you can connect the interfaces other than those dedicated to HA.
Checking the status of the cluster
In the web administration interface of the firewall on which you created the cluster:
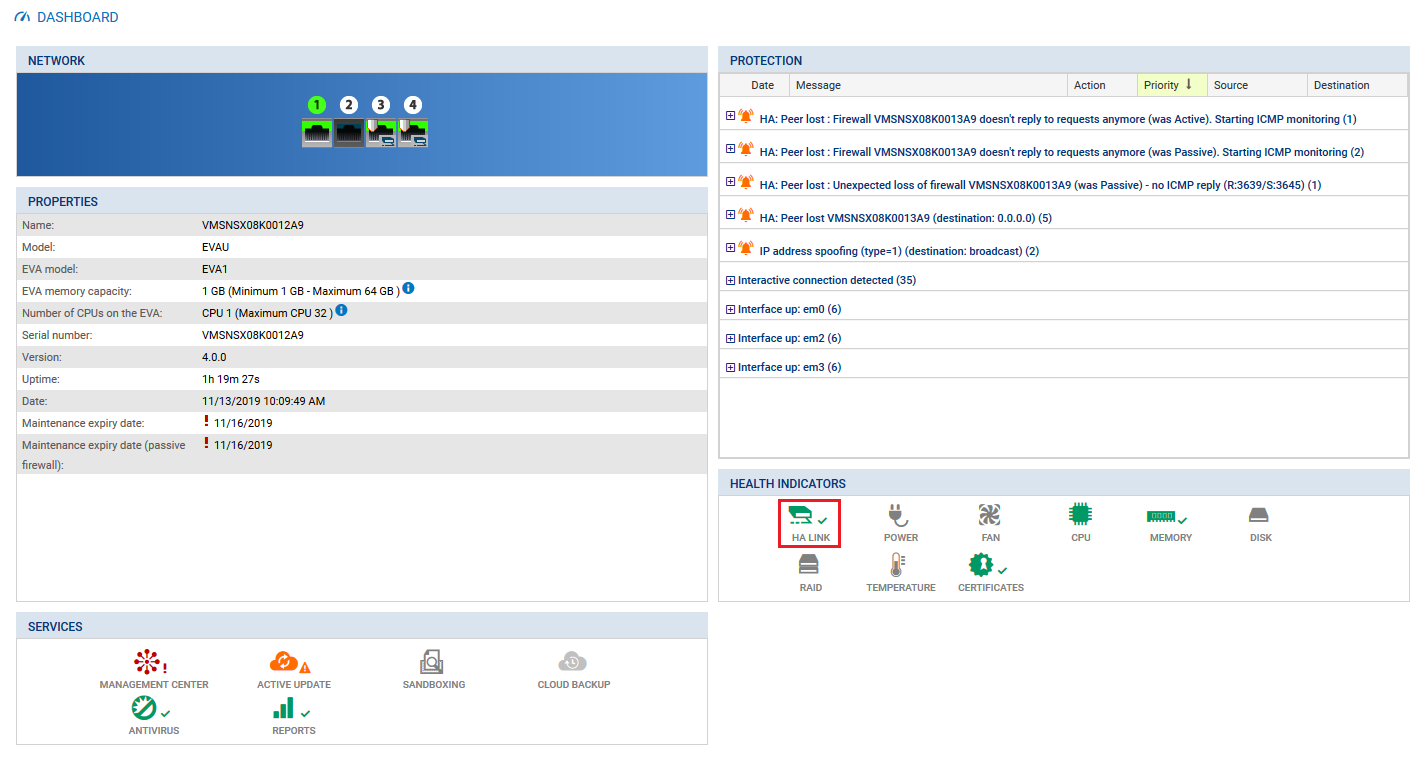
- Click on the Monitoring tab.
- In the Health indicators widget, the HA link icon must be green:

- Click on this icon to go to Monitoring > Hardware / High Availability.
- Click on the Cluster details tab.
The overall statuses of both members of the cluster and of high availability links appear: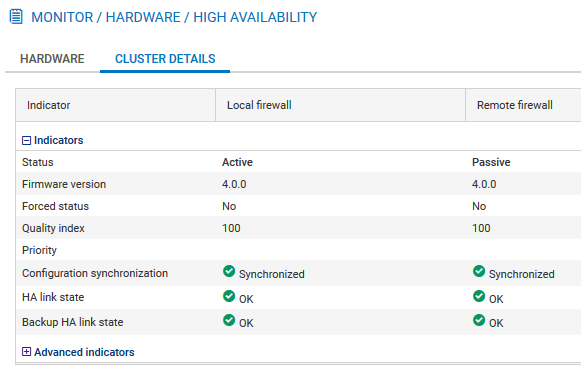
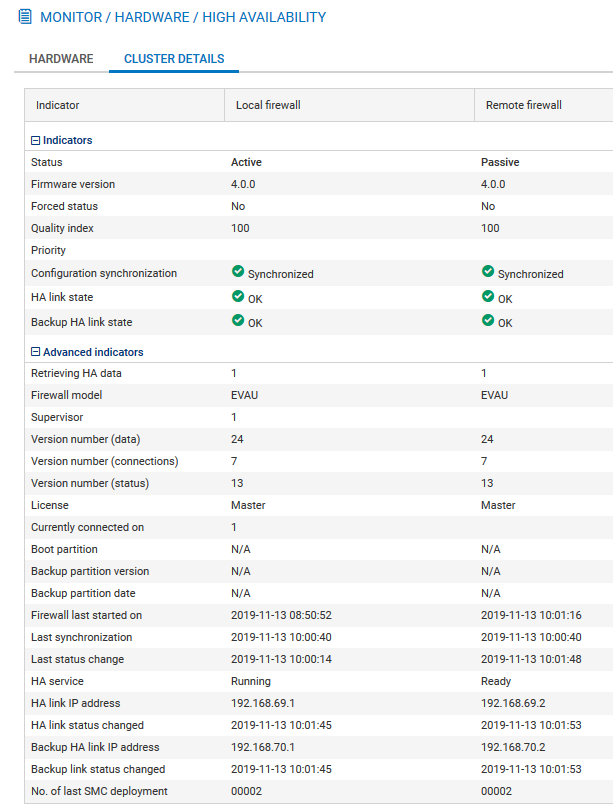
- By clicking on Advanced indicators, you can show other information such as the date of the last synchronization, the last status change of one or both HA links:
Status LEDs on the firewall
On the passive firewall, the Online LED (Run on SN6100 and SNi40 models) will blink (about 2 seconds off for every 1 second it is on). This LED is static on the active firewall.