Allowing traffic to and from the virtual server on the SNS EVA virtual firewall
Now that the firewall and virtual server have been deployed, you must configure the firewall's filter policy to allow traffic to and from the virtual server.
The operations explained in this chapter must be performed when the user is logged in to the firewall’s administration interface at: https://firewall_public_IP_address/admin.
Creating required network objects
-
Go to Configuration > Objects > Network.
-
Click on Add.
-
Select the desired object type on the left.
-
Give the object a name.
-
Fill in the relevant information according to the required configuration.
-
Click on Create.
In the example, we added the following objects:
| Object type | Object name | Information about the object |
| Network | Private_Net | IPv4 address: 192.168.1.0/24 |
| Network | Public_Net | IPv4 address: 192.168.0.0/24 |
| Host | Web_Documentation_Server | IPv4 address: 192.168.1.4 |
| Port | sshwebsrv | Port/Protocol: 222/TCP |
Configuring the filter and NAT policy
The filter and NAT policy contains a set of filter rules and NAT rules. The firewall uses the (9) Azure Default policy by default, in which administrators of the firewall can access the administration interface and block all other connections.
When you configure your firewall’s filter and NAT policy:
-
Always save changes in progress by clicking on Apply,
-
Be careful not to enable incomplete or incorrect filter and NAT policies that may prevent your firewall's administration interface from being reached,
-
Remember that the firewall blocks traffic: any traffic that is not explicitly described in the policy will be rejected without being logged, even when this rule does not appear.
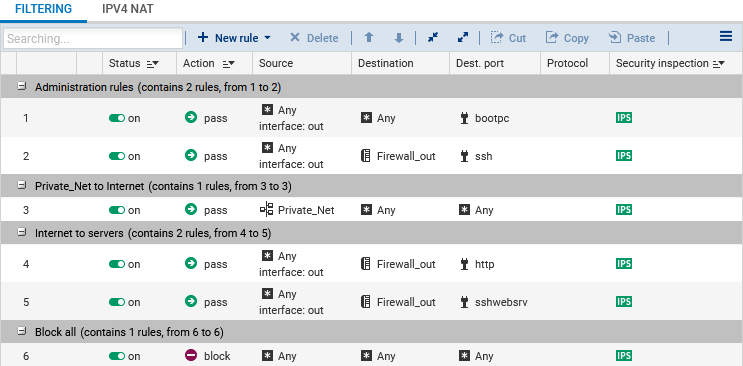
Configuring the filter policy
The filter policy can be configured in Configuration > Security Policy > Filter - NAT, Filtering tab. We added three rules to meet the following requirements:
-
Allow the hosts that are hosted on the private network to access all hosts.
-
Allow all hosts to connect to the virtual server in HTTP.
-
Allow all hosts to connect to the virtual server in SSH.
TIP
Add separators to your filter policy for better organization.
To add rules:
- Click on New rule > Single rule.
-
Double-click on the number of the rule to edit it; a new window will open.
-
In the General tab, Status field, select On.
-
Configure the rule according to your requirements by browsing through the tabs on the left.
-
Click on OK.
Position these rules above the block rule with the help of the Up and Down buttons.
In our example, we added the following rules:
| Action | Source | Destination | Dest. port | Security inspection |
| pass | Private_Net | Any | Any | IPS |
| pass | Any, via the out interface | Firewall_out | http | IPS |
| pass | Any, via the out interface | Firewall_out | sshwebsrv | IPS |
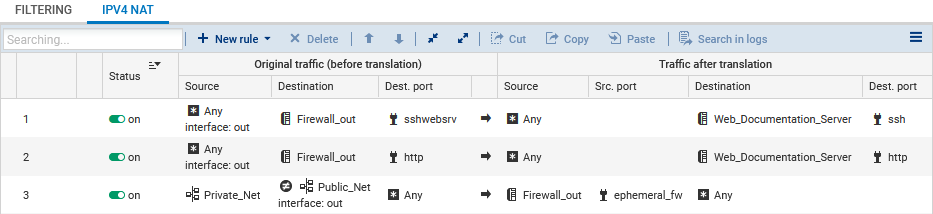
Configuring the NAT policy
The NAT policy can be configured in Configuration > Security Policy > Filter - NAT, NAT tab. We added three rules to meet the following requirements:
-
Redirect SSH traffic meant for the firewall's public interface to the web server.
-
Redirect HTTP traffic meant for the firewall's public interface to the web server.
-
Redirect traffic from hosts in the DMZ to hosts located beyond the firewall.
To add rules:
- Click on New rule > Single rule.
-
Double-click on the number of the rule to edit it; a new window will open.
-
In the General tab, Status field, select On.
-
Configure the rule according to your requirements by browsing through the tabs on the left.
-
Click on OK.
In our example, we added the following rules:
| Original traffic (before translation) | Traffic after translation | |||||
| Source | Destination | Dest. port | Source | Src. port | Destination | Dest. port |
| Any, via the out interface |
Firewall_out | sshwebsrv | Any | Web_Documentation_Server | ssh | |
| Any, via the out interface | Firewall_out | http | Any | Web_Documentation_Server | http | |
| Private_Net |
Different from Public_Net, via the out interface |
Any | Firewall_out | ephemeral_fw | Any | |