Creating the filtering policy
Go to the Configuration tab in Security policy > Filter - NAT.
The active security policy, created automatically when the SNS instance is moved, appears: slot (9) Outscale. This policy contains a rule that allows SSH access to the firewall.
Adding the rule for HTTP access to the web server
- Select the rule for SSH access to the firewall by clicking once.
- Click on New rule, then Single rule.
An inactive rule is added immediately after the rule selected in step 1. - Double-click on the new inactive rule.
A window appears, allowing you to edit this rule.
General menu
Set the Status to On.
Action menu
- Select the General tab.
- Set the Action to pass.
Source menu
- Select the General tab.
- In the Incoming interface field, select the out interface.
Destination menu
- Click on the General tab.
- Click on Add in the Destination hosts field.
- Type firewall to filter hosts, then select the Firewall_out object.
- Select the Advanced properties tab.
- In the NAT on the destination > Destination field, type web to filter hosts, then select the webserver object.
Port/Protocol menu
- In the Destination port field, click on Add.
- Type http to filter ports, then select the http object.
- Confirm by clicking on OK.
Adding the rule for SSH access to the web server
- Select the rule created earlier for HTTP access to the web server by clicking once.
- Click on New rule, then Single rule.
An inactive rule is added immediately after the rule selected in step 1. - Double-click on the new inactive rule.
A window appears, allowing you to edit this rule.
General menu
Set the Status to On.
Action menu
- Select the General tab.
- Set the Action to pass.
Source menu
- Select the General tab.
- In the Incoming interface field, select the out interface.
Destination menu
- Click on the General tab.
- Click on Add in the Destination hosts field.
- Type firewall to filter hosts, then select the Firewall_out object.
- Select the Advanced properties tab.
- In the NAT on the destination > Destination field, type web to filter hosts, then select the webserver object.
Port/Protocol menu
- In the Destination port field, click on Add.
- Type ssh to filter ports, then select the SSH-Webserver object.
- In the Translated destination port field, select the ssh object.
- Confirm by clicking on OK.
Adding the Internet access rule for protected hosts
- Select the rule created earlier for SSH redirection to the web server by clicking once.
- Click on New rule, then Single rule.
An inactive rule is added immediately after the rule selected in step 1. - Double-click on the new inactive rule.
A window appears, allowing you to edit this rule.
General menu
Set the Status to On.
Action menu
- Select the General tab.
- Set the Action to pass.
Source menu
- Select the General tab.
- In the Incoming interface field, select the in interface.
Destination menu
- Click on the General tab.
- Click on Add in the Destination hosts field.
- Type inter to filter hosts, then select the Internet object.
- Confirm by clicking on OK.
Adding rule separators (optional)
Rule separators can be added to the filter policy to make it easier to read.
- Select the rule before which you want to insert a separator by clicking once.
- Click on New rule, then Separator – rule grouping.
A rule separator is added immediately in front of the rule selected in step 1. - Double-click on the separator.
- Enter text to describe each separator.
EXAMPLES
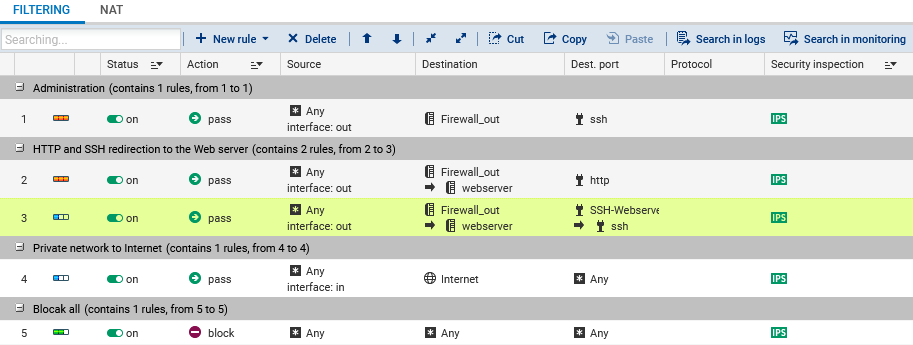
In the suggested configuration, four separators can be added. For example:
In the suggested configuration, four separators can be added. For example:
- Administration,
- HTTP and SSH redirection to the web server,
- Private network to the Internet,
- Block all.
The filter policy will then look like this: