Updating BIOS
This section explains the consecutive steps to follow in this order to update BIOS on SN-M-Series-720 and SN-M-Series-920 model firewalls in version R1.04.
Most of the connectors on these firewall models are located on the front panel. For more information regarding the connectors on these firewalls, refer to the section Presentation of the SNS range in the 2024 Product presentation and installation guide, and select the model of your SN-M-Series firewall.
BIOS in version R1.04 requires two consecutive updates in order to be installed: the first update is devoted to the firewall's BIOS, while the second concerns the Intel Management Engine firmware.
Connecting devices to the firewall
Connect the computer that is equipped with a terminal emulator to the firewall using the USB-A to USB-C cable on the firewall side, or the RJ45 to DB9F console cable and an RS232 to USB-A cable. The connection to a USB-C port requires the installation of the PL23XX USB-to-Serial driver).
Checking the BIOS version on the firewall
- Connect to the firewall system in console or SSH using a Putty program.
- Authenticate by using the admin account on the firewall system.
- Enter the command: dmidecode -s bios-version.
The firewall will show the BIOS version, which must be R1.03 and lower.
NOTE
You can also display the BIOS version by pressing [Del] several times during the firewall startup. Go to the MAIN menu > locate the BIOS Version line; the BIOS version installed on the firewall appears.
Disabling Secure Boot
During the BIOS update, Secure Boot has to be disabled, so that the firewall can be started on the USB key that was prepared earlier. To disable Secure Boot, refer to the technical note Managing Secure Boot in SNS firewalls' UEFI, then select your SN-M-Series firewall model.
Updating BIOS on the firewall
IMPORTANT
The update process is fully automatic and lasts around five minutes.
Once the process is run, it must never be interrupted, and the firewall must not be disconnected from the power supply. If this occurs, your firewall will be completely unable to run.
- As SN-M-Series firewalls have two internal power supply units to provide a redundant power supply, ensure that you have plugged in both power cords to the electrical mains.
- Insert the USB drive that was prepared earlier into a USB port.
- Restart the firewall by using the reboot command. You can also restart the firewall from BIOS, by pressing [F4] and then [Enter].
-
In the command prompt, run the executable file FlashSNMS1_R104.nsh.
The update process will then start: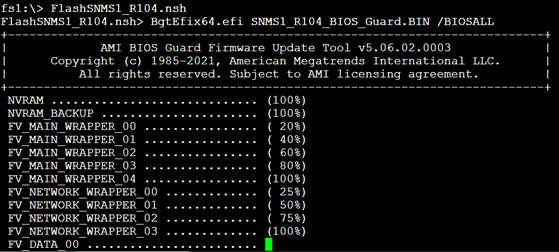
- When the update process ends, run the command reset -s to shut down the firewall.
- Disconnect the firewall's mains cables.
- Wait for one minute, and plug the mains cables back in.
Disabling Secure Boot
Once you have updated BIOS, Secure Boot will be enabled again. During the Intel Management Engine update, Secure Boot has to be disabled, so that the firewall can be started on the USB key that was prepared earlier. To disable Secure Boot, refer to the technical note Managing Secure Boot in SNS firewalls' UEFI, then select your SN-M-Series firewall model.
Updating the Intel Management Engine firmware
After the BIOS update, the Intel Management Engine firmware also needs to be updated.
IMPORTANT
The update process is fully automatic and lasts approximately three minutes.
Once the process is run, it must never be interrupted, and the firewall must not be disconnected from the power supply. If this occurs, your firewall will be completely unable to run.
- Start the firewall by holding down the Power buttons on the rear panel of the appliance.
- The firewall will start up from the USB drive.
-
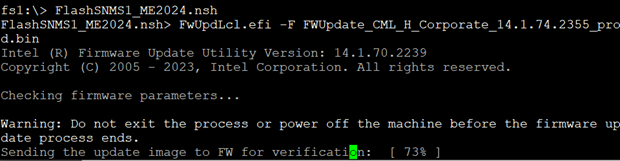
In the command prompt, run the executable file FlashSNMS1_ME2024.nsh:
- When the update process ends, shut down the firewall by using the reset -s command.
- Disconnect the firewall's mains cables.
- Unplug the USB drive from your firewall.
- Wait two minutes before plugging both power cords back in.
- Start the firewall by holding down the Power buttons on the rear panel of the appliance.
Checking the BIOS version and the Intel Management Engine firmware version on the firewall after the update
- Press [Del] several times to stop the startup sequence and access the BIOS.
- Go to the Main tab and check the BIOS version, which should be R1.04.
- Go to the Advanced > PCH-FW tab and check the Intel Management Engine (ME Firmware Version), which should be 14.1.74.2355.
- Press Esc.