Deploying the SMC server from AWS Marketplace
Deploy your SMC server easily in AWS Marketplace with the CloudFomation service:
- Go to AWS Marketplace.
- If you have not already done so, sign in using your Amazon.com account.
- Go to the SMC product page.
- On the product presentation page, go to Pricing Information to see the type of EC2 instance that you need according to the number of firewalls managed:
AWS instance Virtual processor
RAM (GB) SMC size SMC
Number of firewalls
t3.medium
2 4 Small
<50
t3.xlarge 4 16 Medium <500 t3.2xlarge 8 32 Large <1000 You can estimate the cost of your virtual server based on the instance selected.
- Click on Continue to Subscribe at the top of the page.
- Read the conditions of use, then click on Accept Terms.
- Click on Continue to Configuration.
- If you do not wish to deploy the latest available version of the SMC server, select the desired version.
- Select the region in which you wish to deploy your SMC server. You must deploy it in a region in which your VPC and other servers, if any, have already been deployed.
The region in which you are going to deploy the EC2 instance that runs SMC may determine several factors, in particular:- AWS expenses for the instance in question,
- network performance,
- local legislation.
- Click on Continue to Launch.
- Leave Launch CloudFormation in the Choose Action section.
- On the Create stack page, click on Next to configure your CloudFormation stack. The stack includes the SMC server and the network configuration that enables access to it.
- Set the various parameters:
Select the instance in the InstanceType field.
In the KeyPairName field, select the key pair that you wish to install on your instance to secure SSH access to the SMC server. Refer to the section Creating a key pair in the AWS management console for SSH access for more information.
You can either leave the default values in the SMCSubnet and VirtualPrivateCloudNetwork fields or enter your custom values.
Enter an address in the SourceIPAddress field.
- Click on Next.
- On the Configure StackSet options page, configure the various options if necessary, and click on Next.
- Click on Create stack.
- Wait until the end of the stack creation process, when the status CREATE_COMPLETE appears on the left side of the page.
- Go to your AWS Management Console’s EC2 service to view the instance that the CloudFormation stack created.
- Select the created instance.
- Click on the link https://EC2 Elastic IP address>/admin to access the SMC administration console with your web browser.
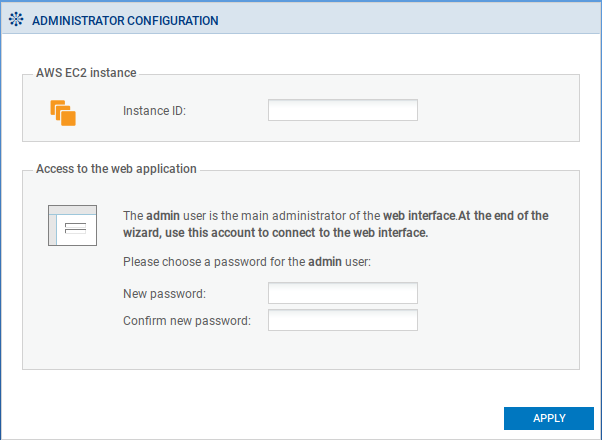
- The SMC server initialization wizard will ask you to enter the ID of the EC2 instance. This ID can be found in Services/ Compute/ EC2/ Instances/ Instances in the AWS management console.
- Set the administrator account password.

- Click on Apply. Your SMC server is ready to use.
IMPORTANT
EBS storage is not included in the calculation of the cost. SMC requires 130 GB of EBS storage.
IMPORTANT
The price includes only AWS expenses. The SMC license is not issued by AWS, as the server comes with a Bring Your Own License (BYOL) model. The SMC software license must be ordered from your distributor. Refer to Obtaining your SMC license.
NOTE
When deployed from AWS, the SMC server can be accessed from the web administration interface and in SSH over port 22.
Console access is not possible.